Deliver to Netherlands
IFor best experience Get the App
🕰️ Time to Build Your Legacy!
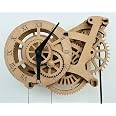
The ABONG Crossingham Wooden Gear Wall Clock Kit is a DIY model designed for first-time builders, featuring 99 precision laser-cut parts, a mechanical movement powered by a counterweight, and a stylish steampunk design. Made from sustainable wood, this clock kit offers an engaging crafting experience with easy-to-follow instructions, resulting in a functional and decorative timepiece.
Item Weight | 454 g |
Item Dimensions W x H | 22.9W x 17.1H centimeters |
Mounting Type | Wall Mount |
Watch Movement | Mechanical |
Operation Mode | Mechanical |
Alarm Clock | No |
Power Source | Battery Powered |
Batteries are Included | No |
Display Type | Analog |
Special Features | Working Gear Clock |
Theme | Mechanical |
Shape | Round |
Style | Vintage |
Room Type | Living Rooms |
Color | Crossingham |
Frame Material | Wood |
Material | Wood |
D**G
A GOOD INTRODUCTION TO WOOD GEAR CLOCKS
A GOOD INTRODUCTION TO WOOD GEAR CLOCKSSUMMARY:This is a good clock kit for the beginning wood clock builder. However, this clock requires a modest amount of tools including a small razor saw, a hobby knife, glue and several sheets of sandpaper to complete successfully. Additionally, you must have a fair amount of patience and the ability to pay attention to small details. With only two driven gears, this clock has a good chance at a successful build by the beginning builder.PROS:1. Simple to assemble.2. Carbon fiber axles that are very strong and sized consistently.3. Large gear teeth that are easy to sand.4. Good fit between gears reduces the amount of sanding needed.5. Error tolerant design.6. Easy to read hands.7. The material used for the kit is a manufactured wood product similar to hardboard. It is a dimensionally stable material that removes easily from the waste material.8. Keeps fairly accurate time once adjusted!CONS:1. No written instructions included. Must download instructions online.2. Requires some sanding of the gears and cogs to allow them to fit with as little friction as possible. The gears have small teeth and will require a lot of patience to sand each one.3. Hardening of the gears needed to reduce friction and increase service life.4. Need to acquire tools if you don't have them already.5. The carbon fiber axles need to be cut to size. The carbon fiber axles can splinter and be a hazard. The carbon fiber dust is also a hazard that needs to be controlled.6. Need to acquire material for the drive weight.7. The material used for the frame and gears is a manufactured wood product similar to hardboard. While stable, it is somewhat brittle and does not have the same strength as plywood.8. The rewinding mechanism is awkward.BUILD TIPS:1. I used a good hobby quality cyanoacrylate (superglue) adhesive in thin and medium viscosity with a fine applicator tip throughout the build to avoid waiting for a wood glue to set. If you haven't used CA glue before, practice on some scrap bits to judge how long it takes to set.2. I hardened all the gear teeth with a drop of thin CA and then sanded each tooth until almost all the brown resin from the laser cutting process was removed. I did this before I started assembling the gear sets. This takes a fair amount of time. Hardening the teeth reduces friction and will reduce wear on the teeth. This step is especially important as the hardboard material can fray under continuous friction.3. The gear holes might need to be drilled out to fit the axles. This requires a 6 mm drill bit. I had to drill out almost all the axle holes to fit the4. I used wax for lubrication on the end of the carbon fiber axles and the bearing holes in the frame. I used a small birthday candle to wax the holes after hardening with thin CA. I burnished the wax in by inserting a wood dowel that was slightly smaller than the hole and spinning it against the sides of the hole. Make sure the axles are a slightly loose fit in the holes.5. I used the wooden washers to locate the gears on the axles but did not glue them in place until AFTER the clock had been fully assembled. This allowed the gears to be slid on the axle shafts to allow proper clearance between gears. Only after I was satisfied with the gear spacing did I glue the washers in place on the axles to fix the gear positions. Make sure all gears spin as freely as possible and don't wobble. Also check to ensure there is no interference between contacting gear teeth. A little clearance is ok.6. I triple checked to make sure all axles were perpendicular to the baseplate, parallel to each other and firmly glued to the axles. Be careful NOT to glue the rewind mechanism to the axle.7. Take care to reduce friction wherever possible. I was able to get my clock running as soon as I hung the drive weight filled with 4 pounds of lead. With some fine tuning, my clock will tick reliably with just under 3 pounds of weight.8. Overall, it took me about 22 hours to build this clock - 10 hours were spent on sanding, 10 hours on fitting and assembly and a couple of hours for tuning. I had to slightly reshape some of the teeth on the escapement as the clock wasn’t ticking with a consistent tempo.RATING: Five Stars.Overall it was a fun and satisfying build. The material is easy to work with but lacks the charm of real wood grain. With only two driven gears, this clock is easier to build successfully.
S**E
Avoir des quide en français
Je ne parle pas anglais et je ne li pas anglais les quide d assemblage son seulement en anglais ass os j’aime beaucoup ses produits mes je ne sais pas si je vais continuer à commander encore j’ai demander d’avoir un quide en français pas de réponse
G**E
Nice kit.
Though quite a lot of sanding I am pleased with this clock kit..Great fun to build ...thanks
C**K
Paperweight for your wall!
I've got a masters degree in engineering and couldn't make this work! I've built beds,toy chests, dressers and this was absolutely impossible.The parts were doomed from the start. Step 1: cut these tiny tubes of carbon fiber. Really? The pendulum, the thing that runs the clock, simply didn't fit, swing freely, or move the gears.Can't tell you how disappointed I am after spending 16 hours on this (don't believe the 8 they say!) Sanding, cutting, dremeling, gluing!DO NOT WASTE YOUR TIME!Pardon the pun!
S**H
NO Instructions in the box,
Not a good gift for people who live off grid. There is no instructions that come with it.They want you to go to there website with a RQ code.I do not recommend this gift for the reason there was no instructions, but still supplied a paper with RQ code.Why not just put the instructions on that paper.... something fishy?
Trustpilot
4 days ago
1 month ago