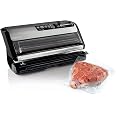
Seal the Deal! 🥳 Freshness at Your Fingertips!
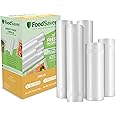
The FoodSaver Vacuum Sealer Machine is designed for the modern kitchen, allowing you to preserve food for extended periods while reducing waste. With features like an express bag maker, user-friendly controls, and smart moisture detection, this vacuum sealer ensures your meals stay fresh and flavorful. Backed by a 5-year limited warranty, it's a durable and essential tool for meal prep and storage.
S**.
Great product.
Very nice product. Have used it a lot for long termfood storage. Everyone should consider being prepared.
E**L
best food saver I had so far
my mom in law has this food saver.I loved it right away.I like that you can just insert the food saver roll and then easily cut and seal bags the size you want and need it.I vacuum a lot of food, for storage in the freezer and I do not want a freeze burn on my food.This food saver is way better then what I had before .It seals the food perfectly every time.
S**N
Helps keep food from getting freezer burns
Great product, easy to use and nice value for the money. I use this for so many things. I always seal my meat with this before freezing.
D**L
Good idea, definitely a design work in progress
First of all, this is a terrific solution to frozen food storage. We have had this device for a year; and, after getting through the learning curve, admittedly with only intermittent use due to frustration, we have finally gotten to a routine that works. Any buyer will have to deal with the reality that it is a design compromise, combining unrelated tasks of bag sizing and cutting, portion allocation, and sealing in the manufacturer's marketing plan. Perhaps this is elementary and tolerable to you, but you should walk in with eyes open.I will leave description of the device to others, and begin with the instructions, which are sunny, enthusiastic, and in many ways incomplete and wrong. The process to use the machine must must be learned with hands-on experience. Both hands, this is NOT device that allows for multi-taskng. There are several tricks to making the device work. This is how we NOW do it, not the way the instructions suggest:1. Plug in the machine on a counter space that will give you enough space to pull bags from the front bottom slot of the device, and to use a support to hold the food in the bag when using the vacuum sealer, and something to hold and transport the cache of sealed food. I use a thick book (in my case, Jacques Pepin's "New Complete Techniques," which is about 3" thick). This is crucial, because the way the device is designed so that, if you follow Foodsaver's instructions, after you cut and fill the bag, unless it is hugely over-sized, you must hold the bag so that it does not slip out of the sealing slot when you try to press the seal bar, which can only be done with both hands for some reason.. The method suggested by Foodsaver wastes a lot of bag, and you will go through a lot of plastic to store a relatively limited amount of food, unless you take some prudent steps to save time and money. Put a roll of the bag you want to use into the bin from either side. It is helpful to unlock the cutter bar at the bottom right, pull the cutter assembly toward the front, and feed the roll to the white line that is usually hidden from view during use. Turn on the machine, power by pressing the button at the top left, re-lock the cutter bar, and press "seal" at the top. Sometimes this is not necessary, especially if you have used the machine before and the same roll remains. One of the nice things about this machine is that its designers "tried" to make it user friendly, and in this instance, the device seals the end of the roll when you go through the process of sealing a bag. Helpful, but not really intuitive to a user.2. Drape a towel or plastic wrap over the book or support, to prevent food juices, and there will be some no matter how careful you are, on your hands, on the bag, and ultimately on the machine.3. Prepare, wash, and cut up the food you want to freeze/store into portions you like.4. Unlock the cutter bar at the bottom right, and pull a bag to the desired size, re-lock the bar, and run the slider to the opposite side to cut off the bag. You will only learn the sizing with repeated use. Again, at first you will use a lot of plastic, not including mistakes and discards, of which you will have a few. Get over it.5. Put the food in a bag. Insert the unsealed end of the bag in the sealer slot (above the cutter bar insert). If you follow my advice and SUPPORT THE FOOD IN THE BAG WITH SOMETHING ABOUT 3" THICK, you will not need to hold the bag. Insert the bag just far enough to see it through the clear plastic window at the top; if you can see about 1/4" that is enough. If you put it in crooked, or too far, the device will not seal properly.6. At the top of the machine, there is a button that selects "dry" or "moist" foods, which seems to have no utility. Each time you use the sealer, it defaults back to "dry." Perhaps I am anal, but I try to put it on the right setting before sealing, but it never seems to make any difference in the resulting sealed bag.7. With BOTH HANDS (if you follow my advice about a support for the bag of food, this will be a snap), grasp the sides of the device, hooking your fingers around the edges, and press BOTH SIDES of the seal bar with your thumbs. If you do not support the food bag, you will fumble, repeatedly, and not be able to satisfy the machine's inner demons to get it to vacuum and then seal the bag.Last, there is a lot of waste of bags when you first start. There will be less as you become experienced, but there still will be a lot, and I think this is by design.. The machines are not cheap, and it is not inconceivable that the manufacturers sought to increase potential profits in maximizing consumables, which you conveniently buy from Foodsaver. Like office printers, broadband, and a million other things, without the consumables, it is pointless to buy the product. The cash, it flows. And, you might try other vendor's bags, which might be cheaper, but the lure to buy bags intended for the machine might be irresistible. It is capitalism, after all.
F**Y
One of our best purchases
Even though this is not the newest model, it is rated by many users on YouTube as the best. I love the way I can seal the next bag as I cut the one I want to use. Seeing the size bag I need right in front with no guessing is great. The bags are reusable. The air removal feature is above and separate from the bag cutting at the bottom. I like that. Takes a few minutes to get used to it, but I can’t stop using it!! I made tomato powder with my dehydrator and with the jar sealer I bought separately, it sealed my 12 oz jars perfectly!!! I am soooo amazed and happy with this machine. It is not huge either and can be transported around your kitchen easily. I did my research before getting this one. My hubby wanted me to spend more to get the newest, bigger one and I’m so glad I got THIS one!!!July 28, 2020 - A little help for those who find pressing the bar and holding the bag to be cumbersome or a pita... lol. Here’s how I do it: Fill the bag and leave a good two or three inches of clearance at the top opening of your bag. The more you do this, the less space you’ll need... If the food is dry, be sure to press the “dry” button and if wet be sure to press the “wet” button before you start. The wet setting will pull air more gently which may be why some people think it’s not working so well on their dry foods.Make sure smooth side of the plastic bag is up when you slide the bag into the machine. I am right handed. I lift the top clear bar just a little with my right hand while I slide the bag, keeping it fairly horizontal and gently pull it across the front of the machine, keeping it under the clear plastic bar and inside the machine.When I have done this, both my hands are equally in front of the machine, one on each side. I look to be sure enough plastic is inside far enough to seal well. Then I press the bar with the orange label with both hands as I’m still holding the bag. This is a super comfortable way to do this. It may take a little getting used to, but it works great for me.The machine starts suctioning the air out and I lift the bag just a little to be sure the machine can pull out the air around the food. If the food begins to get pressed or smooshed too much, I just press the “seal” button and the suction stops and the bag seals. Be patient and wait for the bag to release to indicate it is sealed. That’s it!I’ve stored dried tomato slices, beef jerky, ice packs for coolers, other dehydrated foods, frozen meats, lunch meats, tea mixes, etc. Enjoy your sealer!!! I’m sorry to read some have gotten defective ones. Mine is still working great.
Trustpilot
2 months ago
1 month ago