Desert Online General Trading LLC
Dubai, United Arab Emirates
Desert Online General Trading LLC
Dubai, United Arab Emirates


🚀 Elevate your Raspberry Pi storage game with NASPi V2.0 — where power meets precision!
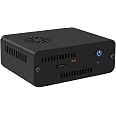
The Geekworm NASPi V2.0 is a compact, NUC-style NAS storage kit designed exclusively for Raspberry Pi 4. It supports 2.5-inch SATA HDDs and SSDs, features a CNC-machined aluminum alloy case for superior heat dissipation, and includes smart power management with auto power on and safe shutdown functions. Its modular design combines the X823 storage shield, X-C1 adapter board, and an efficient PWM cooling system, delivering a professional-grade home media center or web server solution.


| Brand | Geekworm |
| Manufacturer | Geekworm |
| Model | NASPi |
| Model Name | NASPi V2.0 |
| Product Dimensions | 12.09 x 9.04 x 4.5 cm; 346 g |
| Item model number | NASPi |
| Hard Disk Description | HDD, SSD |
| Operating System | Raspberry Pi OS |
| Hardware Interface | HDMI |
| Compatible Devices | Server |
| Mounting Hardware | 1 x NASPi Aluminum Alloy case, 1 x X-C1 V1.3 adapter board, 1 x X823 V1.5 Shield, 1 x X823-A3 metal bracket+4010 PWM cooling fan, Scews pack accessories |
| Number of items | 1 |
| Standing screen display size | 2.5 Inches |
| Batteries Included | No |
| Batteries Required | No |
| Connector Type | Wi-Fi |
| Device interface - primary | Buttons |
| Material | Aluminium |
| Mounting Type | Tabletop |
| Manufacturer | Geekworm |
| Country of Origin | USA |
| Item Weight | 346 g |
Trustpilot
2 weeks ago
2 weeks ago