


💦 Turn every drop into your green advantage!
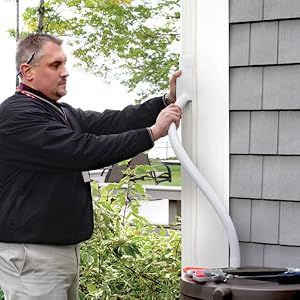
The Oatey Mystic Rainwater Collection System is a durable, UV-resistant PVC diverter that fits standard 2 in. x 3 in. downspouts, capturing up to 90% of rainwater runoff. It includes a 4 ft. high-flow hose for easy connection to rain barrels, enabling efficient water recycling with a quick, 20-minute installation. Perfect for eco-conscious homeowners looking to save water and reduce utility bills while adding a sleek, customizable touch to their gutter system.


| Best Sellers Rank | #51,753 in Patio, Lawn & Garden ( See Top 100 in Patio, Lawn & Garden ) #12 in Rain Barrel Diverters |
| Brand | Oatey |
| Color | White |
| Customer Reviews | 4.4 out of 5 stars 6,838 Reviews |
| Item Weight | 2 Pounds |
| Material | Polyvinyl Chloride (PVC) |
| Outside Diameter | 2 Inches |
| Product Dimensions | 5.7"L x 6.3"W |
Z**S
Exceeded expectations.
I bought this with muted expectations based on the somewhat mixed reviews. However, after installing it and observing it during the first rain storm, I honestly can't figure out why so many people have trouble with this incredibly simple and very effective rain collector. 1. This fit the gutters which were on my house like a glove. It's not going to work for you if your gutters are the wrong size so measure first if your gutters look like they are a non-standard size. 2. When run into my sealed rain barrel, this thing collected almost all of the water during the first rain storm. I would say upwards of 90%. When it started raining hard, I went out several times to monitor the barrels, and there was only a trickle coming from the gutter, but I could hear the torrent of water flowing into the barrel. It easily filled one 55g barrel after about 3 hours of on-an-off moderate rain. Good think I have three more to integrate! 3. Cutting the gutters is a bit of a pain without a nicer hack saw. I only had a cheap one, but I found it much easier to start with the saw, and then finish with tin snips. Installation took about 20 minutes, and went smoothly. 4. The included hose was kinked when it arrived, but feeding it over a piece of PVC pipe and hitting it with a blowdryer relaxed it considerably. 5. The hose actually fits very nicely over a 1" PVC sleeve. Lowes has a PVC connector which is 3/4" threaded on one side, with a 1" slip coupling on the other side. This $0.47 fitting threaded perfectly into the threaded bung on the barrel cap, and the hose fits snugly enough over the slip coupling to make a water tight seal. 6. In general, the product is well build, well designed, and looks attractive when installed. It even has the same texture/pattern that my gutters have.
J**.
This is the best system for the homeowner's money.
The hose that comes with this kit is the worst for kinking. I'm constantly trying to get these areas of the hose from flat (won't let much water through) to round. Otherwise, the system operates without intervention once installed.
C**P
Easy to install and works great!
Bought a rain barrel and needed a device to divert water to it from my down spout. This device is more tougher than one I bought previously. You can cut the hose to length. I cut mine at an angle so I can screw it to the rain barrel's screen screws. Just had my first heavy rain and the device captured a majority of the rain. Reason I only gave it 4 stars is because the hose was kinked in the way they packaged it. The hose is somewhat stiff and hard to get those kinks out. Used a hairdryer to heat up the hose's kinks to get them more open. You can see one of the kinks in the full barrel picture.
B**K
Works Well for Rainwater Collection
Living in the desert southwest, water is always a precious commodity and I've been wanting to collect rainwater for use in my backyard for some time and finally got around to installing gutters and using a pair of 50-gallon rain barrels to go with them. I ordered the Oatey diverters ahead of time and had them installed at the same time as the downspouts for the new gutters and the installer had no problem adding them in. They work very well but do not divert 100% of the rainwater depending on the flow level. A small trickle does still come out of the downspout but not anything like what it would be if the red plug was fitted and the hose removed. I'm ok with that arrangement as when it rains, it tends to be heavy but short duration, so capturing +90% or so is a drastic improvement over what I was getting before which was just whatever runoff happened to make its way to the grass. The installer was a professional so there were no leaks and the feed angle of the diverter matched up perfectly with my barrels to allow the large flexible hose to be directed into them for collection. The hoses do have some kinking from being packed inside the box but once stretched out, that didn't really pose a problem for their flow volume in my experience.
J**A
Works as described but needs a few extras.
Alright. So I ordered this to help keep more water from around my foundation as well as having free water for my plants using a rain barrel. Lets get down to install. Tools required: -Metal hacksaw. -Hammer. (Better to use a rubber mallet) -Lubrication. I had a can of wd40 and used that for external. Internal lubrication i used petroleum jelly(not pictured). -2 flat head screw driver. -3 screws. Flat tip and aluminum preferred. -Screw driver. -Drill and drill tip for screw holes. -tape measurer -sealant for screws if desired. To ensure no water leaks and the screws hold. Install time: -1hr, only because I recently moved and my workroom is in boxes. Could probably be done in less if you have all the stuff handy. 1. So I'm replacing the gutter strap so i pulled that off the top. I cut the gutter 20 inches from the top of the barrel. I removed a 6 inch section. 2. Put on the top part. Lubricate the gutter and slide it on. Use a hammer to reach desired height up the gutter. 3. Lubricate the main section inside. Using a flathead screw driver bend the end of the gutter so you can insert the section inside. Tehehehe 4. Use a hammer to ensure its all the way up. Be careful as to not break the plastic. I couldn't find my rubber mallet so use one if you have one. 5. Bring up the lower cut section and use flt head screw driver again to bend it around the lower part to slide on. I used a tad more lubrication to make it easy. Drill 3 holes the same size as your screws on the front and sides. 6. I had extra aluminum screws from another project so I used those do they don't rust. Ensure the flat tip so if you so go through it debris will not catch. Screw them in after putting the sealant in the hole or around the screw. 7. Attach hose and feed it to the barrel. I plan on putting a clamp on when I find the box of them I have. I may drill a hole in the barrel side later and attach the hose that way to a spout ill screw and seal in. All in all it should be a .5 to 1 hr project. I didn't have my stuff unboxed so I went a little over an hour finding stuff as I went. Use: Works okay so far. I haven't found a need to use more screws yet to ensure the 2 plastic pieces stay attached but I might. I might also add some screws to the top to ensure it stays on. It rained and filled some of the barrel with no issues. The hose couldve been clear so I may swap that out someday so the white doesnt stick out. Pros: -Works as expected. -Feels thick and not flimsy. The hose is not a bad hose and pretty thick as well. Cons: -Add aluminium screws to ensure product doesnt slide off. With possible drilling instructions. -Maybe a water soluable lubricant package. -Add a hose color preference. If I didn't have the extra screws I would have had to go find some. I think they should be at least noted on the instructions as well as possibly needing lubricant. So far its a total 5. I will not deduct overall score for extra missing pieces that may not be needed for everyone. Install score was only thing I gave a 4/5.
I**Y
Collects a tiny fraction of the water coming down the spout
We live in a low rainfall area, and bought this product hoping that most of the water going into it would be diverted into our rain barrel. It was easy to install and seems sturdy, but ~95% of the water goes straight through, out the bottom of the downspout. Looking at how it is built, there is one smallish hole on the side that water can happen into that will divert it, while most of the water goes straight down and out. If you don't care about capturing much of the water, this will serve fine.
E**T
Working Great!
First, as usual I ordered this with Amazon Prime and received it in 2 days. The external and retail packaging was in perfect condition. My wife and I received 2 brown "Algreen Cascata 65 Gallon Rain Barrel Urn" as wedding presents which were both from Amazon. We decided to keep both, one for front of the house, and the second for the back. On the front we originally used 2 "Flex-A-Spout Downspout Diverters" to connect from the gutter down to the top hole of the barrel, and we were planning on just running an overflow from one of the plugs on the side. Our neighbors called the HOA on us because they didn't think it was attractive and was right next to their front door (they're only people who can see it as it's not easily visible from street). I could have submitted a request to keep it, but I'd have to get signature from a 5 neighbors including them, and I just don't care to talk to them. After looking at the alternatives, the Oatey seemed to be the nicest looking and stealth paintable diverter, so I purchased it here on Amazon. I applied 3 coats of paint to both the hose and the diverter, although I probably only needed 1 or 2 coats. It looks great and blends in perfect. The instructions say to make the top cut at least 24 inches above the entry to the rain barrel, but I made my cuts so it only slightly goes above the entry hole. I am thinking that the instructions are for if you have a sealed water barrel, but ours has a lid and a hole on the top which water would overflow from (hole and lid seam). I mounted the Oatey so that the draining hole is about an inch or two above the overflow plug on the rain barrel. I got lucky as the hose fit snuggly onto the overflow plug. In reality I should have mounted the Oatey slightly lower (half inch above plug) because now the barrel leaks out of the lid seam where the hooks attach. I might try to apply some sort of weather stripping around lid to stop it, but that can wait because it's not a bad leak, very minor. I can also put a round paver under it to elevate it to my desired height. I have only managed to see it working on light rainy days so only a little comes from the downspout after the barrel is full, but I can't wait to see it working on heavy rainy day which is rare here in Southern California. I would definitely recommend this product to anyone who needs a downspout diverter and wants it stealth and clean looking. Think about your situation and rain barrel, and how you plan on setting it up to make sure you get it done correctly.
S**N
Doing What I anticipated :)
This was relatively easy to set up as long as you are pretty handy / know your way around gutters and rain barrels, plus have the appropriate tools. It works the way it's supposed to. When there are heavy downfalls, the water goes into the rain barrel and out the gutter. The tubbing is a little hard to flex at first but the as it sits in the sun that improves. My rain barrel filled at a good speed. I have white gutters and a dark blue house, This blends in nicely with the gutter. You can tell it's there but it's not obscenely bulky. This will be the first winter so we will see if it holds up.
Trustpilot
1 day ago
2 months ago


