🧱 Elevate your walls with vintage charm—because your space deserves to stand out!
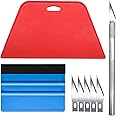
Okydoky Vintage Brown Brick Wallpaper offers 54 square feet of high-quality vinyl with a realistic brick pattern. Designed for durability and easy cleaning, this non-pre-pasted wallpaper is perfect for adding a warm, rustic touch to kitchens, living rooms, bedrooms, and more. Note: requires wallpaper paste and batch consistency for best results.
| Brand | Okydoky |
| Material | Vinyl |
| Size | 20.8" x 393"(Non-self-Sticking) |
| Color | Brown (Non-stick) |
| Finish Type | NOT Pre-pasted |
| Style | Vintage Brick Wallpaper |
| Installation Type | pre-pasted |
| Product Dimensions | 147.24"L x 8.21"W |
| Item Weight | 2.4 Pounds |
| Shape | Square |
| Unit Count | 56.7666666666667 Square Feet |
| Recommended Uses For Product | Living Room |
| Coverage | 54 square feet |
| Form Factor | Roll |
| Water Resistance Level | Not Water Resistant |
| Special Feature | Stain Resistant, Easy to Clean |
| UPC | 614251693760 787794199959 |
| Manufacturer | Okydoky |
| Item Weight | 2.4 pounds |
| Is Discontinued By Manufacturer | No |
| Finish | NOT Pre-pasted |
| Number Of Pieces | 1 |
| Special Features | Stain Resistant, Easy to Clean |
| Batteries Included? | No |
| Batteries Required? | No |
J**S
Beautiful and easy to install
We just moved into our new home and while we pretty much knew how we’re going to maximize the space in our home, for a while I couldn’t figure out what to do with the deep empty void that we had under our stairs. The space just so happens to be right across from our dining room table and kinda looked boring, so we decided to turn it into a mini bar area. When initially receiving the wallpaper, I wasn’t sure how I felt about it. When I laid out the paper, there were already bubbles between the wallpaper and the paper and it made it a little harder to line up the bricks perfectly before I applied. However, lining up the bricks wasn’t as hard as I thought it’d be. It was a tad bit frustrating because the bubbles took a little time to smooth out when applying, but once you get the hang out of it, it’s pretty easy. I saw a lot of people saying that the bricks don’t line up, but I didn’t have that issue. I measured the wall and pre cut the strips before I applied them to the wall to make sure they lined up. If you do this and lay the 1st strip and the 2nd strip next to each other and if you see that they don’t match, try flipping the 2nd strip the other way (upside down) and you should be able to match them seamlessly. Also, if you have bubbles after applying, take a needle or safety pin and poke holes in the bubbles to let the air out. Also, don’t worry about messing up because the wallpaper is VERY forgiving. Overall, it think it looks SO much better in person and I’m extremely pleased with this wallpaper. 100% recommend!
A**D
Exceeded my expectations!
This product was so absolutely easy! I used this as a temporary solution to the fireplace I built in our home. I’d been back and forth between brick thins or marble for the surround so I ordered this to give the brick a test drive and I LOVE it! I will be leaving this up longer than expected to finish some other projects first because it looks incredible! The only hard part I had was matching up the bricks on the next rows. It takes some time getting it right but you can pull it off and adjust the paper and stick it again. I would highly recommend this product!
T**.
Great paper, tips for a successful install.
Absolutely love the brick wallpaper! I purchased the brown color and I looked at papers for over a year. I’ve ordered samples of at least 7 different papers and finally, when the one I had chosen had a shipment delay, I ordered this and one other as a Hail Mary. I had a 5 day window to complete painting and papering this project and I HAD to have something to put up! (Thank you, Prime 2-day). So many papers I looked at had a shiny texture and wanted a more realistic brick look... and in my experience brick is not shiny. As soon as I opened this box I heard the angels’ voices. It was “the one”.Now, I’m a former decorator and experienced paper hanger, having installed countless rolls over my lifetime. This particular paper was easy to work with... for the most part. As others have stated it does tear easily once it’s got a rip in it so know going in that if you are working with long, narrow pieces you must be super careful that the weight doesn’t rip it. I was papering 11’ high walls so this was an issue, but only when using vertically cut pieces. If they had no additional cuts it was fine. When trimming the ceiling and baseboard edges I used a straight edge tool and disposable break away cutter. Hold the straight edge against the ceiling as you cut so the blade doesn’t drag the paper and rip or leave a jagged edge. Snap off the blade often, as soon as you feel any drag, to get super clean cuts. I bought 3 for my project (10 double rolls) and could have used one more.Other tips to make your life so much easier and ensure a great result:Use a wall covering primer before you begin! I use Zinser Sheildz, and if your paper is dark like this brown brick you can have it tinted to hide seams. This is sometimes called “sizing” a wall and basically it seals the surface so your paste doesn’t suck into the drywall. It will make positioning it infinitely easier and whomever removes it years later will thank you because it will help with clean removal as well. I know, it’s another step that costs $20 and takes a couple of hours to paint and dry (2 hours til you can hang paper) but it’s so worth it in the long run.Next, I set up a folding table for cutting and pasting. When you cut your paper make an arrow with pencil on the back indicating which is the top as it’s hard to tell once it’s cut. As soon as you paste your paper (edges are important!) book it. That means fold each edge toward the middle so the pasted sides are together and hang it immediately. The longer the paste sets the more likely your paper will soften and rip. Booking the paper allows you to move it around with out sticking to other surfaces. Once you get the top in place and lined up with your side level line unfold the bottom edge and slide/position the side seams to match your pattern. Once it’s smoothed and you’ve trimmed your top and bottom edges, roll your seams with a seam roller.Next tip is to immediately wash down your paper with water and white vinegar, about a cup per gallon of water is good. A clean flat sponge, the ones used for grouting haze cleaning, work great to smooth out bubbles as you clean the paste. The vinegar water will be your best friend during this sticky project. Change it often. Clean the ceiling and make sure you get the paste off as it will dry shiny. If you don’t, in about a year, say hello to your little yellow stain.Finally, if you are hanging artwork on a papered wall, mark where you want your nail/screw and make a small “X” with your cutter into the paper. Cut deep enough to go through the back of the paper. Pry the edges of your “x” open to reveal the wall behind. Hammer in your nail. When you go to move this item from the wall simply use seam adhesive to paste the tiny flaps down over the nail hole and you have no evidence of damage to your paper.I would have given this paper 5 stars except for this: every single roll was a different lot number. Fortunately brick is a forgiving pattern. It’s uniqueness and non conformity allow for slight nuances of mismatched patterns. But the risk of differing lot numbers means potentially the color is off or the pattern has printed slightly differently and a match is not possible. In the end it did not matter for this paper but be aware of this when you order.
J**N
Amazing!!
This is so much better than I anticipated. It looks so realistic and has a great texture. I’m a renter so I had to put this up in a way that it can come down without damaging the walls. I used liquid cornstarch and it went up great!! There was a lot of waste from cutting the excess off in order to line up the bricks when you move to the next row. However I just drew an arrow on the back to remind myself which way was “up” on the print and saved it for later. It ended coming in handy when I got the end of the wall and had to go go between shelves. I bought one roll and it did 98% of my wall. You can see I have one little patch on the orange and white board against the wall that I still need to cover. Ordering another roll tonight to finish that and will use the left over to line the back walls on the kitchen shelves. Great product!!
A**R
Tears easier than paper
This product is so thin and tears easier than paper. I was very unhappy with the quality of the wallpaper and the creases that the rolls came with that were impossible to get out. That being said, you get what you pay for. It looks good on the wall and the pattern disguises the bumps and creases from the application. I’d pay a little more to avoid the headache this wallpaper caused. Basically wasted a whole roll on all the tearing. So but extra for sure!If you so buy this, a tip for you. Work in small sections vs doing a large strip at a time.
B**I
Looking good
I had to put this up by myself so it has some irregularities in the line up because I gave in to frustration and it was my first attempt. But it still looks good and is sticking great. This wall took about two rolls I believe. So far very happy with it and get compliments from everyone that sees it.
Trustpilot
3 days ago
5 days ago