


🌳 Unleash Your Family Legacy with Style!
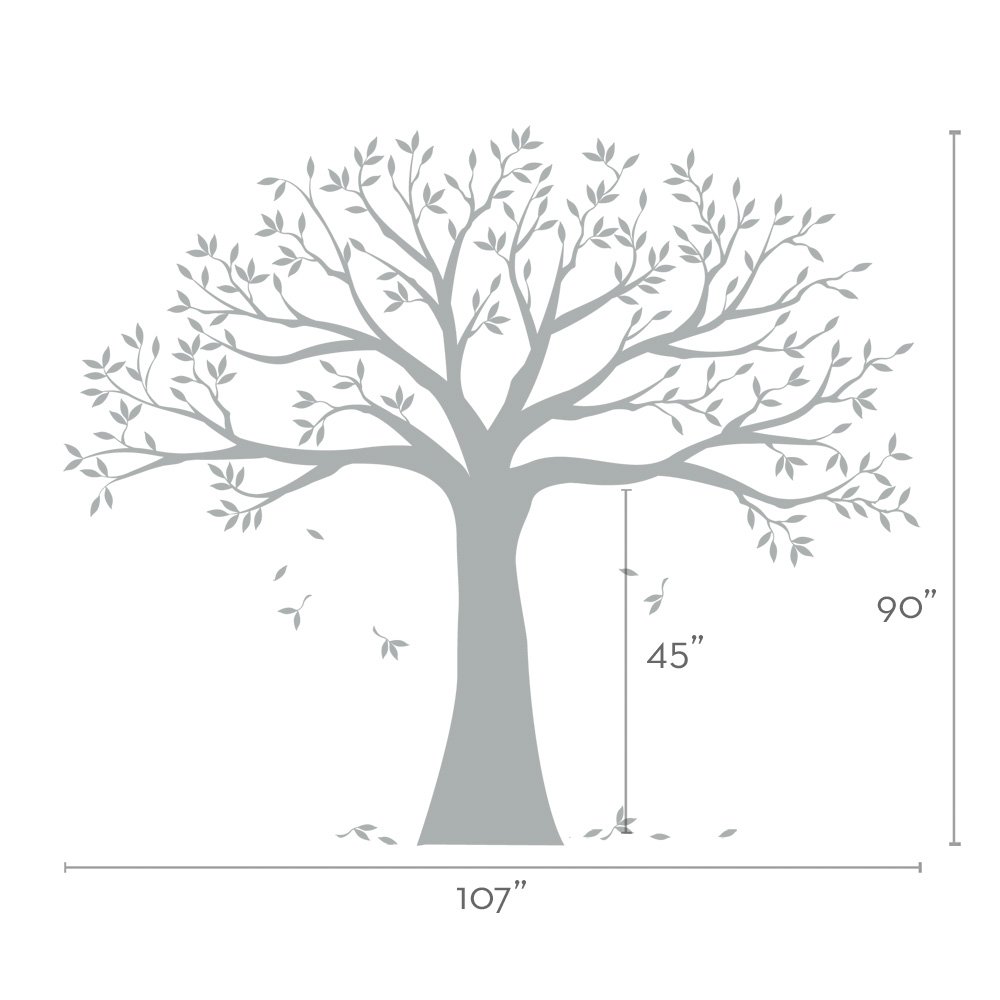
The Simple Shapes Family Tree Wall Decal is a best-selling home decor item, measuring 107" w x 90" h in a rich chestnut brown. Made in the USA from high-quality matte vinyl, it offers a paint-like finish and comes with an application tool and detailed instructions for easy setup.
S**K
Great product, but be prepared to take your time, and be sore afterwards... :)
I read a lot of info on this before I purchased it. It took me 10 hours to put this up all by myself. But I did not rush. I put it on a freshly painted wall, which I learned later is not the best because it is harder to get it to stick. I did it, but it took a LOT of elbow grease and FIRM rubbing. Take your time and do ALL these steps. It comes in rolls. Each roll is labeled with a letter. On the "instructions" /map it says which letter has which parts. Start with page A. cut the pieces out and be sure to rub the little applicator over the pieces FIRMLY because when it arrives it is bumpy, has folds and bubbles. Make sure you rub the vinyl back onto the paper to make sure it is all flat before you put it on the wall. Get some painters tape and put the ENTIRE tree up on the wall. This was helpful because I realized I needed to cut off a few branches or leaves to have it fit correctly according to how I had it on the wall. As you see in the photo graph, the place I first taped it on, did not necessarily match where I actually ended up adhering it to. I was glad for the painters tape to be able to move it around however I chose to adjust it. It helps to be sure things fit onto the right place and lets you see how much space it will take on the wall. Do the whole tree with tape and let it sit. I did mine in two settings, the first part cutting the pieces and taping temporary onto the wall and it took 3 1/2 hours. I let it hang on the wall overnight to let the vinyl settle in to the room temperature and hang to let the folds relax a little. The next day I started rubbing it on to the wall. It took 5 1/2 hours. I did it all alone with no help. Be patient and be sure you can take your time to do this project right. It says to overlap the pieces a little because they will shrink. I found that when I overlapped some of them the pieces did not match up completely so I took an exacto knife and trimmed it off. Also, don't be afraid to remove entire leaves or branches if it does not fit the way you want. They can always be added in later in a different place where ever you see fit. I am leaving some leafs off on purpose because I will be adding green leaves to this next week. I got my TREE off Amazon, but I wanted to customize it so went directly to the simpleshapes.com website and ordered more leaves of two different colors of green. They will not arrive until next week.. I will try and post more pics later when more branches and leaves are added. Some other tips I learned are as follows: It is helpful to trim the attaching piece clear down to the actual decal so it is easier to see where you are attatching to the overlapped part. It just made it better to be accurate. Another thing, When putting on a large piece, don't take the entire backing off. leave the painters tape and let it hold part of the piece on the wall and only take off the paper as needed to get the piece started, then press your way to the end removing the backing paper and painters tape as you go. It looks lovely and I am sure I will love it, but it was a LOT of work.. Easy ( not hard), but labor intensive and it took some time to make it look good. Believe me , I am SORE today from climbing up and down the ladder and having my hands above my head for so long. MY shoulders and neck let me know I over did myself. Just take your time, tape on the wall ahead of time so you can use that tape to adjust as you go. and don't worry if you have to remove entire branches or leaves to make it work..... Would I do it again... yes.... is it tiring and time consuming... yes.... Will I love it when I get my photos hung? YES! But be sure you are ready to take on this project... Hope my info helps...
B**E
THIS TREE IS AWESOME! I JUST LOVE IT.
In previous houses, I’ve always had a gallery of pictures on the hallway walls. In this mega fixer-upper we recently purchased, the hallway is not conducive for that. Even paring down the number of pictures I wanted to hang, I still had about 30 I wanted to use. I started looking on the internet for picture groupings for a large amount of pictures of different sizes and saw several with trees as the anchor and really liked them.I started looking at the different trees and the companies which made them. After reading a gazillion reviews and watching several videos, I narrowed my choice down to two – this one and another with a black tree and green leaves. In the end I choose this one because I wanted the dark brown tree and I didn’t want the color of the leaves to take away from the different colors in the pictures. The chestnut brown color looks wonderful against my light creamy beige walls.The tree came well packaged in a tube. I spent one evening just cutting all the parts apart (I followed others who advised cutting close the actual tree decal except between leaves where I just made a small a dip.) I found it VERY HELPFUL to write the section and number on each piece ex. F 30. I let all the pieces rest for a day on my dining room table putting books on the ones that wanted to roll the most, the trunk and a few others pieces. Following the directions, I used the squeegee to rub all the pieces. Then I used painter’s tape and put the whole thing on the wall. As another reviewer said, “Take your time and do ALL these steps.” I WOULD ALSO ADVISE after the doing the trunk to start putting up the RIGHT HALF OF SECTION C FIRST then the left part of C and then D. These are the two sections straight above the trunk and the hardest to reach; you will need a small step ladder. Once you have these up, you can move out to each side and if you have to adjust (and you will), you won’t have to adjust the entire tree like I had to. I let it set overnight before starting the next step.Now you can start to actually put the tree on the wall. I started with the trunk then with section C and I used the squeegee one more time on each piece, peeled the backing off and put it back on the wall in the correct place. I overlapped the pieces a little and if they didn’t match up just right, I took an X-acto knife and trimmed any areas that needed it. I found if it was a longer piece, it was easier to pull the backing only half way starting where it would attach to the previous piece and tear off that part off until I had it positioned correctly then I pulled the rest of the backing off. Then I used my thumb, fingers, and/or the squeegee to press the piece to the wall, but pressed only on the actual piece paying special attention to the tips of the leaves. When pulling the transfer paper away from the branches and leaves, pull the transfer paper gently straight back against the wall. If a leaf started to peel away from the wall (and a few will even though you followed all the steps), I just push the transfer paper back and pressed the part lifting up again.I’m disabled and can stand for only short periods of time, so it took me longer to put the tree up than it might for someone else who can stay at it longer than I am able to. Two people would be even nicer still, but, alas I had only myself so it took me a week to put up the entire tree. BUT IT WAS WORTH EVERY SECOND. My only problem is now that I have paper templates up for all the pictures, I don’t know if I want to cover so much of this beautiful, beautiful tree.If you decide to purchase this tree decal, READ AND FOLLOW ALL OF THE DIRECTIONS AND WATCH THE RECOMMENDED VIDEO. It takes time and patience, but it is totally worth it.
P**K
I really love the finished product BUT
I really love the finished product BUT....let me say it was not as easy to apply as I was led to believe. The instructions were clear....but it took 3 of us to put it up. One to follow the shape of the branches and compare it to the diagram to be sure we were putting it up in the right spot and two of us to apply it to the wall. It took one of us to peel the paper backing off while the other person used the plastic tool (thank you!) to apply pressure to the decal as it was applied to the wall. It also took a ladder because of the size of the decal. We had a full wall in our entry way that we had just painted and it filled it up perfectly.Some hints: Cut 'into' the areas between the branches where the leaves are. It helped us peel the paper off the leaves easier. Also, if you tear the paper off as you are applying it, it helps a lot. I rolled the paper off the adhesive design but it got bulky so I started tearing off the paper in smaller sections. MUCH easier. By the time we got into a good rhythm, we finished. Go figure.it took us about 3 hours to apply with 3 of us. It's not a project that I would recommend that you do by yourself; nor if you are single and have no friends. HA! You'll be at it all day, will need valium and a bottle of wine.WATCH THE LEAVES>>>>> they tear off the actual appliqué very easily.The end product is gorgeous. Next project is to get the pictures up. Very, very cool idea!
G**N
Beautiful
Good instructions on how put together and easy to apply.
S**Y
Great quality
Beautiful priduct
J**E
Looks like the picture without frames.
Directions are good. Thin branches can sometimes rip and challenging to line up sections. But satisfied with result.
Trustpilot
1 month ago
3 weeks ago