
DOWNLOAD THE APP


Customer Services
Copyright © 2025 Desertcart Holdings Limited
DOWNLOAD THE APP
🖤 Elevate your space with granite glam—DIY style, no compromises!
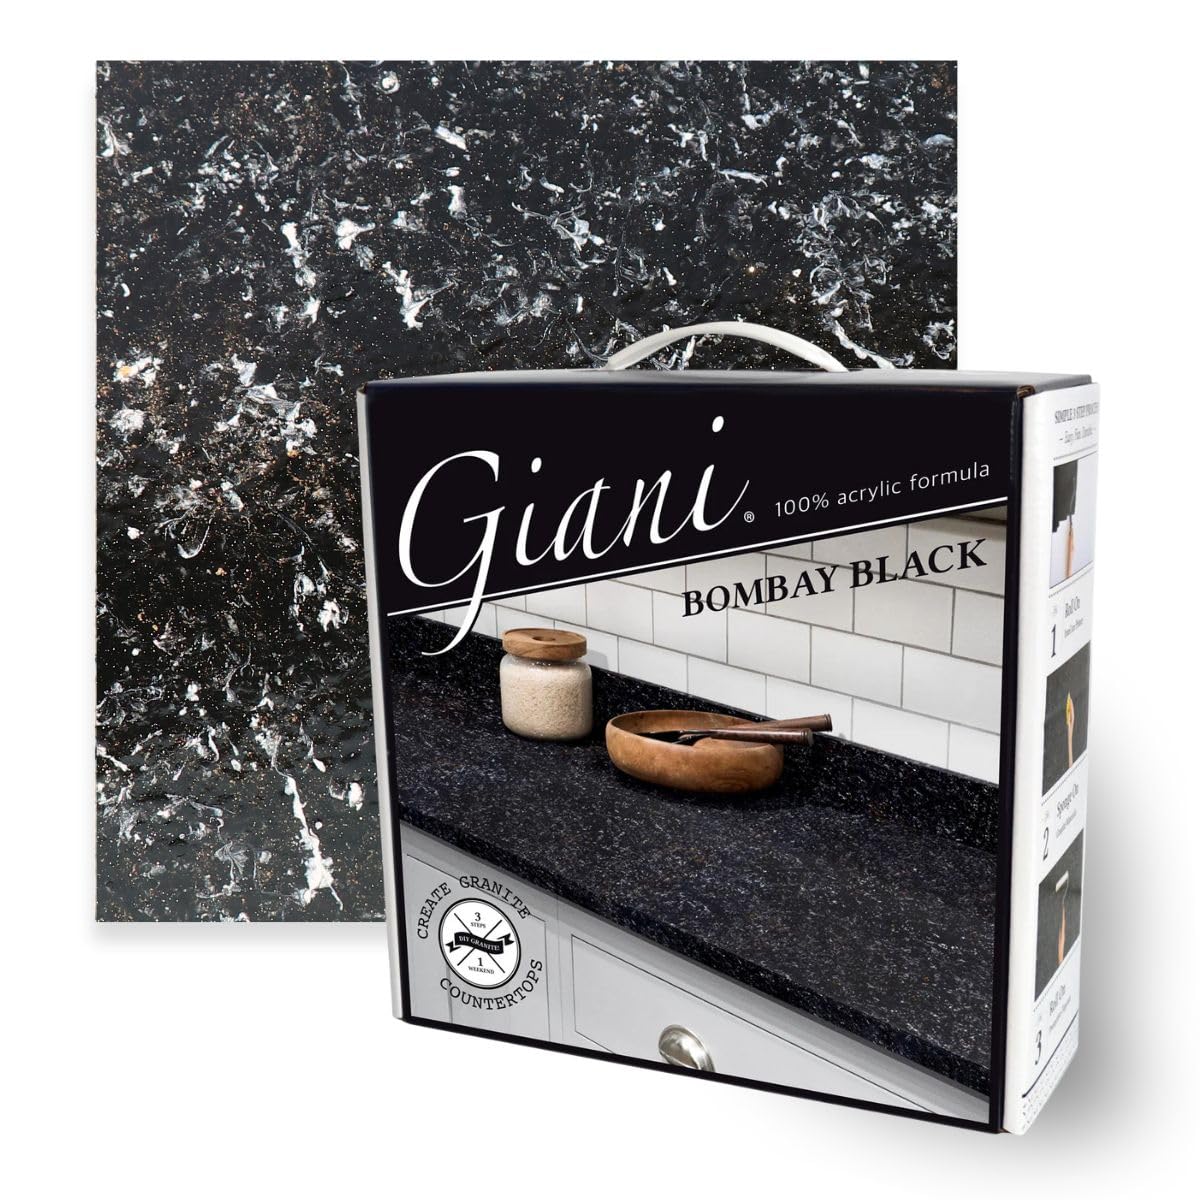
The Giani Granite Countertop Paint Kit 2.0 in Bombay Black offers a professional-grade, 3-step acrylic system to transform laminate, Formica, and other surfaces into stunning granite finishes. Covering up to 35 sq. ft., it features a low odor, water-based, food-safe topcoat that delivers a durable, high-gloss look. With easy sponge and roller application and detailed instructions, this USA-made kit is perfect for millennials seeking a stylish, budget-friendly kitchen upgrade that lasts for years.


| ASIN | B092DQB79Z |
| Batteries Required? | No |
| Best Sellers Rank | #16,645 in Tools & Home Improvement ( See Top 100 in Tools & Home Improvement ) #11 in Household Countertop & Tile Paint |
| Brand | Giani |
| Color | Bombay Black |
| Color Code | Bombay Black |
| Coverage | 35 square feet |
| Customer Reviews | 4.4 4.4 out of 5 stars (3,475) |
| Date First Available | April 13, 2021 |
| Finish | Gloss |
| Finish Type | Gloss |
| Included Components | Foam Brush, Paint Sponge, Practice Board, Roller Arm, Roller Pads |
| Indoor/Outdoor Usage | Indoor |
| Is Waterproof | True |
| Item Form | Liquid |
| Item Package Quantity | 1 |
| Item Volume | 44 Fluid Ounces |
| Item Weight | 5.35 pounds |
| Item model number | FG-G2 BLACK |
| Manufacturer | Giani, Inc. |
| Material | water based |
| Package Information | Can |
| Paint Type | Acrylic |
| Part Number | FG-G2 BLACK |
| Product Dimensions | 11.5 x 4 x 11 inches |
| Size | 46 Fl Oz (Pack of 1) |
| Special Feature | Low Odor |
| Special Features | Low Odor |
| Specific Uses For Product | Interior |
| Style | 100% Acrylic Topcoat |
| Surface Recommendation | Formica, Laminate |
| UPC | 850015970108 |
| Unit Count | 46.0 Fluid Ounces |
| Water Resistance Level | Water Resistant |
R**N
Easy to do, looks amazing!
Just got done and waiting for the topcoat to dry/cure. Love it!!! Great inexpensive way to change the look. There is one before photo where the counter is black with brown and orange specks so you can see how well the iron core primer and mineral paints cover it up. This kit was easy to use, great instructions and lots of videos to watch. I chose the kit with the acrylic topcoat as I was looking for a less glossy finish. I also wanted the counters to lean more towards the white limestone color so I did 3 sponging layers of that mineral color total. For the seams and tops of the vertical pieces, I used a very small triangle cut off of the sponge that was provided and a pair of tweezers to get in there and sponge on the mineral colors. When it gets hit with sunlight, it's beautiful and has a nice sheen to it. When the undercabinet lights come on, it has a slight bluish cast. The glitter topcoat is a nice touch. It is subtle but makes it look even more like granite.
N**E
EASY CHEAP COUNTERTOP TRANSFORMATION
I have used this TWICE! If you need a cheap way to make your countertops look amazing THIS IS IT! I have pictures of before and after and you can see that I used it before. The before I used about 4 years ago. And I did the black marble recently. This stuff is amazing and it has transformed my kitchen TWICE! It is very easy to use and I was able to complete it with two small kids. It took me a couple of days and a lot of patience but it got done and looks amazing! And you get amazing looking counter tops with minimal cost! I do have a tip for the black marble. I wasn’t confident in my first attempt at it but I trialed it and it turned out good! 1. Apply the base coat (black). Dry 2. Sponge white and brown marble 3. Sponge black marble (I applied the 3 while wet then dried) Dry 4. Apply top coat x2. Let first coat dry then do another second I have picture of the steps you can check them out.
U**N
Counter top looks fantastic
This has lasted great!! The paint quality is fantastic and as long as following directions it is easy to use. I ordered 2 kits not thinking we would have enough but the coverage was as advertised
B**S
You still need to buy more stuff
After searching for the best kit to buy I decided on the Giani and Epoxy kit. This wasn’t cheap and I figured for the amount of money it cost I would receive everything I needed to complete the project. Unfortunately that’s not the case. Things you need to buy. Paint tray, extra sponge (I’ll get to that in a second), small detail brush and painters tape. So they give you one sponge. They tell you to cut it in half than half again giving you 4 pieces. 1 for each color paint so that takes up 3 pieces giving you one left over to cut into 3 smaller pieces for getting into the corners and than they say to use the remaining sponge to blend the colors in. Umm I don’t have anymore sponge. Luckily I had bought 2 kits so I used the one from that kit. Okay so that’s why I give value a 3 star. Durability is yet to be determined but it seems like it will be durable. Ease of use. Helpful tip. Light, light and more light. Put every light you have on your workspace. Especially when doing the epoxy. The paint is easy just sponge on and blend to your liking. Note they give you a piece of paper to test your skills before doing the countertop. Listen it’s paper. The moment I put paint on it it just curled up into a roll. Not helpful at all. Use a small piece of wood and paint that with some primer if you want to test your technique. I just said forget it and went straight to the countertop. It’s the epoxy that is difficult. I spread it on using the roller and thought I spread it on good. Came back with a flashlight and noticed I missed a lot of spots. I was able to fix most of it. After it had dried I rubbed my hand over it and found some spots I missed. The edge was the hardest. Using the roller on the edge seamed messy with so much epoxy rolling off it. So I figured the brush did better but it didn’t come out very smooth on the edge. Smooth enough for my satisfaction though. Same with the backsplash. This stuff is self leveling so on the vertical sections it’s hard to keep the epoxy from just running off. I wanted the edge thicker with epoxy because I figured it would get the most abuse. All in all I’m happy with the final outcome. A few spots I’ll touch up with some epoxy. I can’t compare this with similar products but I would recommend this to others. If I had the opportunity to do it again I know the mistakes I made and would do better with the epoxy. Just remember to get a lot of light. If I would have had more light than the epoxy would have turned out perfectly. Final note. The kit claims to do 35 square feet. I had about about 19’ of countertop to do so roughly 38 square feet. So I purchased 2 kits. I was able to do all of my countertop with 1 kit and used every bit of it. Giani let me return the unused kit but unfortunately I used the sponge so they will deduct $12. Yes $12 for a sponge you can buy for a dollar at your arts and crafts store. Well I think this about wraps it up. Hopefully this review will help some of you. Don’t be scared to attempt this. It truly looks amazing even with my flaws lol.
H**B
Expensive for paint but cheaper than having what was a tired looking kitchen torn apart. Completely transformed the look of the kitchen. Very clear instructions provided as well as the tools needed to apply the paint and acrylic.
P**6
This kit has transformed my rental apartment for not much money and 3 days without a kitchen and then 4 days with limited counter tops.... Such a small outlay in both respects for the end product. I have bought real marble for a previous home and I am a convert to this approach, I would rather restore some existing counter top, be my own artist on what color it ends up being and save a heap of money. I followed the instructions to the letter and the specified 3.30 for stirring, so easy to use and the kit makes it an easy task to complete. I am thinking of getting the 1 gallon to change the bathroom vanities, the 2 gallon covered this kitchen with nothing to spare. I can't wait for my next go with this, I hope you have fun doing it.
M**I
Amazing experience, good quality. It gives my kitchen a beautiful fresh and modern look.
J**N
We have concrete countertops so replacing them would be very difficult and costly. I am so impressed with this product. Countertops turned out great. We added the glitter topcoat on and still need a 2nd coat, plus waiting 14 days in between to add the epoxy resin, but I couldn't wait to write a review. If you're thinking about it, just do it! Great product!
V**A
Highly recommend for those who don't have the budget to get a full upgrade. Very very easy to use. I panicked with all the time constraints mentioned on the instructions but it's so very easy. Would 100% use again.
Trustpilot
1 month ago
3 weeks ago