
Desert Online General Trading LLC
Dubai, United Arab Emirates
Desert Online General Trading LLC
Dubai, United Arab Emirates

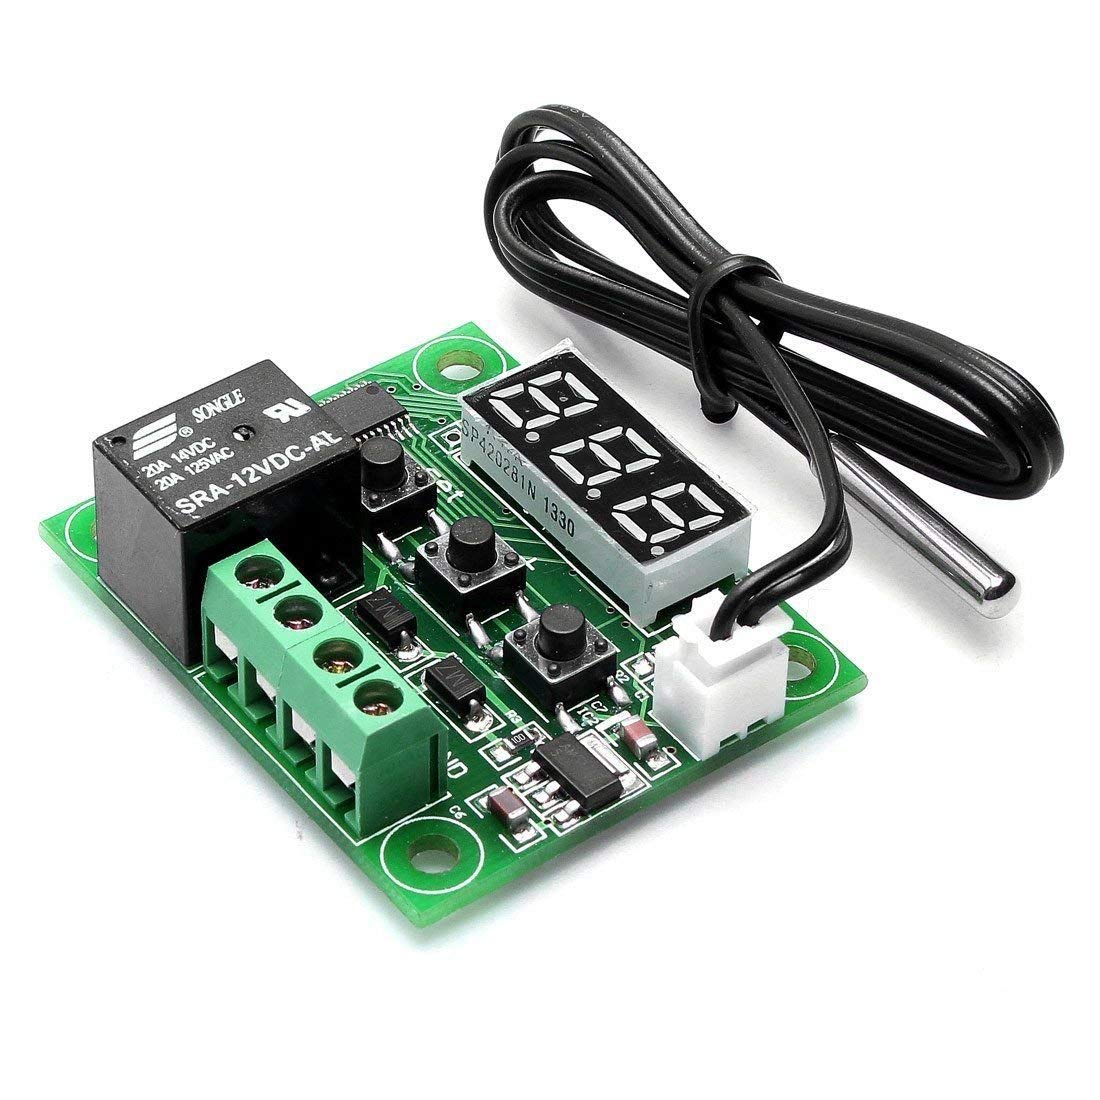


Specifications: Model: W1209 Dimensions: 48.5 * 40mm Temperature Control mode: ON / OFF Temperature Range :-50 - 110 degree centigrade Resolution: When temperature is 0.1 degree, the resolution is -9.9~99.9, other temperature segment is 1 degree. Control Accuracy: 0.1 degree Hysteresis Accuracy: 0.1 degree Refresh Rate: 0.5s High Temperature Protection 0 - 110 degree centigrade Supply Voltage: DC 12V Static Current: Less than 35MA, attract current less than 65MA Output Voltage: DC 12V Output Power: 20A relay Measurement Input: NTC (10K 0.5%) Waterproof Sensor Environmental Requirements: -10 - 60 degree centigrade; Humidity 20% - 85% Instructions for use: Connect the power supply and equipment, the measuring temperature is displayed, press the "SET" button, press " + or - " to set the desired temperature (long press " + or - " to quickly increase or decrease), press "SET" to confirm the setting and return, controller automatically performs the relay ON/OFF. the thermostat output is 10A relay, meet a variety of high-power loads. LED Indicator: LED off indicates the relay off; Lighting, indicates the relay is closed. Digital LED Tubes: "LL" indicates sensor open, "HH" indicates overrange, the relay will be forcibly disconnected; "---" indicates high temperature alarm Long press the "SET" button to enter the main menu settings, press " + or - " to switching between P0-P6, then long press "SET" or 10 seconds without keystrokes to confirm the setting and return. Package Included: 2*W1209 12V DC Digital Temperature Controller Board
F**M
This unit needs to be sent with instructions! This should help you all.
So far so good. I REALLY wish these came with instructions! But I figured out the P0-P6 settings.P0 - Switch between relay on when temperature is above set threshold, or on when set below threshold. (C & H indicate cold or hot triggers the relay to open.P1 - Hysteresis setting. If this setting is 2 (C), and you set your unit to switch on when cold, and 30C or below is is reached, the relay will turn on, When the device warms up past 30C it won't flip the relay until 32C (30C + 2C = 32C). This is to help prevent your heating/cooling system from flipping on and off rapidly as your device hovers around the set temperature.P2 - Max temperature so someone fooling around with it can't set your incubator to 50C and kill your eggs or overheat your PC.P3 - Same as P2 except lower limit.P4 - Temperature correction to adjust for inaccuracies in the thermometer's reading. Use this to calibrate the unit with a known good thermometor.P5 - Delay in minutes from when the temperature threshold is hit, and when the relay is thrown.P6 - Apparently this is an audible alert. I turned this on and my unit reads HHH and I had to turn it off to use it again.
M**E
Be careful with these
These units work well. However, there is no warning in the rather scanty docs about exceeding around 12.6V. I have destroyed 4 of these, having them powered by a 12V system that is charged to 14.5V every day. I finally figured it out, and now have a 1W 12V zener and a 20 ohm resistor connected so as to prevent this happening.I updated this review from 3 stars to 4 when the distributor offered to send me 1 replacement. That's fine, but the problem, which is one of specification and communication, still remains. In fact no docs are sent with the items. You have to go get them from mpja.com.
Z**X
Cheap, effective, no instructions
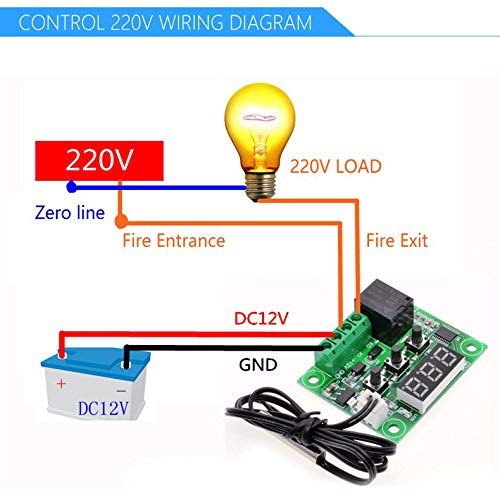
I purchased this product for a little side project. I wanted to add a 12v fan to cool the charging transformer in a battery backup when it is charging on commercial power, but didn't want the fan to run 24x7. The UPS is no longer charging the small 7AH 12V batteries, but rather two 90AH 12V batteries.Installation of the device in the UPS case was pretty simple, but wiring and configuration was a different challenge since this product comes with absolutely no documentation. Keep in mind that this unit only deals with Celsius. If you want to know Fahrenheit, you'll need to convert it.Fortunately, some other reviews here have links to instructions and wiring diagrams.To wire it for 12V power to the controller board **AND** to the load device (fan in my case), do the following:1. Connect the 12V power source to the +12V terminal2. Run a short jumper wire from the +12V terminal to the K1 terminal, tighten down both +12V and K1 terminals.3. On the 12V device, (fan in my case), connect the positive power wire to the K0 terminal and tighten the terminal4. On the 12V device, (fan in my case), connect the negative return wire to the GND terminal. Also connect the negative return wire from the main power source to the GND terminal. Tighten down the terminal.To program the device for running a **cooling** fan like I did, do the following:1. Short press "SET" button one quick time and set the desired "turn off" temperature with the "+ or -" buttons. This is the temperature that your fan will turn off once reached. Once you have your "off" temperature selected, press the "SET" button again.This should get you going. If you set the temperature to 30C, the default swing temperature is 2C. This means that the temperature probe must get to 32C before the fan will turn on. The fan will run until the thermal probe drops back to 30C, then shut off.If you want to change the default swing temperature from 2C, do the following:1. Long press "SET" button until P0 shows on the screen. Press the + button until P1 is displayed. Short press "SET" button to modify that value. You should see "2" which is the current default setting. Press "+ or -" until the desired temperature is reached, then short press "SET" button again to set the new value.If the main "off" temperature is set to 30C like the above example, and you set P1 to 10, then the thermal probe would have to get to 40C before the fan kicks on. The fan would then run until the thermal probe reaches 30C before shutting off.
M**O
Wiring is the Trick
Figured out how to wire it... the programming is fairly straight forward (default works for cooling, assuming you set the target cool temp), but the wiring has a bit of a trick.+12v Power needs to be plugged into two places, +12v and K1 <-- That's the trick-12v Power goes to GND+Load goes to K0-Load goes to GND
R**S
Good product, amazing price.
For what it does, the price is amazing. On mine, the relay is marked 20A for both 125V AC and 14V DC. Current draw is 22mA "off" and around 75mA with the relay and LED on. Using mine in cooling mode, the turn on temperature is the base temp plus hysteresis and the relay turns off when the temp goes back down to base temp. IMPORTANT: Just changing the base temperature does not save to NVRAM on mine. Going into the "P register" mode and out again does save it. (Press "set" for about three seconds, let go, then press "set" again for another three seconds.) Is this a bug or a feature?
G**E
The only thing that would make these units better would be to include basic instructions in the box
The only thing that would make these units better would be to include basic instructions in the box. Fortunately, it is possible to find wiring instructions and a rundown of the functions if you search hard enough on the internet. Note I found some instructions that suggest the load's positive and negative wires should go to K0 and K1, respectively. This is not correct - at least for the unit I wired up. K0 is positive to the load; K1 is positive from the power source; +12V is positive from power source; GRND is negative from power source. You'll also have a negative from your power source to your load. Press and hold the Set button for 5 or 6 seconds to enter the programming mode. P0 is how you switch from cooling to heating mode. The Amazon product description covers everything else, I think.
A**R
Works as expected
Bought these (only in fact needed one) to control solar powered ventilation fans in my greenhouse. Can be configured to operate in cooling (on when set temperature exceeded) or heating (on when below set temperature). There's a couple of degrees hysteresis so it won't oscillate too much. The LEDs show the current temperature and it seems fairly accurate. The temperature probe supplied has a reasonably long lead and is potted into a metal cap, making it waterproof (the board itself will of course need protecting in a box).Configuration is simple, albeit a bit tricky to figure at the start I found. It essentially comes down to up and down buttons to set the trigger temperature. The settings are non-volatile so survive power loss.Was a bit concerned about the current drain given I'm using it in a solar/battery environment. However, even though it has pretty bright LEDs they have minimal drain on my small Li-Ion pack (not enough to discharge it over night anyway).
C**N
Great!
Used to automate a fan heater in a campervan, turns on when there's enough heat to transfer turns off when it gets cold, perfect.
S**S
Temperature switch
Am using them to operate cooling fans so only light load but they work well and have many settings
R**Y
Small and compact with good settings
Really small board all that’s missing is some clear instructions, connected it up to turn a cooling fan on in my av cabinet and 2 days in it seems okay
D**B
hiletgo
works well but would be better if instructions were included
Trustpilot
4 days ago
2 weeks ago