


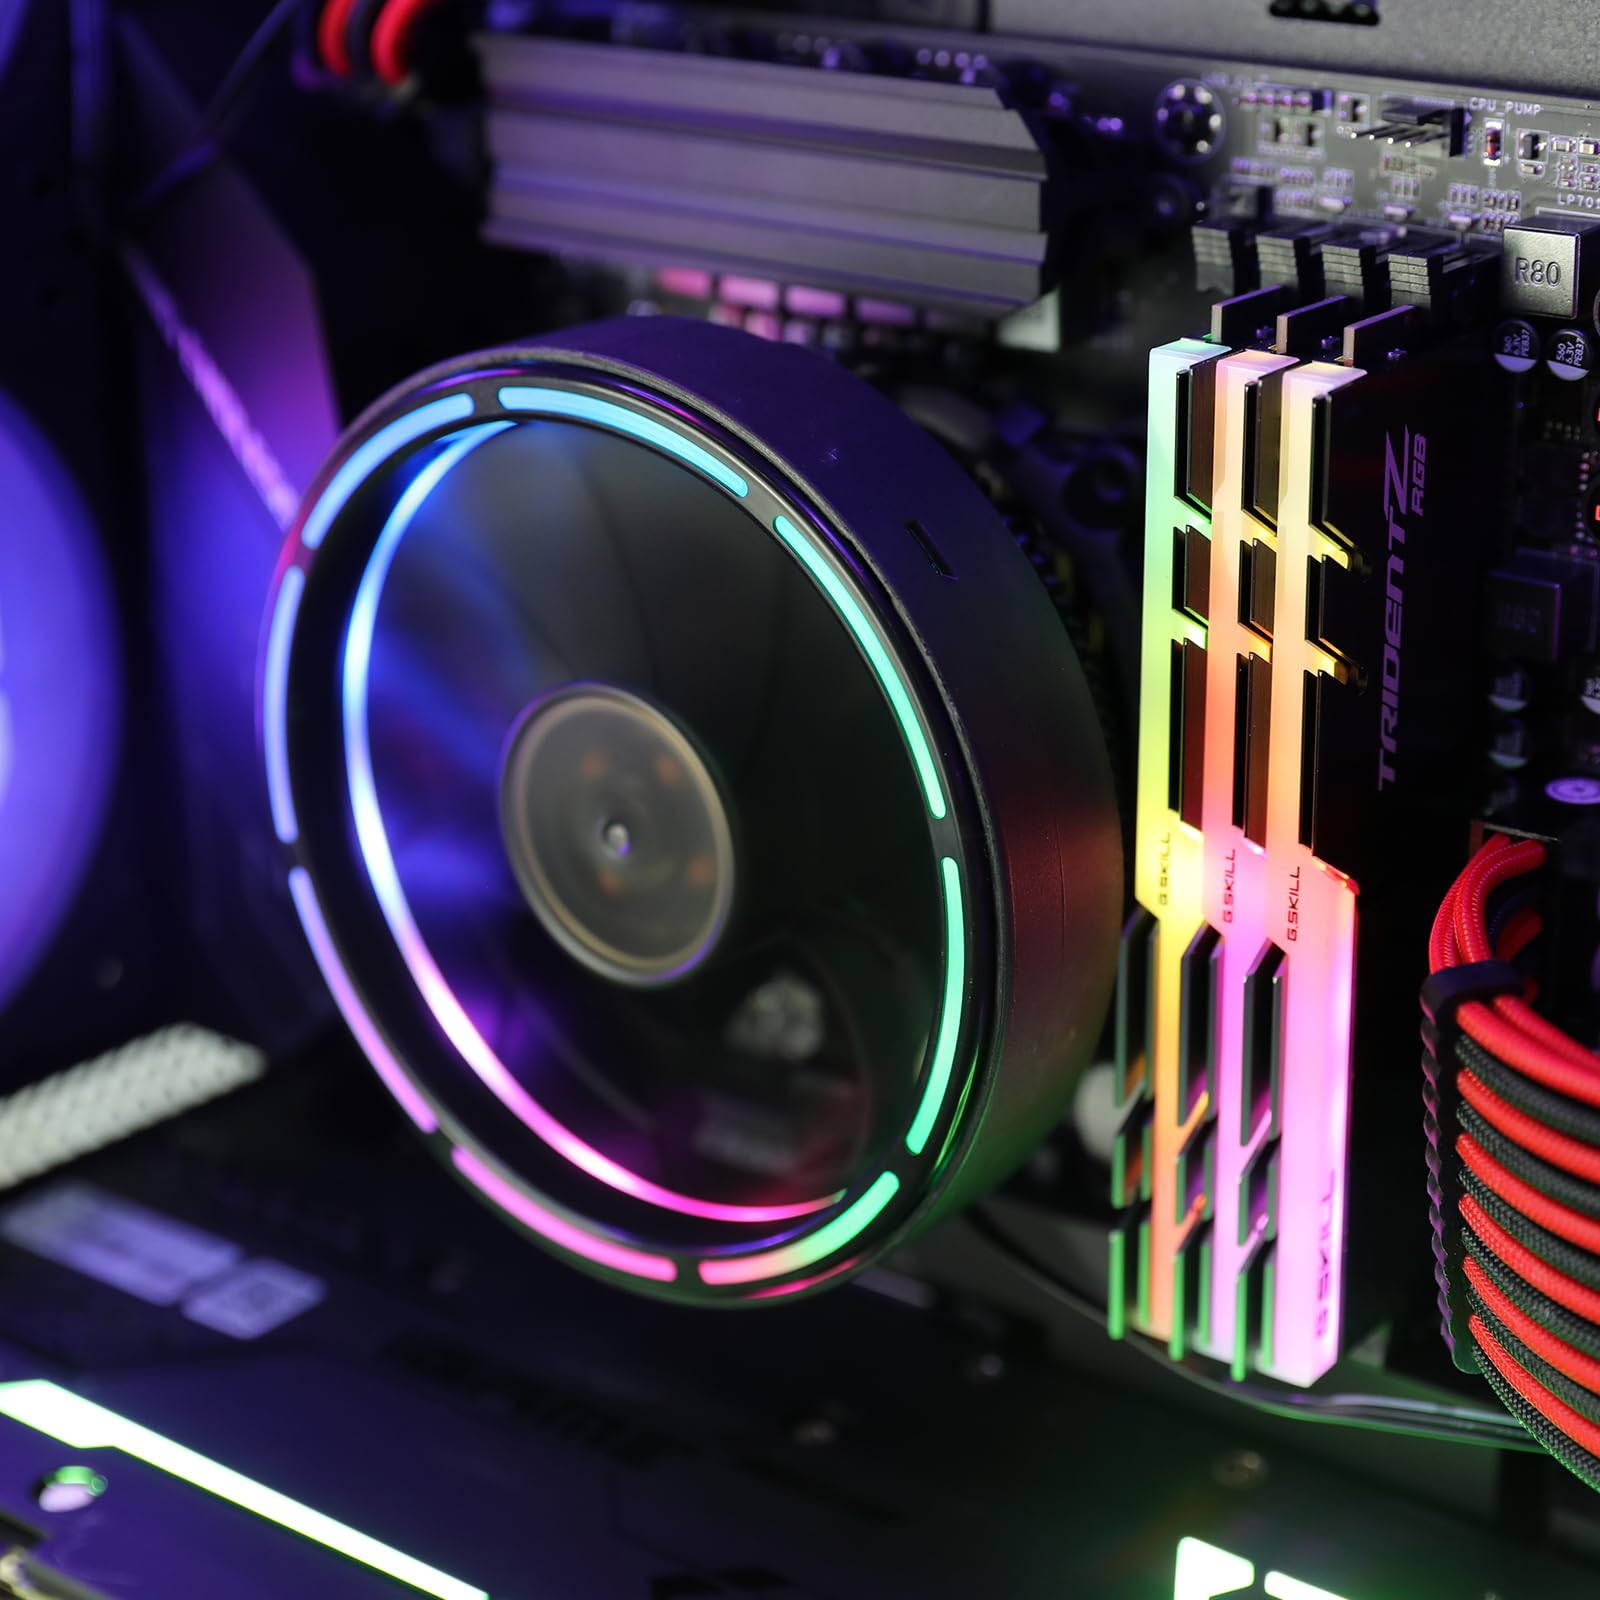
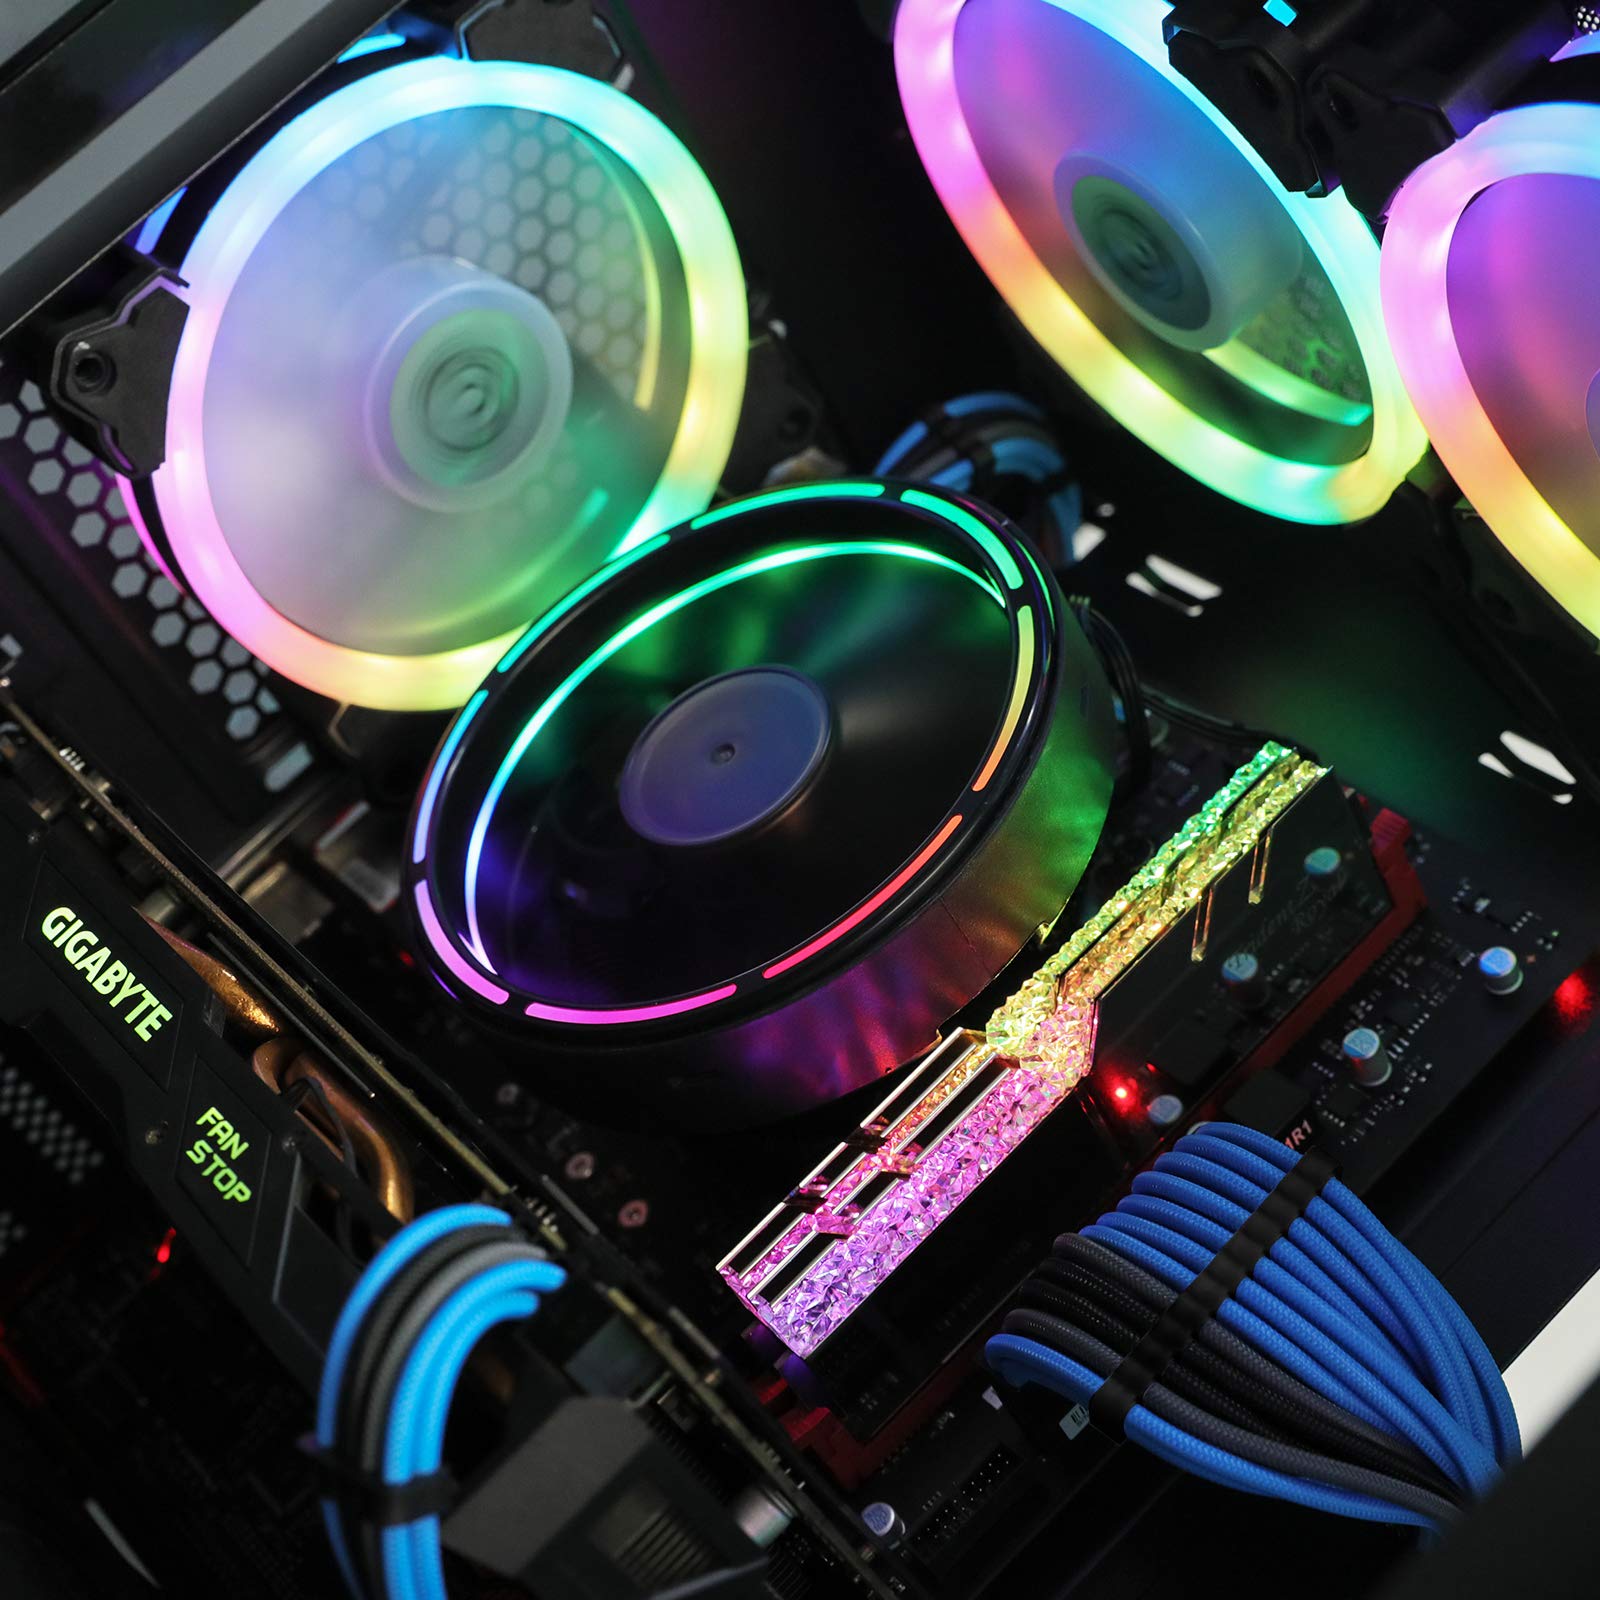
🌈 Cool in Style: Where Performance Meets Aesthetics!
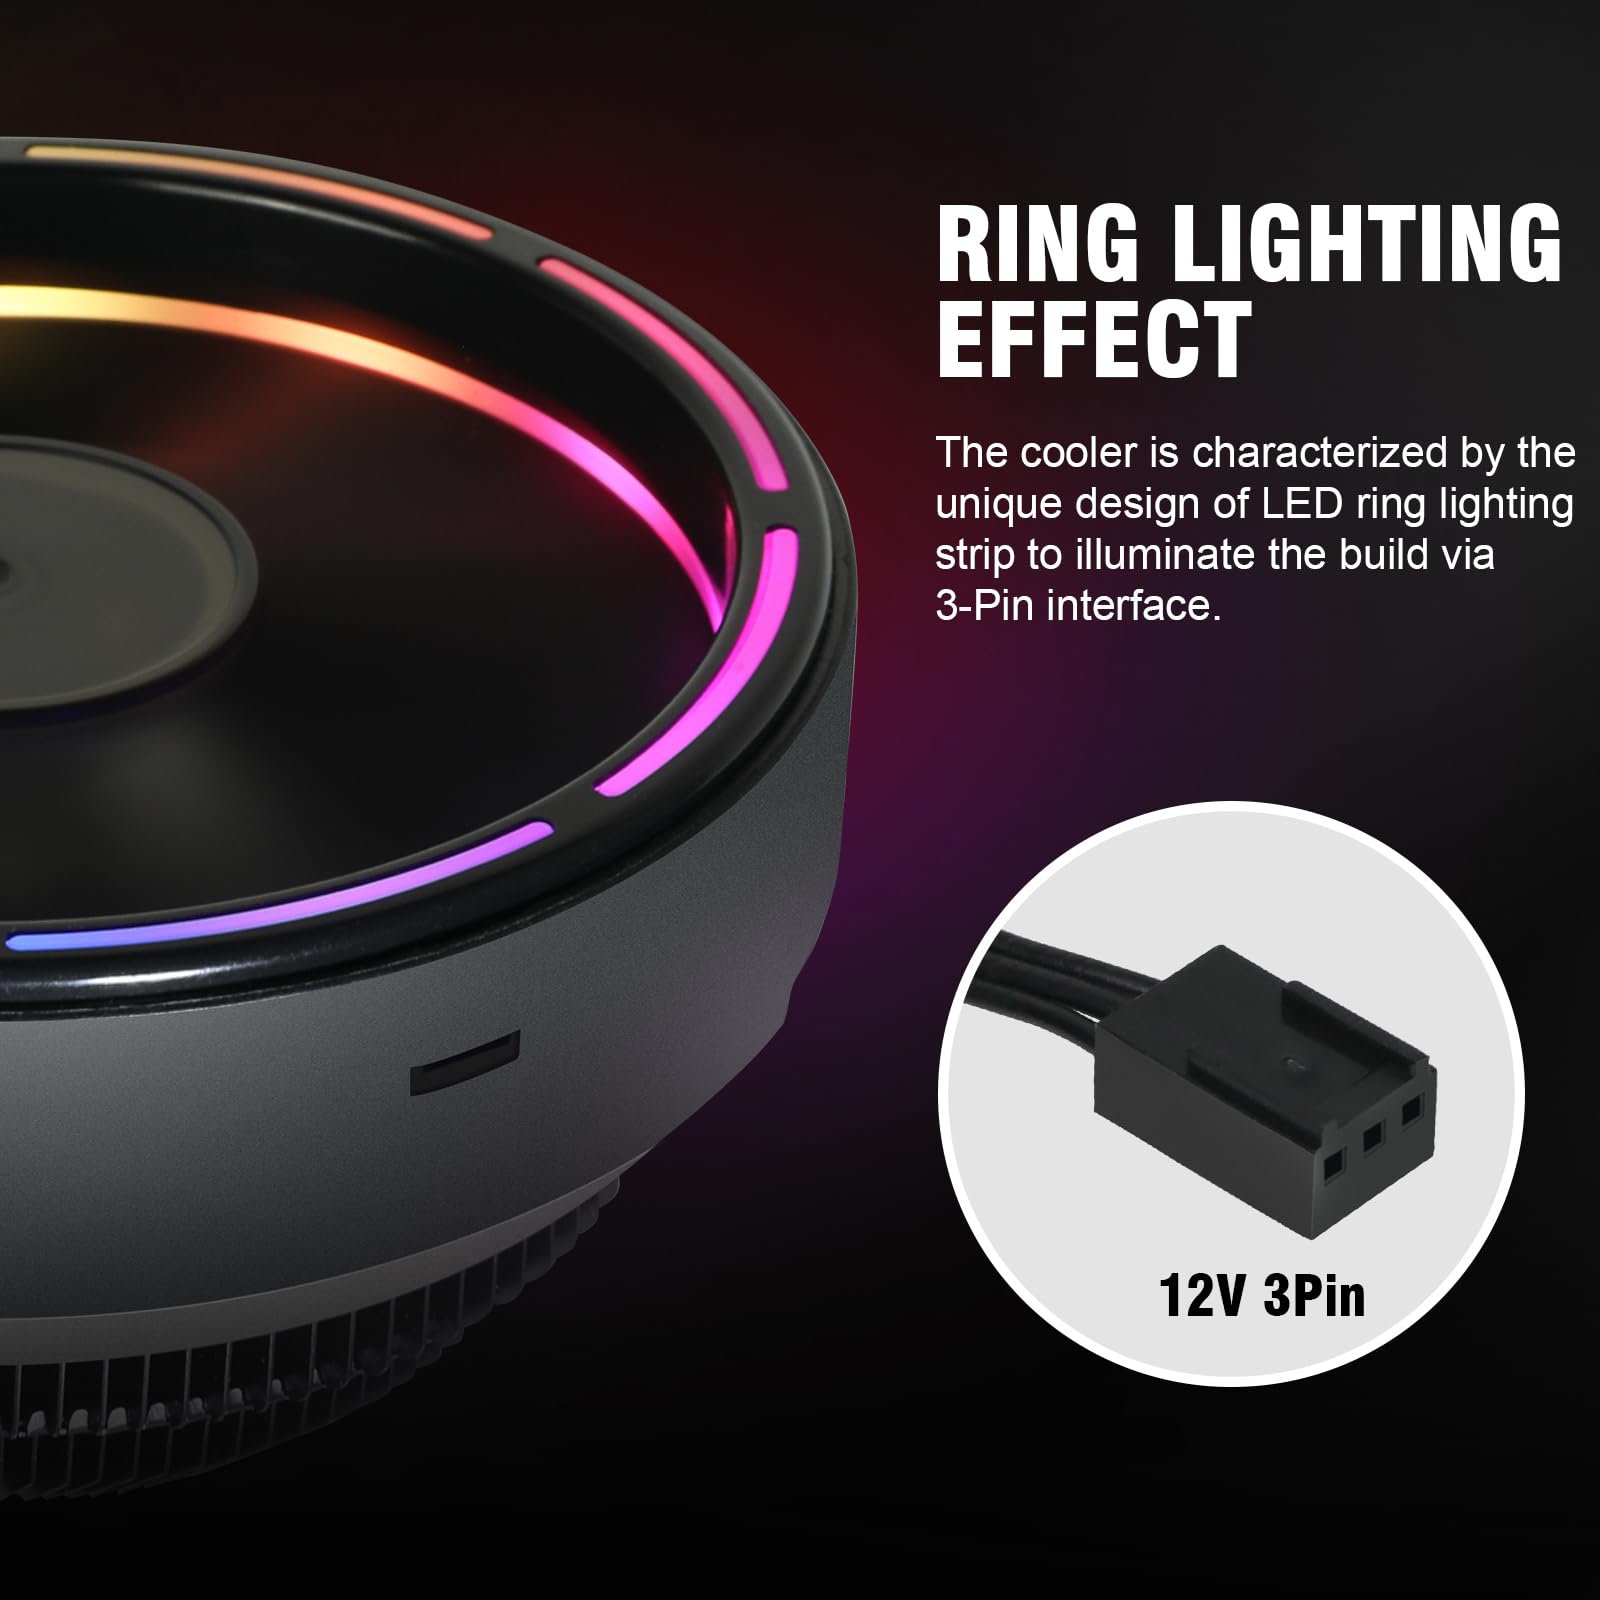
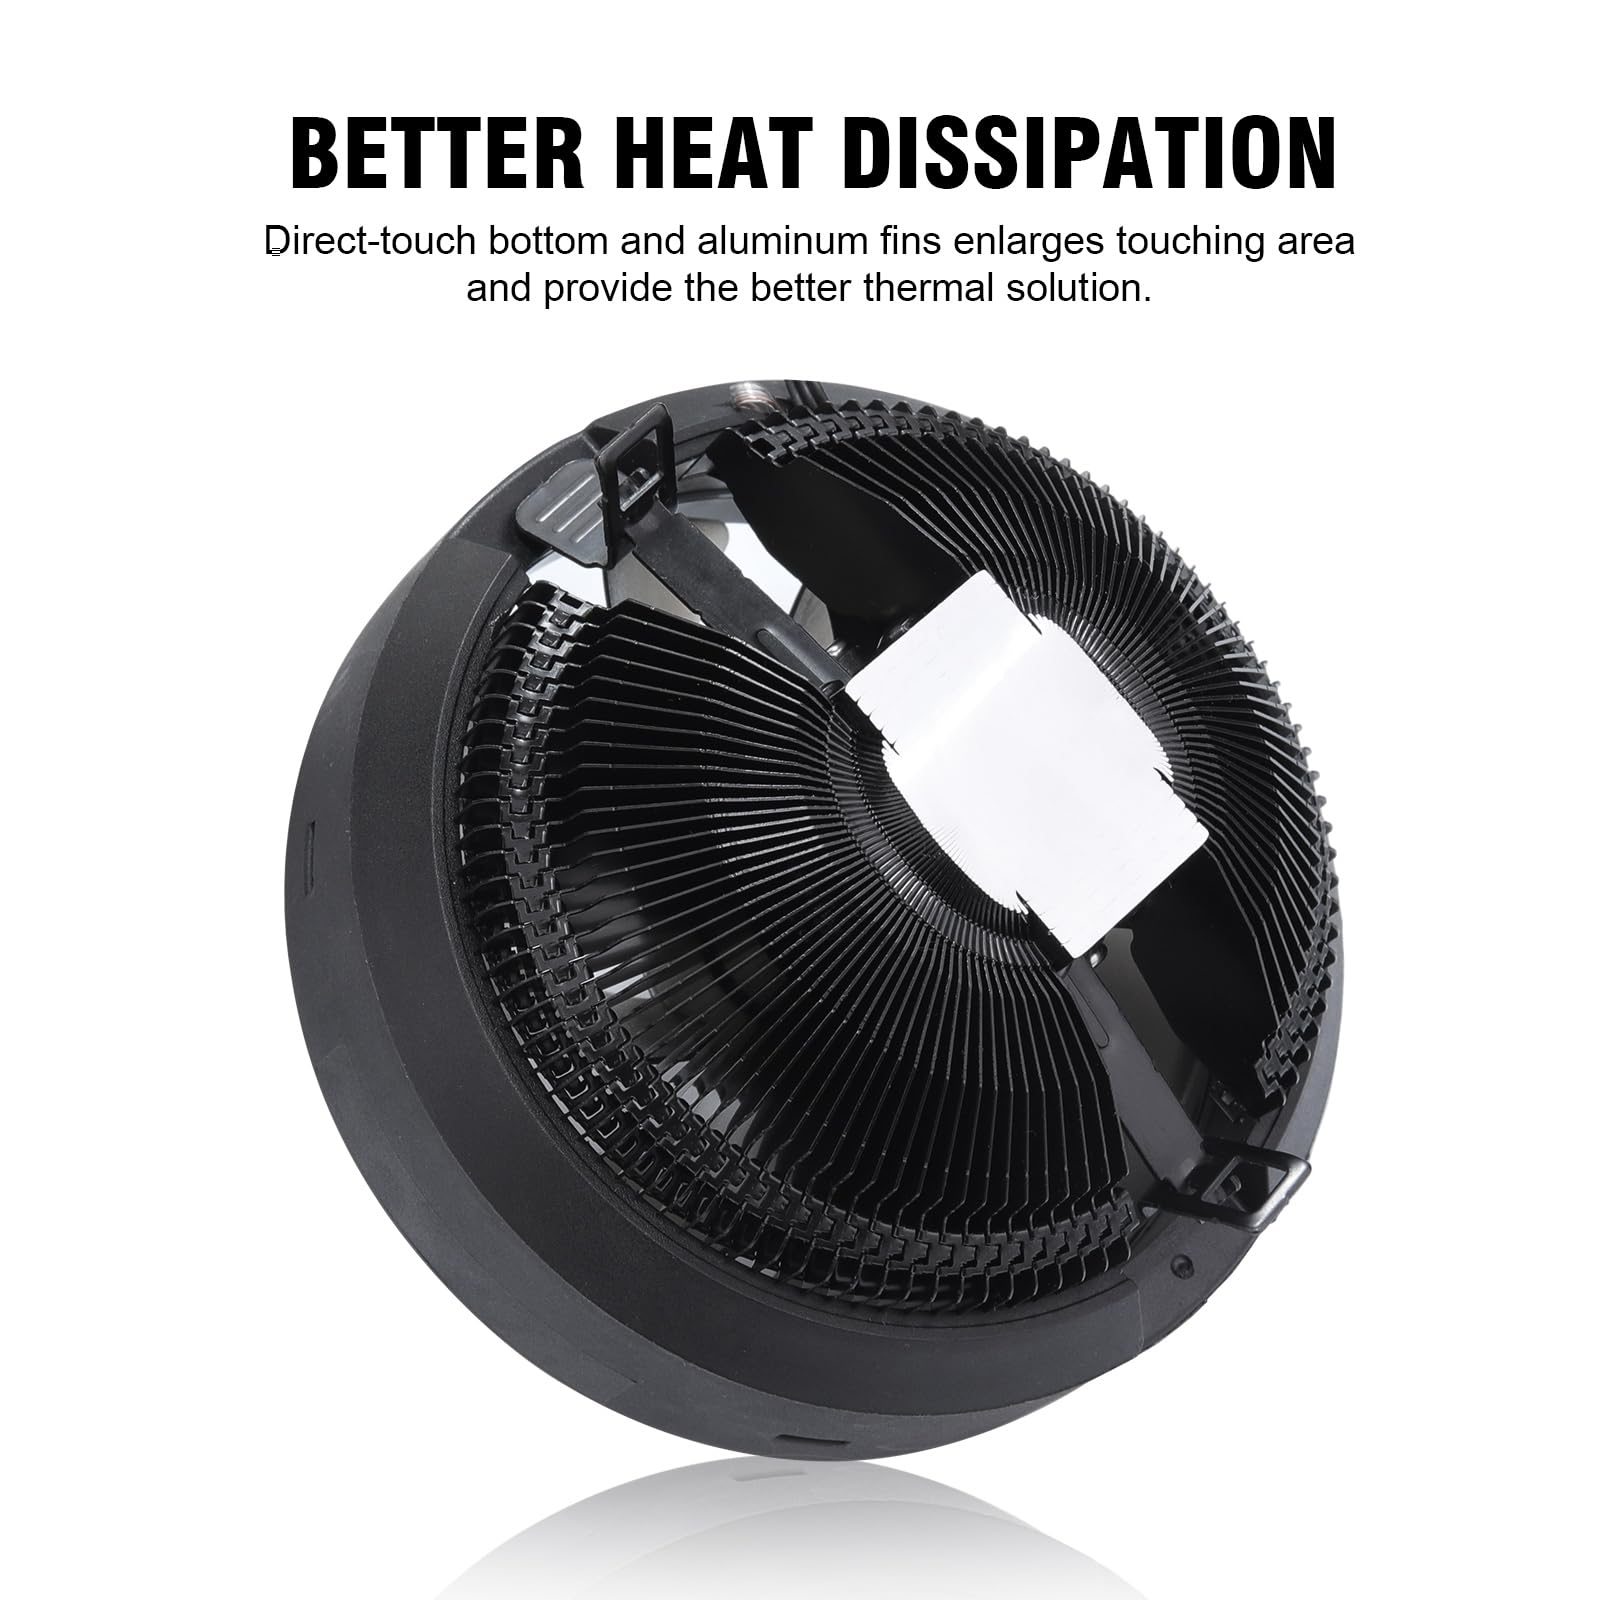
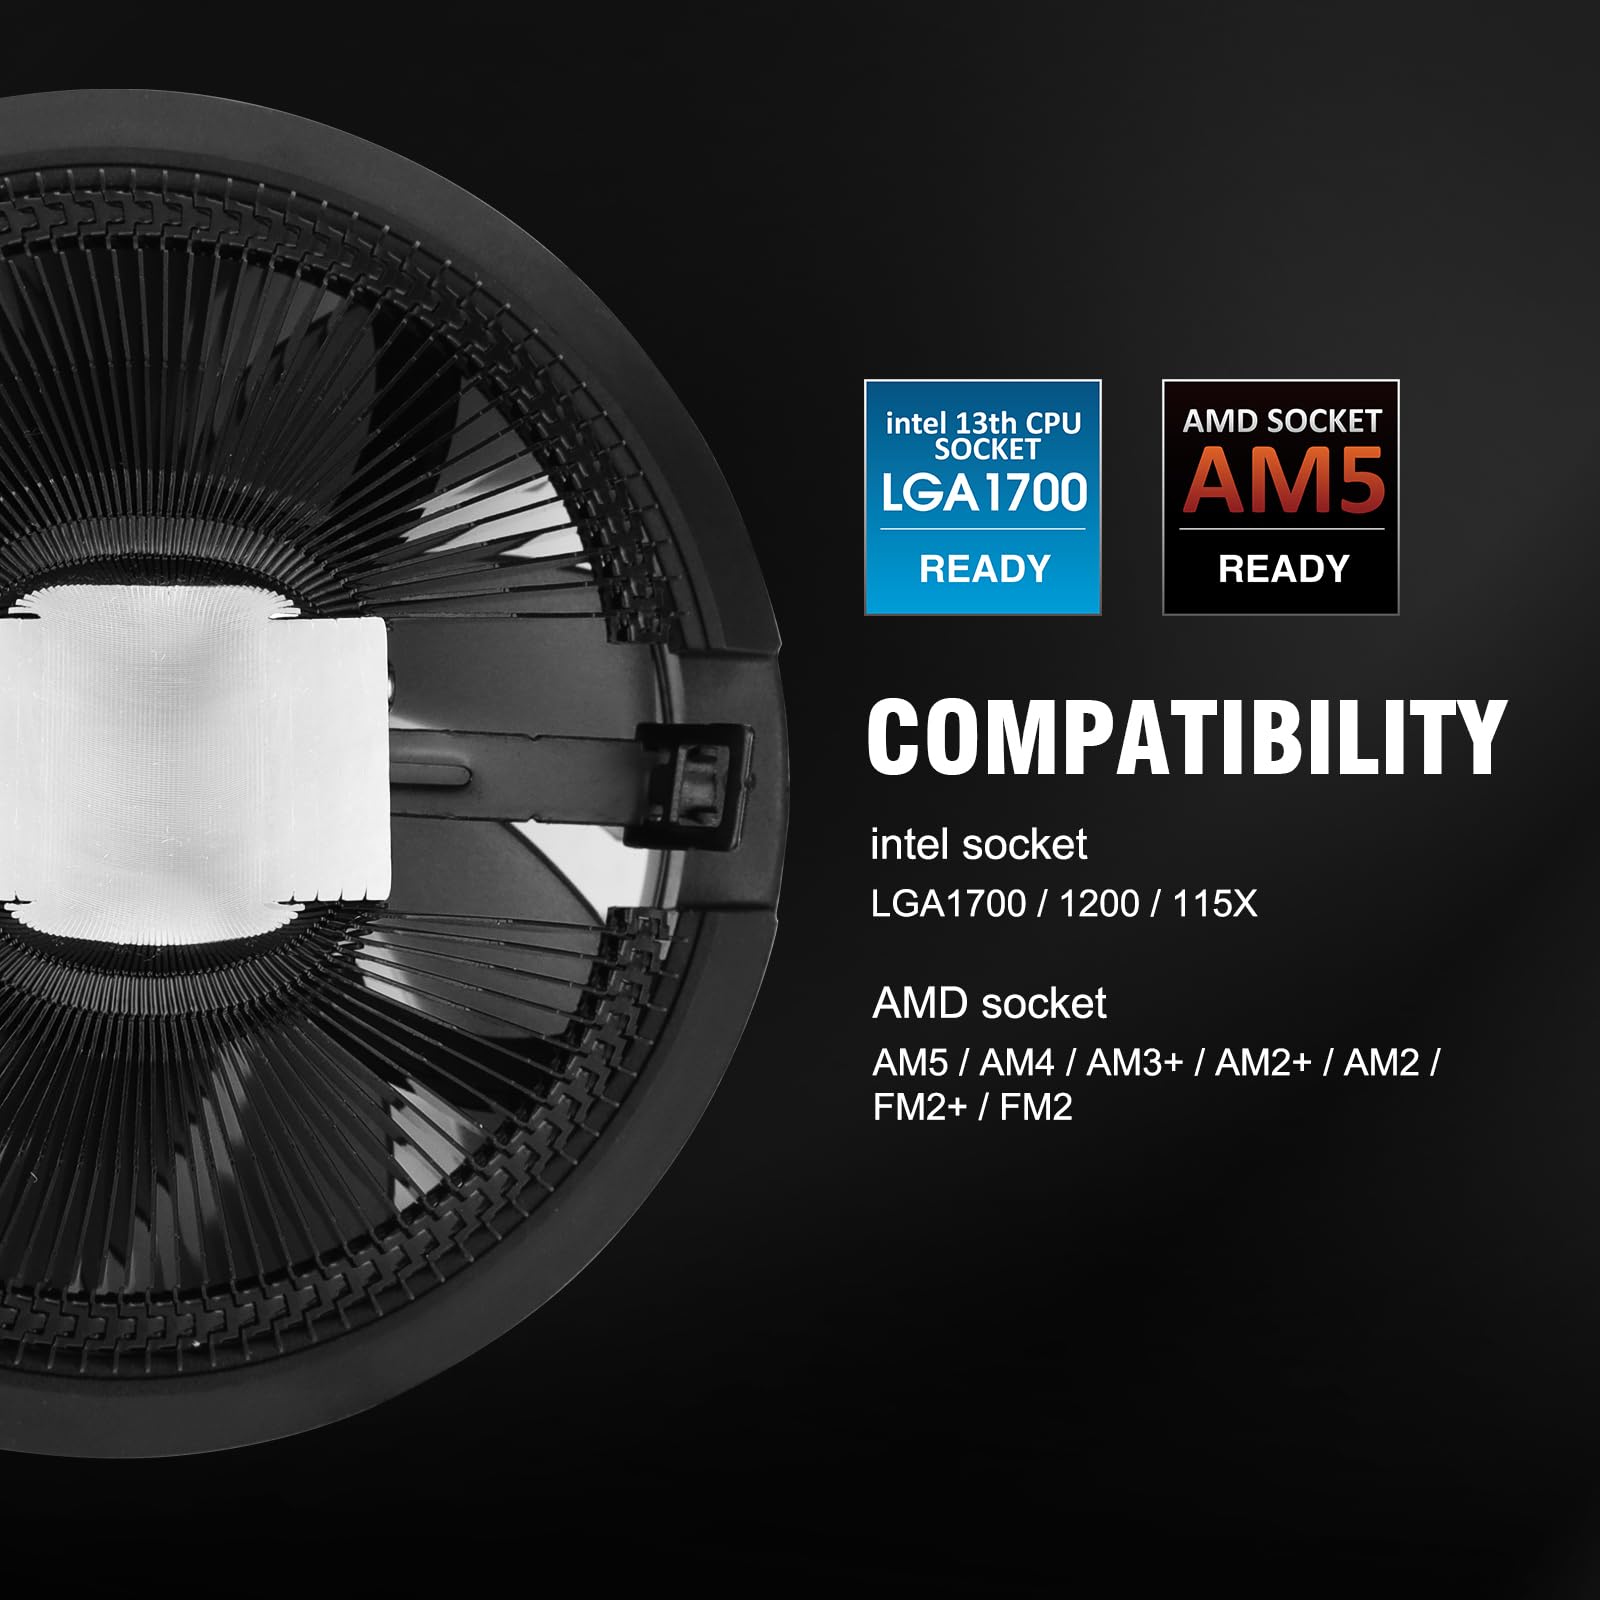
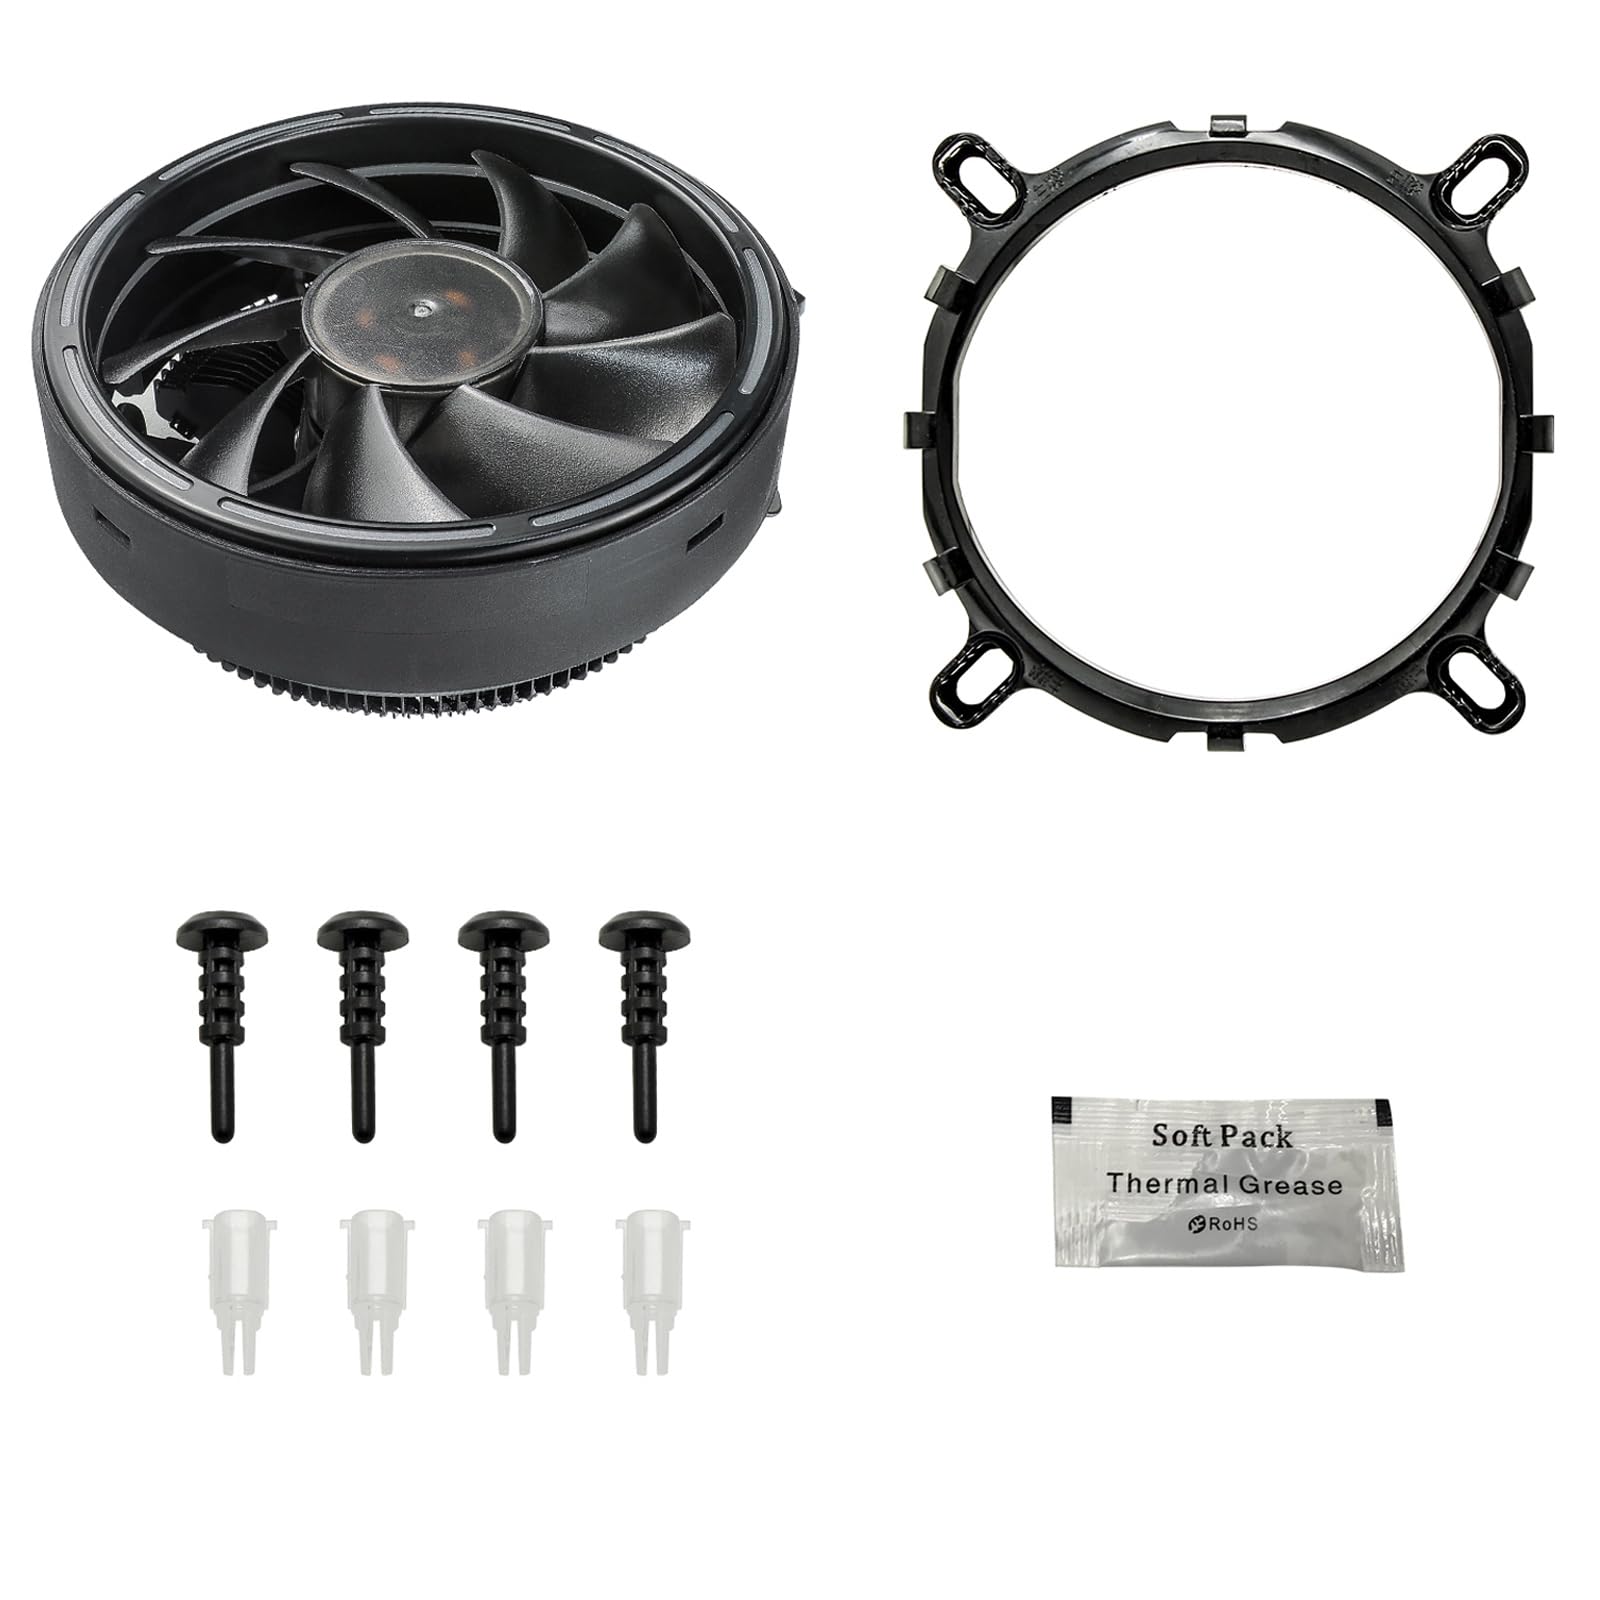
The Vetroo M2 CPU Cooler combines striking RGB LED aesthetics with high-performance cooling capabilities. Designed for compatibility with a variety of Intel and AMD sockets, it features anodized aluminum fins and direct contact technology to ensure efficient heat dissipation. With a maximum airflow of 56 CFM and a noise level of just 26 dB, this cooler is perfect for gamers and professionals seeking both style and substance.
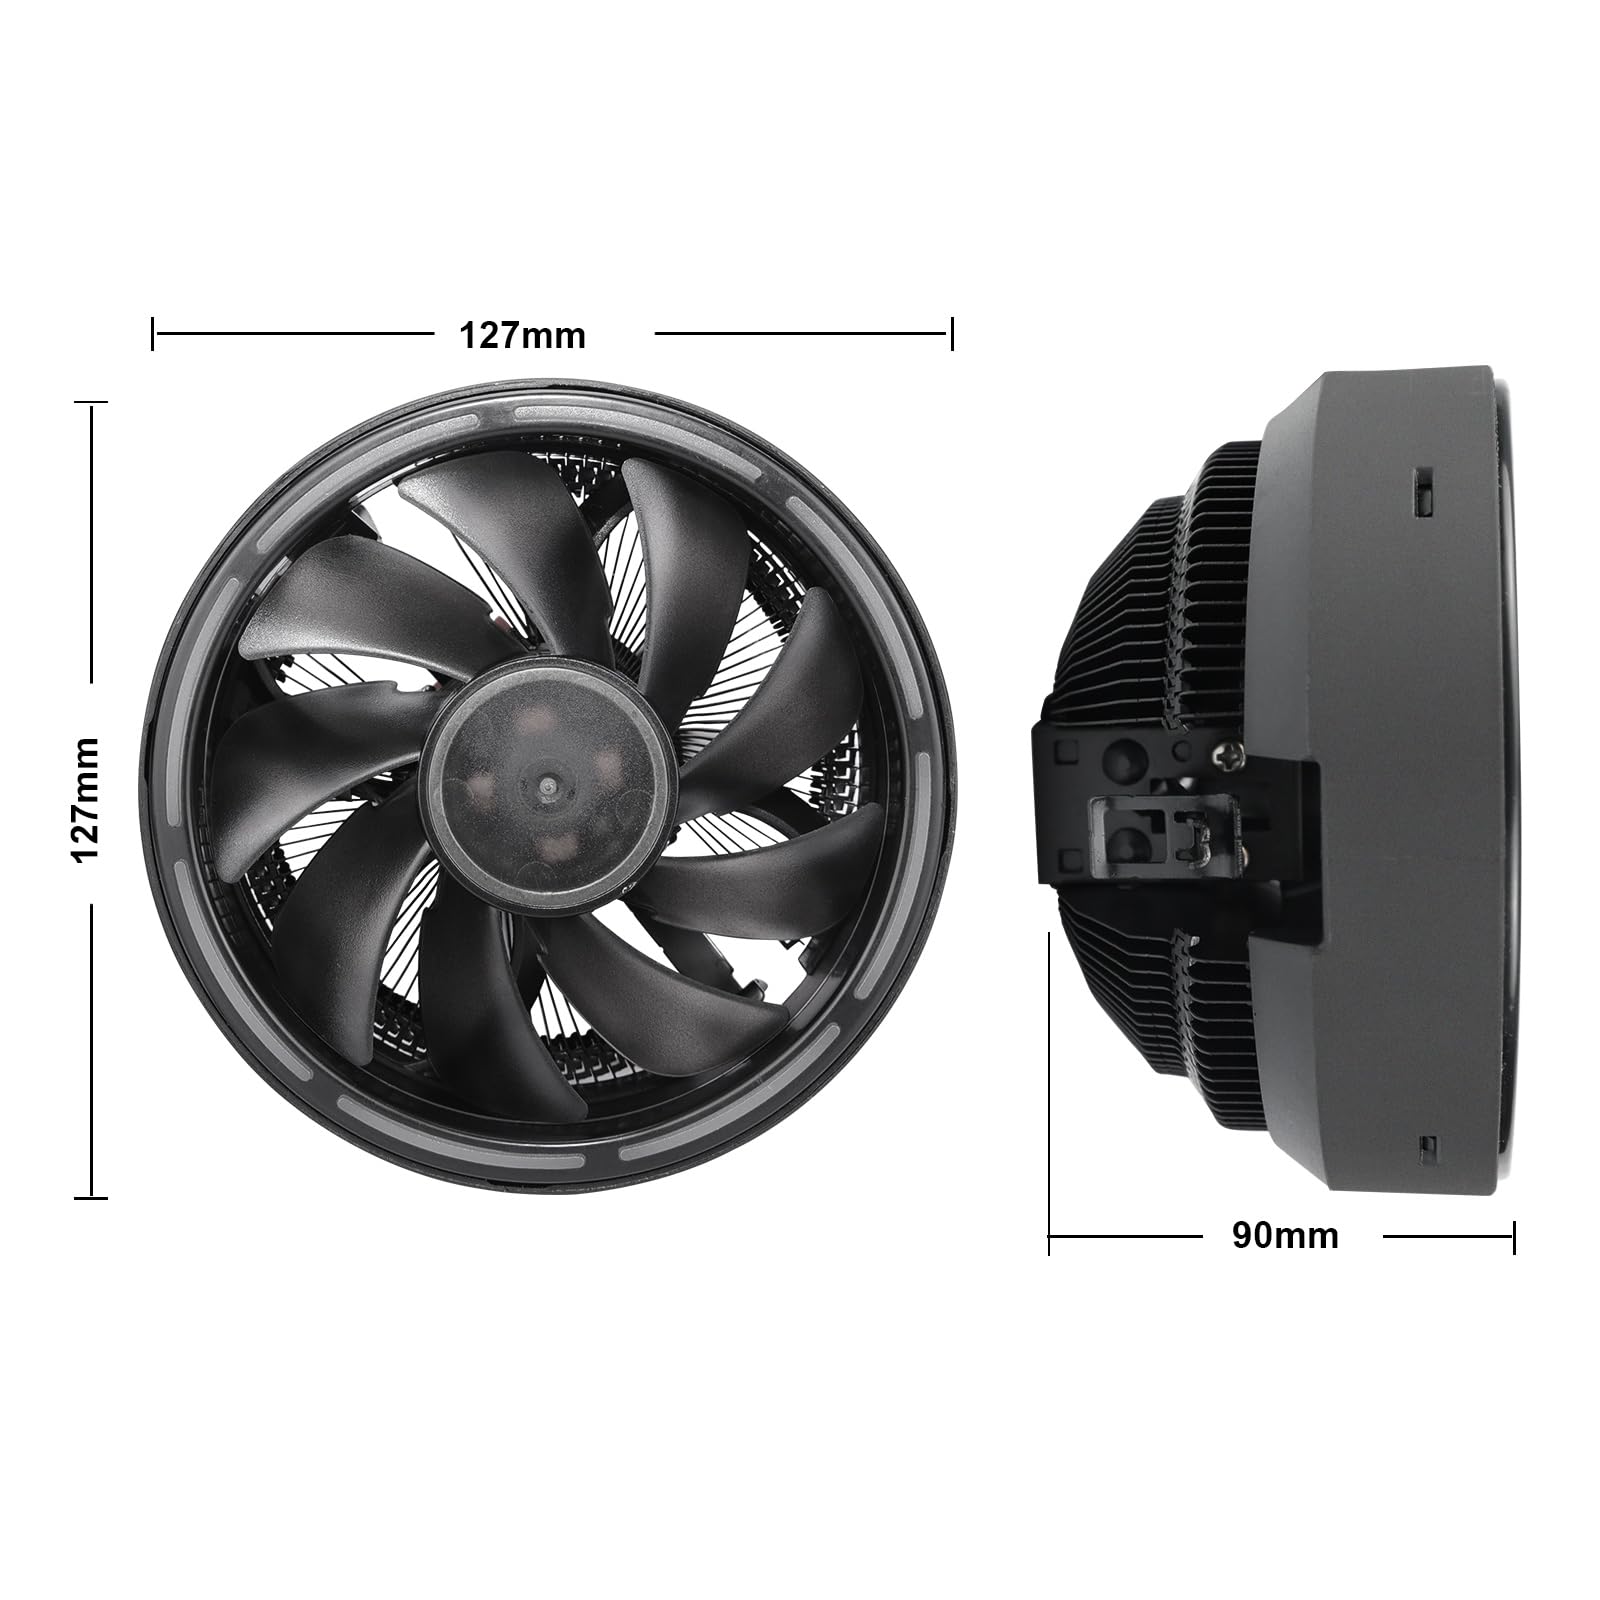
| Product Dimensions | 5"L x 3.54"W x 5"H |
| Brand | Vetroo |
| Power Connector Type | 3-Pin |
| Voltage | 12 |
| Wattage | 90 watts |
| Cooling Method | Air |
| Compatible Devices | Gaming Console |
| Noise Level | 26 dB |
| Material | Aluminum |
| Maximum Rotational Speed | 1600 RPM |
| Air Flow Capacity | 56 Cubic Feet Per Minute |
| UPC | 794832618860 |
| Manufacturer | Vetroo |
| Number of Items | 1 |
| Item model number | M2 |
| Item Weight | 13.2 ounces |
| Item Dimensions LxWxH | 5.04 x 5.04 x 2.95 inches |
| Color | Black |
| Power Source | DC |
| ASIN | B08M5C4V4S |
| Date First Available | October 29, 2020 |
J**K
Effective CPU Cooler for Older FM2 Socket: Great Value and Performance
This CPU cooler is bigger than it looks, but it still fits perfectly in my case. I have an older FM2 socket CPU and needed a better cooling solution. This cooler was one of the few options that fit my case and provided ample cooling. Although it comes with a 3-pin fan, I found a device that converts the 3-pin to a 4-pin PWM for about $10. This converter isn't just a simple adapter; it includes a MOSFET and other control circuitry to make it work.The installation process can be a bit tricky to clamp down, but with patience and care, it's manageable. Remember, slow is fast and fast is smooth. While you may need to adjust it a couple of times, I don't think it's worth taking the rating down for this small, minor issue.Overall, I'm happy with this cooler, not just for the price but also for its design and performance. It works well for my auxiliary communications computer on my desk. The affordable price is just an added bonus and a darn good one at that.
M**X
Nice cooler, but the mounting system requires Mage Level 100 skills
The media could not be loaded. Great cooler overall. It is super-hard to install on older motherboards, especially with shields on top of various components. I am not new to assembling computers, and this mounting system actually forced me to read the instructions. First, you need to make sure you put the pins properly. Next, while you attach one end of the metallic bracket that holds the fan, you have to carefully poke your finger thru the fan in order to push hard on the other end of the bracket, to attach it securely. I was desperate at some point - since on my motherboard there was no way for me to access the bracket from a side. This finger pushing trick saved the day. Overall it looks nice. There is no ARGB control, it will just cycle thru random colors.Summary: great cooler with good performance, not so easy to install. Good for cheap builds.
M**L
Fair for the price. Some comments and tips from Frankenstein.
Fair as in just or honest. I got this fan to doll up my partner's work computer. We game together occasionally so a high-end beefmaster cooler isn't appropriate for this use case. This cooler dropped the idle temps by about 11 degrees C, which is a significant foundational improvement. It holds up well to heavy workloads. Definitely worthwhile to protect your CPU investment. The software she uses for work can be pushy at times, so keeping things frosty is important for extending the life and stability of this machine.The RGB is a funky bonus though it isn't something either of us actively seek out. I would have preferred a four-pin fan without RGB for a similar or slightly higher price, or a four-pin with RGB at a higher price. From the perspective of a spoiled rotten Noctua user, this fan is loud. This is not a fan I would want in a box that sits on top of my desk, but if you keep your case (properly mounted) under your desk, the noise shouldn't be bothersome. Again, a matter of perspective and this is by no means counts against the product.I took a star off for the awkward lever mounting system, plastic mounting ring (it works fine but feels cheap compared to an otherwise sturdy cooler), and 3-pin fan that favors form over function. That being said, this is a straight-up win. It says a lot about what Vetroo has accomplished if I can have these criticisms and still recommend the product. Try it for yourself. It's an excellent value....and now the buildingI was installing this cooler into an HP Envy TE01-xxxx. The cooler is round and space-efficient such that medium and low-profile ram sticks will fit underneath just fine and can be removed without taking off the cooler. The Baker Motherboard in this system has permanent cooler threads, so if you want to install this cooler the plastic push pins won't work. Push pins are the worst I hate them. If you're working on a pre-built, there is a strong likelihood you will run into this issue. It's not a deal-breaker. It just requires some creativity.With that in mind, if you too are working with a screws-only situation, I recommend purchasing a pack of mixed m3 screws and nuts, such as this DIWISHKEY kit: https://www.amazon.com/gp/product/B07VT199JR/ref=ppx_yo_dt_b_search_asin_title?ie=UTF8&psc=1. These screws are good for mounting hard disks and so many other components that you will never regret having a bounty of them available. I also recommend tweezers if you plan to follow my steps.To install this cooler, I recommend completely removing the motherboard. You will use four 20mm screws and four nuts to mount it. The heads of the screws are too narrow to hold the feet of the plastic mounting ring. For this reason, you will use a nut as a washer to fully and securely span the holes in the feet to mount the ring. The guidesheet will instruct you to install the ring first, and then latch the cooler onto the ring. This seems to work well for a lot of folks, which is great. I found that this order of things applied an uncomfortable amount of uneven pressure to the processor, so I instead put the heater in the ring and then guided the ring over the mounting holes while palming the cooler like a softball.Use your judgment. The point still stands that you should properly align the bolts and apply even pressure throughout to provide firm, uniform contact. If you do it my way, you'll be working in tight spaces and using fine tools around the cooler. It's not so bad since you can rotate or move around the mobo in any way you need to get the best angles. Whatever you do, don't forget top apply thermal paste!-Keep in mind that you will still want to align the screw holes with the plastic push pin notches. For socket LGA 1200. this means you will want to align the screw holes with the middle notch.-Now prep your nuts and bolts - screw a nut about 1/4 of the way down all four of your 20mm bolts.-Apply a pea-sized blob of thermal compound (included in the kit) to the processor-Place the cooler over the processor - the thermal compound will provide a small amount of adhesion, but be careful not to move it too much and smear it everywhere-Align your first bolt with the middle notch and gently screw it in with an L-shaped hex key, just a few threads of catch. Tweezers and a long key are helpful here - roll the key between your fingers like you would a q-tip. There should be little resistance on the threads.-The nut should help to gently hold the foot of the ring in place and keep the bolt standing upgright.-Now go to the opposite corner and align that bolt with the middle notch and screw it in, again just a few threads of catch until the nut gently holds the shoe in place. Repeat for the other two corners.- You should now have four bolts sticking up from the shoe. Now give two or three turns on one corner, two or three turns to the opposite corner, then the other two. Repeat This pattern three more times to get a firm, even pressure.-From here, sink those screws following the same opposing corners pattern. Once the head of each screw has reached their respective nut, pick up the fan by the cooler to make sure it is attached and flip it over. Buy now there should be a little bit of screw end sticking out of the bottom of the mobo. This is a good start.-Flip the mobo back over and give the screws a few more gentle turns. The first three or four turns should be easy, then you'll start getting resistance.-Gentle-gentle on the four corners - by now the short side of your hex key should be screwing on the heads and you should be leveraging with the long side.-When the leverage stops on all four corners, flip the board again. You should have about two mm of screw sticking out the bottom....and that did it. I left it running a Kombustor test overnight and everything was great. Lots of tinkering and no regrets.---Update 9/24/22: it's been a few months and things are going well. Thing is loud. It's actually okay when sitting at the desk where there's a large slab of wood between you and the fan, but sitting on the couch in the same room there is a noticeable hum. Still fine for the price.
U**P
Cheap but good (just like me).
I was looking for a quite inexpensive fan simply for the task of temporarily reassembling my old computer to move items over from my old installation to my new computer. (Really long story of this ill-fated computer build, but I'll be short and say making an image backup on a BIOS computer, and trying to restore it onto a UEFI computer didn't work.I didn't expect much, but this cooler did the job remarkably well. If I had to put together another computer that didn't have to be quite as high performance as the one I was building, I would likely use this model again. It was relatively quiet for basically being a big fan. :-) It did a very effective job of keeping my older processor cool. The only reason I took a point off of the ease of installation is that I have always had trouble with this particular type of clip to get fans onto processors. I definitely prefer a mounting system more like the one I have for the heftier cooler on my current computer. It does not rely on a big bowed clip across the top of the processor, like this one does. However, this is a very minor issue, and rooted more in my own ineptitude than anything else. The clip system does work remarkably well once it is on.
J**N
Damaged before shipping
The item *seems* like it would be what I'm looking for, but I won't know for sure until a replacement is sent. Fan shroud was completely destroyed, but the box was untouched: product was damaged before it was ever put into the box.Simply based on that, I'd have to give a single star. Fast shipping, decent price for the quality, but absurdly terrible quality control. Good thing I intend to use this in a backup computer that isn't going to be doing much work.Update: Seller did replace item, very quickly. Changed rating to 3 stars to reflect my respect for that. The design for the clamp mechanism is pretty terrible, but it gets the job done. I definitely do not recommend this CPU cooler for anyone who is new to building computers, as it takes a lot of force to get it seated correctly.Second update: Cooler is worse than stock Intel cooler. Temps ramped up until thermal throttling, and then never came back down.
J**I
Pretty, très jolie
Its like they said, keeps cool for the g7400 i have in there. Quiet enough better then the stock cooler i had, hard to imagine that the stock cooler that was in there originally was for an i5 lol anyway. The clips to latch on to the board where indeed a struggle so be gentleCome ils ont annoncé, garde les températures de mon g7400 basse. Bien mieux que l'original que j'avais la d'dans avant. Dure à imaginer que l'original etait pour un i5 lol tk. Les clips pour s'agripper sur la carte sont un têtu un peut, alors sois doux
A**Y
Cumple con su propósito
The media could not be loaded. Cumple con su propósito y hasta ahora mantiene las temperaturas a raya, sin embargo, el cooler solo va a una velocidad y el RGB no es controlable y se puede apagar, fuera de eso, por el precio esta bien.
J**Y
This item was incredible
Installed immediately. Worked straight away. Excellent value for money, and has a great built-in cooling system.
W**L
Cools a Ryzen 3400G adequately
Installed on a 3400G as i didnt have the box cooler but needed something cheap and low profile. Seems to do just fine under gaming loads, around 60c at 50% fan speed. Its actually surprisingly quiet given the fan speed and size. I will say though, under an unrealistic load like OCCT full power it cannot handle a 3400G, it shoots up to about 75c then slowly climbs to 90c before throttling. The RGB is also not controllable, aswell as cannot be disabled.*Advice for those who have trouble fitting*Stick one side on, then to get the other side, stick one finger inbetween the fan blades to push the bracket down and use the other hand to latch it.This was an oversight by Vetroo, as it doesnt seem to be too much pressure, just poor angle of the latch system.
W**2
質感高い
The media could not be loaded. 999円だったのですがとてもそんな値段とは思えないほどしっかりしていました。取り付けはマザーを組み込んだ後だとやりずらいのはAMD方式の宿命なので、取り付けはマザーを外した状態でやるのがおすすめです。ARGBではないのですが十分カラフルに光るし、明るさもちょうどいいです。純正クーラーよりも安いのにかっこいいまである。
Trustpilot
2 weeks ago
1 week ago