
DOWNLOAD THE APP


Customer Services
Copyright © 2025 Desertcart Holdings Limited
DOWNLOAD THE APP


⚡ Delid like a pro, overclock like a boss!
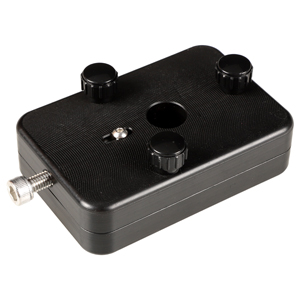
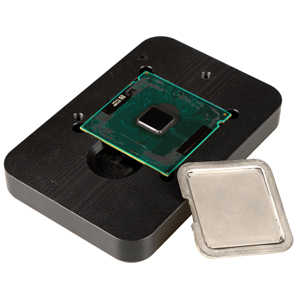
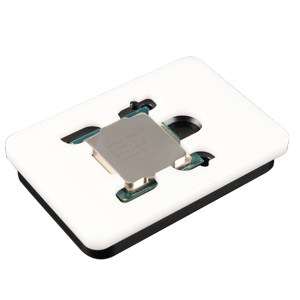
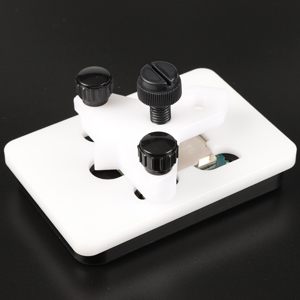
The EG STARTS Kaby Intel CPU Delid & Relid Tool is a precision-engineered device designed for safe and easy delidding of Intel CPUs across LGA 1150, 1151, and 1155 sockets. Compatible with Skylake, Kaby Lake, and Coffee Lake processors, it enables enthusiasts to reduce CPU temperatures by up to 20°C, unlocking superior overclocking potential. Trusted by hundreds of users, this tool ensures a damage-free process with a robust build and clear alignment guides, making it the go-to choice for professional-grade CPU thermal optimization.


| ASIN | B07FM58Z42 |
| Are Batteries Included | No |
| Brand | EG STARTS |
| Customer Reviews | 4.6 4.6 out of 5 stars (286) |
| Date First Available | 24 July 2018 |
| Item Weight | 240 g |
| Item model number | Tool001 |
| Lithium Battery Weight | 10.05 Ounces |
| Manufacturer | EG STARTS |
| Processor Brand | Intel |
| Processor Count | 1 |
| Processor Socket | LGA 1150 |
| Processor Type | Core i7 |
| Product Dimensions | 14 x 10 x 4 cm; 240 g |
V**5
As many people who bought a 8700K have done, I finally decided to delid my 8700K...Yes I was terrified but I have to admit the EG STARTS CPU Delid tool worked brilliantly and took all the worry way. It is extremely well built and was very, very simple to use. I would suggest you go online and look at some YouTube video's as there are many guides on deliding with this type of Delider. The process was very simple and worked within minutes. Using Thermal Grizzly Conductonaut liquid metal TIM, I dropped near on 20 degrees C which made a huge difference to my overclock. My 8700K runs now under full load in Prime95 and AID64 at under 60 degrees C...spectacular to say the least with an overclock to 4.9GHz for 24/7 use and 5GHz when bench testing, completely stable. Anyone looking to delid a Kaby Lake CPU will not go wrong with the EG STARTS Delid tool and it was at a very good price compared to others.
M**9
Just delidded a 4690K as it was getting hot on Core 0 and 1 (90+C) compared to core 2 and 3 (50 C). The metal block should slide freely and butt up against the lid edge of the cpu and ride on top of the PCB. The corner of the cpu with the gold triangle needs to match the corner symbol indicated on the bottom holding block. Take note of this as you install the top half of the holding block. This will prevent shearing off any of the tiny caps inside. Before applying force to remove the lid, take note of the letters through the view port. For me I could only see the "469" of the 4690K. When applying force, the lid should only need to slide two and a half letters to see the text. After removing the lid, clean up the insides and have liquid metal and RTV sealant on hand to complete the process. Allow 24 hours to complete the job. Tip: I used clear fingernail polish to insulate the tiny capacitors on the PCB from any possibility of getting liquid metal on them. Watch Youtube to see how others have done it. A little tiny amount of material is all you need. Suck in the excess if too much comes out on the first squirt. Same goes for the sealant when relidding. I used Thermal Grizzly Conductonaut for the liquid metal. The before and after temps are amazing. Before, Temp at load: Core 0 99 Core 1 99 Core 2 58 Core 3 58 After, Temp at load: Core 1 51 Core 2 51 Core 3 50 Core 4 50 I used MX4 and CM Hyper 212+ for the cooler. I am really impressed with the results as this process saved this CPU and evened out the temps of a supposed terribly unlucky cpu. Good stuff. Be patient and take your time.
A**T
Delidded my 8700K, applied liquid metal and reapplied the ihs using this tool. Temps dropped dramatically after delid - over 20c overclocked to 5Ghz! It’s manufactured very well. Quality tool. Highly recommended.
T**O
Bought this tool as the vice method didn't work for me -- lid wouldn't budge despite strong pressure; didn't want to risk damage. Tool worked fine, lid came off quite easily with little force. Still, I would say this is not a job for the unsavvy as there are things that could potentially go wrong: 1. Ensure the CPU is rotated so the lid is being pushed away from any capacitors under the lid. 2. Ensure the block is pushing against the lid not the PCB -- tricky if you can't see inside the block during delidding. Perhaps the tool should be laid flat during delidding to ensure this? 3. Be careful with the included scraping tool when removing old glue/TIM as you can easily slip and hit the capacitors on a 4790k. For some reason I didn't screw the 3 thumb screws all the way in during delidding, so not sure how that affects it. I thought the thumb screws were to stop the two halves from sliding horizontally, but then I realised it's also supposed to create vertical pressure which I didn't have during my delidding. Someone else said their 4790k was destroyed by this tool so I have no idea if that was the reason. In any case, just spend a few minutes studying the tool and reseating everything until you're absolutely sure what's going to happen when you start pushing the block. Temp results appear successful -- I'm seeing approx 15C decrease, sometimes 20C depending on the test. Setup is CLU > lid > NT-H1 > Gammaxx 400 > NF-F12.
N**E
This did a perfect job on my 8086k. Had to apply more pressure than I thought, but straightforward enough for my first delid. Reliding was just as easy.
Trustpilot
1 month ago
1 month ago