

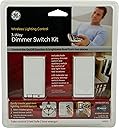
GE 45613 Z-Wave Wireless Lighting Control Three-Way Dimmer Kit, Works with Alexa
Product ID: 1660246
💡Dimmer Functionality
📱Mobile Control
🔌Z-Wave Tech
Buy anything from 5,000+ international stores. One checkout price. No surprise fees. Join 2M+ shoppers on Desertcart.
Desertcart purchases this item on your behalf and handles shipping, customs, and support to Netherlands.
💡 Illuminate Your Space, Elevate Your Life!
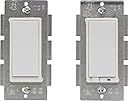
The GE 45613 Z-Wave Wireless Lighting Control Three-Way Dimmer Kit allows you to effortlessly control your lighting with voice commands via Alexa. Designed for easy installation, this dimmer kit is compatible with various Z-Wave hubs, enabling you to customize your home's ambiance with just a few taps on your mobile device.
R**S
How to make them work - Know these switches and your existing wiring.
Switch Identification:Here I am talking about GE 45613 Z-Wave 3-Way Dimmer Switch Kit. It include a primary switch and and an Auxiliary switch.Primary switch has 5 pigtails (6" wire hanging out of switch) White, Black, Blue, Yellow, Green and Auxiliary switch with 3 pigtails (Yellow, Green, white with Red Strips aka candy-cane wire).If you have another version of switch, details in this review may not apply. I saw mention of a version of this switch on Mi Casa Verde forum that has screws for connection instead of pigtails.Some Important Points:--> Primary switch do require neutral, if you have neutral available in at least one of your wall box then you will be able to use it without rewiring.--> Green wire is for ground. its for safety, no current supposed to flow through them unless wiring is incorrect or device has some fault. Connect green pigtail from switch to the ground wire in the wall box (usually naked wire or green.) if no ground is available in your wall box do not connect it to something else.--> These switches can be used to replace 4 way switch, you would need to buy another Auxiliary switch.--> Instruction may be confusing and your wiring may be very different than what you think it is so check carefully. (Sometimes a 3 Wire cable (Red White Black) coming directly from breaker to your switch box maybe result of a split phase supply so watch out for these)--> If you are confident in wiring, do test these switches on a work bench before putting them in wall wiring. This way you will see the wires and test them back to back. So there will be no doubt about distance between them. If they do not work this way and you connected them correctly then I would think you have a defective piece.How these switches/Dimmer Work:Step 1:First just put the primary switch in front of you. This is the switch that has all the BEEF. It has dimming device (usually TRIAC) it has Z-wave radio that needs to keep listening for wireless command from a remote/controller all the time irrespective of the sate of switch (on or off), irrespective of whether load is connected or not and also to work as repeater. That means the switch itself needs to be supplied power to function. So connect green wire to ground, white wire to neutral and black to line (line that is coming from breaker and remains hot all the time). Leave blue and yellow and candy-cane wire (just cover them with wire nut for safety). Your switch is now powered on, you can add it to your network/remote and try to on/off and check that blue LED should change state.Step 2:In this step connect load, for testing use a 25-60 Watt incandescent bulb and connect it between blue and neutral. You should be able to turn on/off and dim using remote and from switch itself.Step 3:Now the yellow wire is for controlling the switch using auxiliary switch. So to provide control signal input to primary switch connect yellow wires together, you can't provide control signal just using a single wire you would also need a reference and that reference is candy-cane wire, it is designed such a way that you can either connect it to neutral or Line (but not load) intuitively I would prefer to connect it to neutral. So connect the candy-cane wire to line or neutral and Auxiliary switch should be able to on/off and dim the load.TIP: In final installation if you see problem of not reaching full brightness, try to use 2 wires directly going from Aux to primary box connected to yellow and neutral. This way these wires will not carry any other current then the control signal. This way they will be balanced and will have less interference. Shielded wire should increase the length between Primary and Aux that you may use.After step 1 above if you connect one end of a long (10 ft) wire to primary switch yellow with other end of the wire open. The long wire will work as an antenna and pick all shorts or electromagnetic interference and you will notice that primary switch is not functioning properly. That means its sensitive to interference.So now that you know these switches better and if you also spend some time understanding your existing wiring you can make them work.I made it work with Cree CR6 dimmable LED lights. It has a bit of flicker at about 30% brightness but its easy to ignore and its not necessarily a dimmer issue. Dimmable LED lights are not compatible with all dimmers.TIP: Connecting an incandescent load in parallel to dimmable LED or connecting multiple of LED lights in parallel reduces flicker however it may not be a practical solution for everyone.Conclusion:I would give this product five stars if it is designed fool proof, means if its less sensitive to household interference, has LED indication on Aux switch and include wall plates and screws (pic shows it, gives an impression that it comes with wall plates).Overall I am happy with this product and so ordered few more. It works well for me and I like the fact that dimming rate can be programmed. Lower price is also a factor for choosing them. Hopefully they will last for a long time.
G**K
Working in 4-way after troubleshooting
I was able to get this pair of switches, plus GE 45610WB Z-Wave Add On Auxiliary Switch installed in a 4-way configuration (three switches plus a load, the lights). Installation was not easy and I spent about 6 hours in total working on the project. The directions provided are accurate and it would be relatively easy to install this in a new application where the walls and ceiling are "open" and you can see all the wires. It was more difficult for an existing house where all you can see are the wires in the gang boxes at the light switches and you have to figure out how everything works.My largest gripe is the actual dimming switch itself. I do not like that you cannot set it to be on/off without dimming. When I turn the lights on, they have to go from dim to full brightness and then they dim from bright to off. I wanted the ability to dim, but I also wanted to be able to have it just turn on at full brightness directly. I am using these with smart LED bulbs since that is the only thing I had on hand that was dimmable. Link 90W Equivalent Bright White (3000K) PAR38 Connected Home LED Flood Light Bulb INSTALLATIONAs other reviews have pointed out, these switches are not wired like a normal light switch. There is no line (hot power) and load (the wire to the lights) connected to the auxiliary switch. That switch is just connected to the neutral and the traveler wire. The pictures are nice and tell you to identify the colored wire for the traveler wire. My installation only had black and white wires. In my case, I have two 3-way switches and one 4-way switch. 110V "line" power was supplied to one of the 3-way switches, and the wire that goes from the last switch to the actual lights was from the other 3-way switch. The 4-way switch in the middle had two wires (white in my case) travelling from it to each 3-way switch as well as a line (black wire) from the first 3-way switch and a load (black wire) going to the other 3-way switch.You cannot hook up these z-wave switches with the wires that are attached to the existing switches. There is a terrible YouTube video from the manufacturer that implies that you easily hook the devices up. There is a much better YouTube video that shows you exactly how the final setup should be. You will have to add wires to the common (normally white wires) in the gang boxes for the auxiliary switches. You will have to remove the black line and load wires on the auxiliary switches and wire them together.Installation can be done, but it is not as trivial as removing the wires from the existing switch and putting them in the same location on the new switches.TROUBLESHOOTINGAfter I installed the switches and powered them back up, the lights worked (ON/OFF/DIM) from the master switch and from the SmartThings app (after pairing). However, the auxiliary switches would turn off the lights, but they would not turn the lights on. I checked all the grounds and connections, etc.Ultimately, what I determined is that I was mistaken on which 3-way switch the line power came into and which switch went to the load (lights). Because of this, I had the load and line terminals reversed on the Master switch and the auxiliary switches were not getting power when the master switch was off. I swapped the (black) wires and everything now works.OVERALLIt will help if you have some background in electrical wiring if you want to install these in a complicated system. The alternative is to replace the lights in the fixture with smart lights that work on the z-wave system. I have been happy with the lights I linked to above. They are a 90W LED smart light that my Home Depot store stocks for ~$25 per light. If you only have a couple lights on a 3-way system (like a set of hall lights), then just using the smart lights may be just as cost effective.
A**I
not electrician friendly, I waited till I had a ...
not electrician friendly, I waited till I had a proper electrician available and had him install these, he took one look at the manual and uttered "WTF!" the diagrams are not standard, or at least, not north american standard diagrams, and they don't use clear patterns on the back of the plastic covering (there are no indicators to which is which)so it burnt upon first setup, and never worked.certainly not the electrician's fault, he knew what he was doing, and have worked on my entire house without fault.
A**A
Doesn't work with LED bulbs... so if ...
Doesn't work with LED bulbs... so if you're installing it to use with pot lights, you will most likely need to look else where.
S**N
Four Stars
Slight buzzing sound but otherwise works great.
9**C
Five Stars
Working Great
D**A
Five Stars
Very good
Trustpilot
2 months ago
2 months ago