Buy anything from 5,000+ international stores. One checkout price. No surprise fees. Join 2M+ shoppers on Desertcart.
Desertcart purchases this item on your behalf and handles shipping, customs, and support to Netherlands.
๐ก๏ธ Take control of your climate like a pro โ precision meets power in one sleek package!
The HiLetgo W1209 Digital Temperature Controller is a compact, 12V DC thermostat module featuring a high-precision 0.1ยฐC control accuracy, an embedded low-power MCU chip with EEPROM memory, and a waterproof NTC sensor. It supports a wide temperature range (-50 to 110ยฐC) and a 10A relay output, making it perfect for applications requiring reliable, stable temperature regulation such as aquariums, HVAC systems, and heating devices. Its intuitive interface and durable design ensure consistent performance and easy integration.
| ASIN | B07VDRGK9F |
| Best Sellers Rank | #32,777 in Industrial & Scientific ( See Top 100 in Industrial & Scientific ) #33 in Temperature Controllers |
| Brand | HiLetgo |
| Brand Name | HiLetgo |
| Color | With Case |
| Customer Reviews | 4.2 out of 5 stars 982 Reviews |
| Display Type | LED |
| Item Weight | 0.09 Kilograms |
| Manufacturer | HiLetgo |
| Material | Plastic |
| Material Type | Plastic |
| Model | 3-01-1310 |
| Part Number | 3-01-1310 |
| Smart Home Compatibility | Not Smart Home Compatible |
| Voltage | 12 Volts |
J**S
Air Conditioning Freezing Fixed!
While there are plenty of professional fixes for central AC that freezes up, sometimes it's just a combination bad duct airflow, low outside temp, and/or too low thermostat set. Obviously you should make sure you aren't low on refrigerant or the air filter is dirty, but if you have old ducting or a miss-sized unit, it just happens sometimes (especially fall and spring). If your wallet doesn't mind the thousands of dollars to get a new AC installed or otherwise remedied, skip this. For the rest of us, this little gem you just provide it 12V (find an old wall wart, or buy one for a few bucks), cut one of the signal wires from the furnace to the AC (usually 2 of them, carrying low voltage AC, doesn't matter which one you cut), strip the ends on both sides of the cut and put them into the two relay legs (K0 K1), and then tape the temp probe to the copper coolant-in line. Set the setpoint to somewhere a little above freezing (5C or so), set P0 to "C" for cooling, and then set P5 (restart time) to 5 minutes. Now, if the line approaches freezing, it will cut out the AC unit outside while the furnace/air-handler fan still blows air over the too-cold coils warming them up. The restart delay prevents short-cycling the AC. Cheap, easy, works. Will mask a dirty air filter, but you're changing that on a regular schedule, right?
S**E
Worked great for fan control
I have a home made cabinet for my CNC router. There is a compartment for the computer, but it doesn't have much air circulation. The other day I noticed the temperature was quite high in the cabinet and possibly a contributing factor for a recent hard drive failure. I wanted to add a fan to circulate air, but since the computer goes in to sleep mode and doesn't generate much heat when it's not being used, I didn't want something that ran all the time. With this gizmo and a 12V fan, I was able to set it up so the fan only runs when the temperature in the cabinet exceeds a certain amount. So far it seems to be working great. I have it set to come on at 32C and go off at 30C, and it's been been right in that range each time I've noticed the fan running. Set up was easy. I already had a 12V supply available in the cabinet, so all I had to do was hook up the power, insert the K0 and K1 ports inline with the positive lead of the 12V going to the fan, and drop the sensor in the cabinet. As I recall the default settings were what I needed, except maybe changing the temperature range. I opted for the case and that was worth the extra 60 cents. I could have laser cut my own, but it probably would have cost me 60 cents worth of material and certainly more than that in time. The only complaint about the case is that is doesn't provide any holes to mount it to anything unless you want to use the same holes used to hold the case together. No big deal - some double sided foam tape got the job done. Definitely worth it for less than $5 each.
Z**X
Cheap, effective, no instructions
I purchased this product for a little side project. I wanted to add a 12v fan to cool the charging transformer in a battery backup when it is charging on commercial power, but didn't want the fan to run 24x7. The UPS is no longer charging the small 7AH 12V batteries, but rather two 90AH 12V batteries. Installation of the device in the UPS case was pretty simple, but wiring and configuration was a different challenge since this product comes with absolutely no documentation. Keep in mind that this unit only deals with Celsius. If you want to know Fahrenheit, you'll need to convert it. Fortunately, some other reviews here have links to instructions and wiring diagrams. To wire it for 12V power to the controller board **AND** to the load device (fan in my case), do the following: 1. Connect the 12V power source to the +12V terminal 2. Run a short jumper wire from the +12V terminal to the K1 terminal, tighten down both +12V and K1 terminals. 3. On the 12V device, (fan in my case), connect the positive power wire to the K0 terminal and tighten the terminal 4. On the 12V device, (fan in my case), connect the negative return wire to the GND terminal. Also connect the negative return wire from the main power source to the GND terminal. Tighten down the terminal. To program the device for running a **cooling** fan like I did, do the following: 1. Short press "SET" button one quick time and set the desired "turn off" temperature with the "+ or -" buttons. This is the temperature that your fan will turn off once reached. Once you have your "off" temperature selected, press the "SET" button again. This should get you going. If you set the temperature to 30C, the default swing temperature is 2C. This means that the temperature probe must get to 32C before the fan will turn on. The fan will run until the thermal probe drops back to 30C, then shut off. If you want to change the default swing temperature from 2C, do the following: 1. Long press "SET" button until P0 shows on the screen. Press the + button until P1 is displayed. Short press "SET" button to modify that value. You should see "2" which is the current default setting. Press "+ or -" until the desired temperature is reached, then short press "SET" button again to set the new value. If the main "off" temperature is set to 30C like the above example, and you set P1 to 10, then the thermal probe would have to get to 40C before the fan kicks on. The fan would then run until the thermal probe reaches 30C before shutting off.
โ**โ
Class B RV battery warmer
This temperature monitor is the heart of my class B RV battery compartment temperature regulator. My 460 amp/hour lithium battery has to be stored above 14ยฐF and weighs 100 pounds. I used the W1209 along with a 70 W heating pad to keep my battery compartment above 19ยฐ F. I programmed the W1209 to turn on a 70 W heater when the temperature drops below 19ยฐF, and shut the heater off when the temperature rises above 20ยฐF. In single digit weather the system has performed perfectly I used a X-Sense Wi-Fi based smoke alarm to for an this added layer security in case my electrical system has a problem I will be notified through my phone.
B**E
Fiddly to assemble, but nice controller!
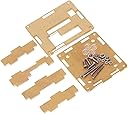
I give it 5 stars because I'm very satisfied with the product. It's precise and well-conceived. It's got a few rough edges, though. (I decided not to deduct a star, because the everything else is so good.) 1. Very clever and attractive little plastic case. However, it requires assembly, which takes a bit of time. It is made of 6 precision-cut panels with protective film that you need to peel off. They insert together with tabs. Getting all the tabs in the holes is a fiddly process. If you want the case to be completely flat for mounting, you might want to remove a bit of the tab material before assembling, as the tabs stick out ver slightly (fraction of a mm) on the opposite sides of the holes. 2. Some of the leads on the bottom of the board are a bit too long for the spacers provided, so you will need to trim them before mounting it onto the bottom panel of the case. 3. I don't like the screw terminals. It's hard to insert wires into them. I have a rather stiff 18AWG wire that I used, just because I could push it into the terminal. Forget using any finely stranded wire, unless you use a (small) ferrule. 4. The two boards I received disagree by 0.8 deg C. It's not a deal-breaker by any means. 5. Setting the "on" temperature is very intuitive, but there are no instructions. Press (do not hold) the set button, and then set the temp with the +/- buttons. When you hold the set button, you end up in some mode to select different programs, without any idea what those are. (I think they set different hysteresis values.) 6. The relay is pitched as 20A. However, that's the rating for 15VDC. The 120VAC rating is 10A. The 240VAC ratting is 5A. Other than that, the board is very snappy and precise, programmable to 0.1 degC increments. The temperature probes respond quickly.
R**G
Warning: Incorrect application of the internal 5V regulator that powers the microcontroller.
Another reviewer mentioned that the 12v to 5F dc regulator IC,( AZM1117 ?) is incorrectly applied. I have also confirmed this issue. I not only traced the pc lines to confirm this misapplication, but I also measured that +5V bias input to the controller IC (the output of the 5V regulator) varies as the +12V input varies. The output pin of the the regulator IC should be a constant 5V (or possibly even a constant 3V since I don't have a part numbers for the controller or dc regulator). I also noticed that the IC regulator is rotated 180 degrees on the parts I shown on the photograph illustration. I also observe that the temperature controller appears to function with an input voltage on the +12V input pin as low as 3.5V and as high as 12.5V, but with very low input voltages, it is iffy that the relay will function correctly. I definitely DON'T RECOMMEND using this product when high reliability is important. I am annoyed that the product specifications does not have a recommended operating range for the input voltage. I wonder why?/S. I am especially concerned with applications that are powered from a Lithium battery that can have a charging voltage as high as 14.6V. BTW, I am an power electronics design engineer with 40 years of experience. You have been warned!
A**N
Useful temperature controller; but I'd like to see a number of improvements
This review is for the HiLetgo W1209 temperature controller, 2pk. No problems with this order, arrived on schedule, no obvious damage, powered up fine on 12vdc. As many others have noted there is no documentation supplied so copy off the chart on the ad for your reference. In general, once you've played with it a few minutes, the operation and settings aren't too complicated. Next I set up an ice bath to compare readings with my Fluke DMM & thermocouple โ I rarely saw more than 1C difference and in most cases <0.5C. I then put sensors into a water pan and heated it to boiling โ again rarely saw more than 1C difference. Most cases the readings were 0.4C or less different. Overall temperature measurement is quite good; but I wouldn't go so far to say the temperature reading are within 0.1C as advertised. The accuracy of both the controller and my meter still have at least a digit plus or minus in variations from true temperatures. Now to my dislikes: First problem - the wiring connector, thermocouple connector, and relay are all mounted on the same side of the PCB as the display and switches. There is no way you can easily mount this module in a project box with the display and switches near a surface of the box so you can use them. Take a look at an end view of the module โ switches and display height are well below the height of the other parts. Had the connectors and relay been mounted to the back side of the PCB it would mount nicely in a project box with three holes for the switches and a cutout for the display. For most situations you are likely stuck with this module just mounted out in the open. Interesting aspect to me is that the terminal block and sensor connectors could easily have been installed on back side without redesigning the PCB. Unfortunately the SPST relay is not symmetrical so it can't be swapped to back side w/o PCB redesign. However I do appreciate the four corner mounting holes. This problem (following problems and the short sensor wiring) is my primary reason for 3 star rating. Second problem โ the environmental requirements on the ad are listed as -10 to 60C. The -10C (+14F) is not that impressive; especially when the module comes with a 20โ long sensor lead. I found the jpg image (see pic) of a W1209 module schematic on line. I then located a STM8S003 data sheet which identified operating temperature range of -40 to +85C with supply voltage of 3 to 5.5V. I also located a UMW brand AMS1117 data sheet for the 5 volt regulator. Operating temperature range listed as -40 to +125C, maximum output current of 1A, and input voltage maximum of 18v (recommended 12v) with the dropout voltage of <1.3volts. I did not find the Xhong XD-SS-112DM relay specs. Google AI says it is similar to the SDT-SS-112DM relay by TE Connectivity. That relay is rated to operate over -30 to 60C. I can't verify the exact semiconductor parts on these HiLetgo modules โ no markings are visible. The data sheets I was able to locate only had these specifications (no commercial, industrial, or military temperature ranges). So there may be a good chance you can use these modules in more harsh environmental temperatures such as a remote shed (or chicken coop) over a -30 to 60C temperature range based on what I found. Third problem - There's no s/w setting to turn on/off (or auto off) the LED display. I find this very annoying; especially in an micro controller product. When I have the module set up and running, and I am working on something else, the frequent changing of the display is constantly catching my attention. I do appreciate the indicator light for when the relay is active. However, if I add an LED to indicate when the module is powered on (if I don't have one on the 12vdc power supply) then I'd rather just touch a button on the module to wake up the display for a temperature reading check. While the power consumption of my modules came in at 11-15mA with the relay off and 60mA with relay on, the power savings by blanking the display would be limited. However, my first application is located as a water heating controller in the barn โ it's not like I need the display on all the time out there! Fourth problem โ The ad didn't provide an operating voltage range; just 12vdc. While I can reduce the input voltage to about 4.3v before the relay will drop out (when active), the input voltage had to be a minimum of about 8.5v to get the relay to activate. Also, the display dims significantly below 7v. Appears you wouldn't want this module if you don't have at least a 9vdc supply voltage. The 12vdc input maximum is also a concern. The 5v regulator can handle a maximum input of 18v; but you do have to allow some headroom for any relay coil spikes (yes, even with the circulating diode and filter cap on regulator input). I've had no problem running the module at input voltages up to 14.4v with relay on/off operation so far. (and my smps has 0.25-0.30 noise on the output so 1ms peak readings are 14.65v) One of the small LM2596 DC-DC modules with it's much wider input voltage range is a good power supply for this module if you don't need a lot of power. After my conversion, discussed next, I operate the W1209 module up to 16v input. Fifth problem โ While many of you may be happy with the relay for your application, I'd much rather have a power mosfet for dc load switching or an opto-coupled triac for AC switching. Both of these solutions have much better reliability ratings and would also require less power consumption when active. For my barn application I removed the relay, transistor and base resistor on the module. I then mounted a gate drive resistor and IRLZ44N logic level mosfet. The very low on resistance of the mosfet with the 5 amp heater load does not require a heat sink (To-220 devices can handle ยฝ to 1 watt in free air) which made the modifications fairly easy. In conclusion, while I can live with this low cost temperature controller for now, and it's a pretty decent product for the price, if it should fail in the future I'll look for something more up to date and better suited to my applications.
C**K
Works as expected, great value
These controllers work well and you can't beat the price. I'm using one to control a 20W silicone heater for an enclosed butter warmer. I keep the house cool in winter, and I got tired of mangling my toast when trying to spread cold butter. These don't have a parameter to switch from Centigrade to Fahrenheit display units like others do, but no big deal.
G**O
Mini termostati
Circuito elettronico semplice, ma ben funzionante e di facile regolazione (reperibili facilmente sul web le istruzioni). Vengono spediti 2 circuiti e due sonde ntc. Io ne ho usato uno per costruire un mini impianto di raffreddamento per un dvr (al fine di prolungarne la vita). Finora funziona perfettamente.Ottimo rapporto qualitร -prezzo.
A**O
Llegรณ bien. Funciona perfectamente. Excelente relaciรณn calidad/precio.
Control de temperatura de un Inversor Vcc/Vac.
A**R
Works as expected
Bought these (only in fact needed one) to control solar powered ventilation fans in my greenhouse. Can be configured to operate in cooling (on when set temperature exceeded) or heating (on when below set temperature). There's a couple of degrees hysteresis so it won't oscillate too much. The LEDs show the current temperature and it seems fairly accurate. The temperature probe supplied has a reasonably long lead and is potted into a metal cap, making it waterproof (the board itself will of course need protecting in a box). Configuration is simple, albeit a bit tricky to figure at the start I found. It essentially comes down to up and down buttons to set the trigger temperature. The settings are non-volatile so survive power loss. Was a bit concerned about the current drain given I'm using it in a solar/battery environment. However, even though it has pretty bright LEDs they have minimal drain on my small Li-Ion pack (not enough to discharge it over night anyway).
D**O
Good product. As specified
Works exactly as specified. I use it to control an electronic solenoid connected to a tap which turns on a mister in my greenhouse if it gets too hot. Easy to program too
E**M
Control anything electrical through the flow through relay (up to 10A)
I used this as a fan controller for my motorcycle. I put the sensor into the radiator fins and dialed in the temperature I wanted to see on the temp gauge. The fan comes on and goes off precisely and crisply compared to the thermo switch that was impossible to find for an older bike. It now starts the fan smartly as opposed to groaning to life with the thermo switch. Just connect the device (+) source power to the running light circuit which comes on when the engine is running. For the fan, provide frame ground, and positive from battery, then through 10A fuse, then through switched relay onboard the device to the fan positive. The programming is simple if you google the device specs on YouTube.
Trustpilot
1 day ago
3 days ago