Desertcart purchases this item on your behalf and handles shipping, customs, and support to Netherlands.
🔥 Shield your drive, silence the noise, and stay cool under pressure!
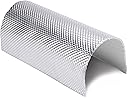
The Design Engineering Floor & Tunnel Shield II is a premium, adhesive-backed aluminum heat shield designed to reduce radiant engine heat and dampen noise. With a durable 10 mil embossed aluminum face bonded to a 1/8" composite fiberglass core, it withstands continuous heat up to 1750°F and adhesive temperatures beyond 450°F. Its flexible 3/16" thickness allows custom fitting in tight vehicle spaces, making it ideal for automotive restoration, racing, and everyday thermal management.


| ASIN | B000CEO5W8 |
| Best Sellers Rank | #43,530 in Automotive ( See Top 100 in Automotive ) #76 in Automobile Insulation |
| Brand | Design Engineering |
| Brand Name | Design Engineering |
| Coverage | 14 square feet |
| Customer Reviews | 4.8 out of 5 stars 436 Reviews |
| Global Trade Identification Number | 00607078505033 |
| Included Components | Design Engineering 50503 |
| Item Dimensions L x W | 48"L x 6"W |
| Item Thickness | 0.19 inches |
| Item Type Name | AUTO_PART |
| Item Weight | 2.49 kg |
| Manufacturer | Design Engineering |
| Manufacturer Part Number | 50503 |
| Manufacturer Warranty Description | Manufacturer Warranty |
| Material | Aluminum |
| Material Type | Aluminum |
| Model Number | 50503 |
| Number of Items | 1 |
| Number of Packs | 1 |
| Part Interchange Info | 050503 |
| Product Dimensions | 48"L x 6"W |
| Recommended Uses For Product | auto racing |
| UPC | 099998581271 607078505033 799916897650 |
| Unit Count | 14 Square Feet |
M**Y
Excellent product. Takes patience to install if you want an excellent result.
This is a very high quality product but there are things you need to know. First, it is not like working with that rubberized sound deadening material that goes under your carpet. This uses a much thicker aluminum foil over a fiberglass material with a very aggressive adhesive. To give the adhesive its best chance, I started by cleaning my 140k mile floor pan multiple times with mineral spirits, prepped it with scotch bright pads and sand paper, then and gave it a fresh rattle can paint job. I let the paint cure for a week before installing the tunnel shield. It took a 42x48 and 21x48 sheet to do the entire tunnel area from frame rail to frame rail of my '04 Miata. Once the adhesive makes anything more than the lightest contact, its difficult to remove without separating the fiberglass layer so get it right the first time. I created a template with paper bags and masking tape. then cut the template in such a way that it would lay flat. I then layed out the template pieces on the tunnel shield material to plan my cuts. I bought an inexpensive pair of scissors (ASIN B00LSWLAA8) and they made it through the job... I needed to stop periodically to clean the adhesive and fiberglass off them. The cut edges are sharp so wear some gloves! I roughly contoured the tunnel shield to my project BEFORE removing the paper backing. I then carefully positioned my work and gradually removed the paper backing while rolling it in. Work slowly and deliberately. The foil is flexible enough to roll into and around contours but it does have its limits. The roller I used: (ASIN B07X5SV5FD), its a good quality product that should last through many projects. You'll need to seal the edges since water could get into the fiberglass layer. DEI recommends their tape for this purpose but several people had negative things to say about the tape. On the recommendation of another enthusiast, I sealed the edges with RTV. I used loctite grey #5699 ASIN B0794BYCZ2. The pressurized container works in any orientation and made it easy to apply a consistent bead. Mask along your seams so you get straight, tidy edges. Again if you work slowly and deliberately, you can get good results. I worked in the silicone with a finger and wore heavy Venom Steel nitrile gloves to keep the chemicals off/out of my body (ASIN B00Y2OFGMW). Good Luck!
B**Z
Excellent heat barrier and VERY GOOD ADHESIVE.
Excellent heat shields. Use them in the engine compartment of my rv. They REALLY stick once they are pressed on. Well made and VERY good adhesive. Good luck if you want to want to remove it.
P**O
It's great at doing its job.
It's great at doing its job: it's a good insulator and heat reflector. The adhesive is very aggressive, which is great.
Z**R
Good initial quality
I will re-edit this when I've put some heat to it and seen the miles it holds up to. As far as the product itself though, initial impressions are very good. I had the engine and transmission out of my miata so I could hopefully do this job the right way. There is a video out there of a gentleman putting one of these in with it installed and I can't imagine it would hold up as well. Reasons are numerous but I think the most important being there's no way you could get the tunnel clean enough for proper adhesion. Yes this product is extremely sticky, but like anything adhesive once you clog that surface up with contaminants it's going to lift off the surface and not provide the kind of bond intended. If you've come here, your car is too hot due to tunnel heat most likely. Though I suppose this product would work for lots of places. The aluminum side of this shield resembles the sort of thing I've seen on lots of new oem shields. It's got a cratered surface, it's somewhat reflective in nature. It is fairly stiff as a result, though it bends fairly easily. My application is for a race car (miata) and I've always found the tunnel gets just too hot from exhaust especially during the summer months (I usually don't have carpet either). So hopefully this helps this season. I've attached an image that shows how mine went in. I made sure to thoroughly clean the surface before-hand and started with the driver's side. Working it down and peeling back the adhesive protection layer of the product I was able to get it to finally adhere the way I wanted. Note, I cut my product with tin snips at the folds of the body to help ensure I didn't have any bubbles in where it applied. I don't believe there is any real way to not do this at least on a miata's tunnel. We'll see how well it works but I'm real hopeful it solves or at least helps to mitigate the heat issue. Hoping cutting it the way I did doesn't somehow ruin it's overall effectiveness or make it less long-lived. Will update with how it holds up. [...]
S**T
Effective heat shield for motorcycle saddlebags
I am using this product to protect nylon motorcycle bags sitting in contact with an exposed motorcycle exhaust, so I needed something that could handle direct contact, not just reflected heat. This shield is meeting my needs. The adhesive backing of the shield seems to be adhering well to the neoprene pad on the bag. In testing, the exhaust becomes far too hot to touch, while the neoprene pad and the bag itself become only slightly warm, so I'm confident there will be no meltdown during my upcoming road trip. The sturdy shield material can be cut to size with a heavy-duty pair of scissors, and is flexible enough to shape without distorting at freeway speeds. I would recommend taping the cut edges of the heat shield with aluminum exhaust tape for a little more finished look and keep water from getting into the insulation.
N**K
Worth the money if you need the protection
This practically holds itself in place. seems to work great.
S**E
Buy the adhesive backing kind and save yourself the hell that is working with lose fiberglass!
Exceptional product. I chose the 2x the cost version with the adhesive already applied and I HIGHLY recommend you do the same. I used 4 different DEI products on the heat/sound insulation modification project on my 2019 Thor Freedom Elite. Thing was loud & hot. I did the entire floor in this product. Wish I had also used it for the dog house. Moldable (to a point) but still quite thick and stiff at 10 mil aluminum facing. Worked exceptionally well for cooling down the cab.
F**T
Very satisfied
I purchased this to replace the factory tunnel insulation on my BMW E36 M3. The factory ones are known to just drop as they age, and it made it extremely difficult to reach the bellhousing bolts, so I ripped the factory one off, and installed this one. To cover the whole tunnel, I made three pieces, two half pieces going from the engine to the rear of the car, and one smaller piece to cover the top side, where the top of the bellhousing would go. I made sure to clean the tunnel with mineral spirits, then with a soft and light rubber film and non permanent two way tape stuck all over the tunnel, I was able to take the three templates, then measured and remeasured, making sure I was aware of which side was the adhesive backing, and which side would be exposed to the exterior. After the three pieces were glued, I installed three rivets per side , right on top, just in case the glue gets undone in the future. When drilling the holes for the rivets, just need to be sure there is nothing on the other side, wires or anything important. Overall I'm really happy with the results, and I feel this is a better solution than the factory insulation my car came with. The only thing left to do, is to apply Hi temp grey RTV to the cut edges, so no moisture will get into the fiberglass .
A**R
AMAZING product !!
cut with either a really sharp knife... and good tin snips sort of fits anywhere, seems to stick well. 1/4 of kevlar padding seems perfect !!
D**N
Fantastic heat wrapping.
Proper aluminum hear wrapping with asbestos lining and glue surface. Highly recommend it.
J**.
Great trustable product though pricey.
Good quality. Easy to use. Can mold into intricate shapes to heat shield my ecu and battery.
Z**E
Funktioniert gut
Wird als Hitzeschutz/Leichte Schalldämmung an der Unterseite des Getriebetunnels beim Kat eingesetzt. Das alte Hitzeschutzblech des Katalysators war abgebrochen wegen Rost. Nun hab ich dort den Floor & Tunnel Shield aufgeklebt mittels Sikaflex 554, die klebende Rückseite reichte nicht aus und zur Sicherheit wurden noch Spenglerschrauben mit Dichtscheibe ergänzt. Das dünne Aluminiumblech lässt sich gut an die Konturen des Unterbodens anpassen und leicht zurechtschneiden.
J**R
Quality
Wery good product. Sticks well and does a great job of deflecting heat.
Trustpilot
3 weeks ago
3 weeks ago