
DOWNLOAD THE APP


Customer Services
Copyright © 2025 Desertcart Holdings Limited
DOWNLOAD THE APP

🏍️ Capture Every Ride, Day or Night — Because Your Story Deserves the Best View!
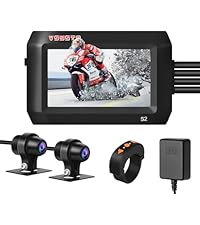
The VSYSTO WiFi Motorcycle Dash Cam features dual 1080P HD front and rear cameras with 130° wide-angle lenses and advanced starlight night vision for superior low-light recording. Equipped with a built-in WiFi module, it allows real-time video access and sharing via a mobile app without removing the memory card. The system includes a wired controller for emergency recording, a G-sensor that locks collision footage, and loop recording to manage storage efficiently. Designed for motorcyclists, it is compact, waterproof, and easy to install, ensuring reliable, continuous protection and documentation of every ride.


| ASIN | B07QB6Q3C5 |
| Batteries | 1 AAA batteries required. (included) |
| Best Sellers Rank | #32,586 in Electronics ( See Top 100 in Electronics ) #482 in Car On-Dash Mounted Cameras |
| Color | Black-D6L |
| Connectivity technologies | Wi-Fi |
| Customer Reviews | 4.0 4.0 out of 5 stars (673) |
| Date First Available | April 4, 2019 |
| GPS | Not Support |
| Item Weight | 1.46 pounds |
| Item model number | D6 |
| Manufacturer | VSYSTO |
| Other display features | Photography |
| Product Dimensions | 2.44 x 0.78 x 2.28 inches |
| Special features | Built-In WiFi module, G-Sensor and Loop Recording, HD 1080P Front and Rear Camera and Starlight Night Vision, Waterproof, Wired controller |
| Whats in the box | 2 Cameras, Host with bracket, Power cable, Wired Controller |
S**E
Good video quality, easy to install and operate
I've had this setup on my motorcycle for a couple of thousand miles now so figured it was time to give my thoughts. First, the picture quality exceeds my expectations. I was only looking for something to document road wrecks and such, hoping to be able to show traffic signals, other cars, lane position and such if I got involved. I've used inexpensive action cams for this purpose on my other motorcycle and had pretty good luck with them but didn't like them sitting up on my handlebars and I only had one that faced forward, nothing for rear. These new units have excellent video quality during the day and even in the rain but I've not driven at night with them yet. The videos are sharp with very little jello, despite being mounted on a large v-twin bike. It captures a fairly wide angle but not so wide as to cause fisheye. I haven't viewed them on my television but on a 14" computer screen they look great. Installing was not too hard but finding room for the excess cable was a bit of a pain. I contacted the seller to get shorter cables but was told they are not available. I put the main unit under my seat and had about three feet of extra video cable for the rear, two feet extra for the front and a couple of feet for the remote cable. I cut off most of the power cable since I was mounting the main unit next to my battery. I mounted the cameras with the double sided tape, no screws, and they haven't fallen off yet. I used double sided tape to mount the remote on the side of the left switchbox on the handlebars. I picked up power at a connection that is only active when the bike's key is turned on. Operation is pretty much automatic. I did the initial setup on the main unit using both the main unit buttons and the Android app and haven't changed anything since. The unit comes on as soon as I turn on the bike's power and shuts down once I turn the engine off. I've used the app to look at videos via wifi with no problems, also viewed some videos on the main unit itself. The quality of the cameras and easy operation make this one of my better buys. Highly recommend this setup.
E**C
Great camera at this price point
This camera system earns 5 stars at this price point. At twice the price I'd probably dock a star for video quality, but it does what I was hoping it would at $150. Functionality as a "dashcam" is very good and images are clear. The quality is a little short of a decent action camera, but I feel that is made up for in the fact that it is continuously recording. No worries about whether it is on, battery is charged, card is full, etc. when I want that moment captured. Installation was pretty straightforward, with instructions that were just good enough to get it accomplished. Plastic removal on my ST1300 took most of the installation time. After a 1500 mile round trip and all is functioning as expected. Some usage instructions would be helpful, particularly for the remote control. The buttons are oddly labeled and there is no real indication as to what they do. It appears that pressing either button takes a jpg and locks the video file for both cameras. A long press turns on WiFi on the unit, which is a good feature. My biggest issue came with file playback. In Windows, there is no audio in either Media player of DaVinci editor when playing the MOV files stright from the card. It appears to be an audio coding issue, since I found that VLC would play sound on the files. My solution is to use Handbrake to covert the MOV files to M4V, and then sound plays fine. Sound quality is nothing spectacular, though.
S**R
Great little system, But
I purchased two of these Vsysto P6F's. One from Dash-Cam and the other though Amazon's warehouse. (really, y'all need to go there as there are good deals to be had) They seem to be quality units, but are really susceptible to outside interference though the shielding of the wires and unit is excellent. I suspect a bad ground someplace. Be aware the FOV is not 170 degrees, not even 150 degrees, both stated in the add. Both of the units I purchased have a 120 FOV. For me that is more than acceptable since wider than that seems to give less detail. So, yeah, I'm happy with the 120 degrees, checked with a laser and protractor from a fixed point to get the proper FOV. The reason for my purchase of the two units is to use them for front and rear recording as well as left and right side recording especially since I have been hit from the sides, front and back, of my bike. (different bikes) The units here are probably older models which would account for the lower price as well as the FOV only being 120 degrees. Add to it these are stud mount like a regular camera would be only from the top of the unit. The metal fittings for the camera wires (a plus in my opinion) may be a way to keep the models separate. Or who knows, perhaps these are refurbished. Personally I don't care as long as the units work! I ride a touring class Harley so your needs may differ than mine. I did have to run the cameras wires down the frame tube, across the bottom to the rear of the bike making sure the wires were to the side especially when passing under the engine since the lift would otherwise crush the wires. I ended up having to place both units in my left saddlebag to keep everything away from the alarm, ECM, and spark plug wires due to those items being the potential cause of interference. I also installed a dual port USB outlet to run the systems from the USB adapter cord (provided) removing the power supplies with miles of wiring. The video is of good quality, and setup is easy. Turn off or on the things you want and many other settings, all just using the menu on the main unit. I turned off the WiFi, Sound, and the sensitivity for a collision/bump since the video stops and is saved once the power is cut. Just change out the memory cards (carry a couple of extra) if needed and not be concerned with and Locked/Key files. I won't be using the GPS option since it requires a separate App or program so it holds no value as far as evidence in the event of a collision. (if it were imprinted on the video with a degree of accuracy, then it would be useful, specifically the speed you were traveling at). The remote is not really needed because if you were in a collision you probably couldn't reach the button anyway. Everything I listed in this paragraph are useless, at least to me. (dumb additions in my opinion) The purpose of these units is to help in the event of a collision or crash. Not to be used are a rear view mirror or be played on your cell phone while your riding. (My opinion! Cell phones and anything to do with cell phones are a distraction and shouldn't be allowed in or on a vehicle of any kind!) The recording will be your best evidence of who is at fault in case something happens when dealing with insurance companies or attorneys. Not another toy to play with! These units will do a fine job of that! The reason I'm only giving this product 4 stars isn't because of the misstated FOV or even the possible grounding issue caused by spurious emissions, but because of the stupid additions like WiFi, Sound/Microphone, Remote, and the potential addition of a GPS. Also for the amount of nmea files it creates for the front camera. Those are likely for the GPS and to me they are annoying since they don't contain any data. As always, your mileage may vary! Would I recommend these units? Yes with the stipulation you understand all of the idiosyncrasies I mentioned above. And, by all means purchase extra zip ties. You will be glad you did!
A**R
Good picture quality fantastic price and fairly easy to install
H**T
Bij snel accelereren stopt de opname
G**O
Easy peasy installation folks! This company makes it easy, includes everything required, provides quality, solid material including the wiring and DVR unit. Instructions are totally understandable. tons of wire and length included. Including a USB cable to plug into a power pak for a power source before actual installation is genius. You just can't go wrong buying this, the price for what you get in return is great - video quality is outstanding just as so many other reviews state. I couldn't NOT buy it considering the excellent reviews everywhere, so when it was offered with a $20 off coupon I bought! I've got no wiring knowledge whatsoever, and especially on a Harley. So I started by getting to know my Harley wiring system and how it works and what connections were available. I took off the seat and side panels, dismantled under the seat wiring and harnesses, plugs etc. down to expose the battery. Gas tank removed with help, that is NOT a one person job especially when it was plumb full. I ride a fat-hipped 3 wheel factory Harley-Davidson trike, a 2017 Freewheeler. First thing I learned was that I needed an electrical harness to wire this into, then plug that harness into an existing plug (the 325 deutsch plug located on the right side under the side panel). If you have a different year and/or bike you may need a different HD adapter harness but the one I required was part #69201599A. This harness gives you 3 different ends you can connect with, 2 with plugs and one of them is wire to wire and includes the heat shrink connectors. The bare yellow wire from the camera wiring connected to the harness wiring - you connect it to the wire that powers ignition in the harness I think it was blue and purple, but the instructions with the harness tell you for sure. The black wire and the red wire from camera connected to the bike battery terminals. The wire ends going to the battery were just bare wire and no round tab connector that fit over the battery post so I had to find a couple of those rings and sodder them on the wires first. Speaking of wire - note in the photos in the seat area where all the wires are visible the wire with silver on it coming out from under the tank connects front cam to the DVR. The silver is a heat tape to protect that wire since it runs under the tank which is directly above the engine (if you are familiar with the M8 engine you know she runs hotter than hell). I covered the wire from the start of it under the tank to the point you see where the seat would hide it. It came with a ton of wire, each camera has a sturdy protected length with a screw connector on the end and each also had a matching extension. An important thing to consider when installing is the location of that connection point in the wires if using the extensions so you can easily disconnect the camera unit. I ensured the connection between the camera connector and the extension wire was accessible under the nacelle. That'll make it an easy disconnect between the wire and the camera itself in future if needed. If I hadn't thought of that beforehand, the connection would have ended up under the tank, completely un-accessible unless I took the tank off again. Zip-tied extra wiring & slack from the front cam in a neat bundle up under the nacelle after leaving some slack so wire to camera mount doesn't bind when turning hard left or right. Then I found the perfect use for the bell bag that came with my bell, perfect size and soft velvety material to slide over the camera for protection when the bike is in storage :) I stole hubby's bell bag for the back cam. I used the sticky back mount that came with the kit to mount the front cam. It is solid, not moving or loose at all. Back wiring was a short distance to go. There was a small gap between the frame and the seat so the back wire came through there without danger of crimping or crushing. There is also a crease in the body panel right there. I might use clear 3M to run it in the crease on the exterior in future. I stole a metal wire clip with sticky back from some previous HD installation to keep the wire tucked on the edge under the seat. Made sure all connections to the DVR unit itself were on top and handy for quick removal. A simple twist off of the metal connectors, pull the plugs and it is fully disconnected. The kit came with excellent quality sticky back pieces for mounting the DVR but I used 3M outdoor Velcro instead to mount the DVR to the frame as well as the power box. Then I zip-tied the power box to the frame for good measure. The underside of my seat provided a lot of extra room since a good deal is hollow under there so I could mount the 2 boxes, don't think that would have been possible with the factory seat though. I was sitting on the fence over whether I wanted to mount or have the button box visible, but I decided I should have it visible as it is an indicator when the unit is powered up. I mounted it on top the side panel using the included sticky-back. It is very solid, i have no doubt it will hold. Its just so cheap looking. I'll have to remember to unplug that wire when removing the side panel, but I planned ahead for that too - made sure the plug is right on top and used a small piece of electrical tape to hold it in place on the frame where it crosses the frame out on top the side panel. Spent hours of searching through Amazon for a gadget that might work as a mount for the back camera. It paid off, and the gadget is perfect for this purpose! I am absolutely thrilled with the back mount system I came up with. Makes it highly portable, quick to move too. Cheap! It cost me $10 here on Amazon. It is meant to be a flashlight bicycle handlebar mount (universal handlebar flashlight mount by Olight). It has good solid silicone straps in various sizes you can change out, depending on your application. The curved diameter on top is exactly that of the camera. I believe how it is made will go a long way in reducing vibration and therefore smoother videos as a result. The app works flawlessly, connects quickly and you can review and save front & back videos separately to your phone. I’m a bit of a camera buff and have quite a collection of various brands and most have app issues, so I was impressed this worked right out of the box. At first I thought it wasn't obeying settings I made on the DVR itself once disconnected, but after resetting it and testing a few days later its fine and retains them. So, what's not to like? Well, the missing rings on the bare wire ends to the battery, but that's not a biggy. Not sure about the camera mounts. Solid for sure with the sticky back but not enough turning flexibility with them for mounting positions. Just plastic, nothing outstandingly tough about them. I highly dislike the bright green arrows on each camera body, but I understand why they put them on. I intend to use a black marker over the green arrow so it isn't as noticeable. I also don't like that the DVR says hello and goodby when it turns on & off. Probably there is a setting for that I haven't found yet. Co. support is pretty decent. This is the second time I bought this. First time it was a P6F model and it was hooped. So was the USB cable that came with it. I tested the cable and contacted them, they said they were sending another one, the USB cable that is since I didn't know yet the DVR was hooped. They answered very quickly and were attentive and stayed in contact. Unfortunately my time for return was running out & no usb cable yet so day before deadline I wired it directly to my vehicle but got a BSOD on the DVR so I returned it and waited before purchasing again. This one is B6 model, other was a P6F. Difference is beyond me since I used the same button from the previous order to order it again but got a different model with slightly different parts, although the DVR looks identical. No matter, it works and works well. Anyway, thanks for reading this lengthy review, if you found it helpful at all, by all means click the button below to say so!
M**A
VSYSTO No Screen Motorcycle Video Driving Recorder Dash cam, arrived just in time for Christmas as I purchased this for my son. Unfortunately he had already ordered one for himself. I contacted the Vsysto and advised them of this , they were very understanding and accommodating, by offering to give me a full refund of the purchase price. Service was good and I highly recommended dealing with them. Marinella
J**E
Relativamente sencillas de instalar, lo que me ha sorprendido es la calidad de la imagen de este modelo en concreto.
Trustpilot
3 weeks ago
2 weeks ago