
DOWNLOAD THE APP


Customer Services
Copyright © 2025 Desertcart Holdings Limited
DOWNLOAD THE APP


🎬 Light up your content like a pro—because ordinary videos are so last year!
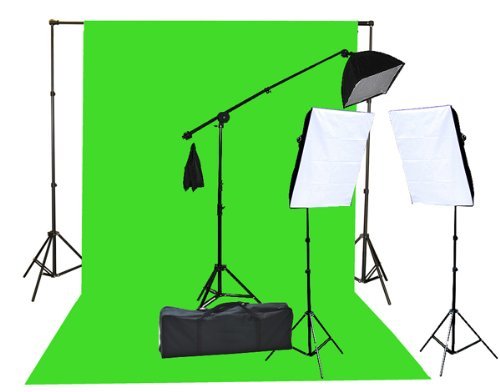
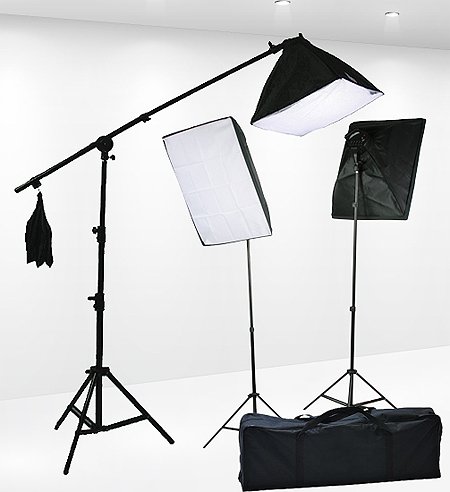
The Fancierstudio 2000 Watt Lighting Kit combines powerful 2000W softbox lighting with a large 10'x12' chromakey green screen and a sturdy backdrop stand. Designed for both photography and video, it features three adjustable softbox lights including a boom arm hairlight, all compatible with major camera brands. Compact and portable, this kit offers professional-grade lighting and background versatility to elevate your studio or on-location productions.
| ASIN | B0056BWYAC |
| Best Sellers Rank | #1,289 in Lighting Soft Boxes |
| Customer Reviews | 4.2 4.2 out of 5 stars (370) |
| Date First Available | June 16, 2011 |
| Is Discontinued By Manufacturer | No |
| Item Weight | 29.9 pounds |
| Item model number | 9004SB 10x12G |
| Manufacturer | fancierstudio |
| Package Dimensions | 35.02 x 12.62 x 11.81 inches |
D**R
Great product
Super set! Buy a steamer (like Esteam) and steam the green screen once hung. Buy a pack of of plastic clamps so you can pull the green screen tight to help remove waves. Use blue painter's tape to tape legs of screen assembly to the floor so that when you pull the screen tight, the legs do not slide. Some reviews claim some light bulbs were broken on delivery. Mine were all fine. The instructions are not detailed. You are best to use the instructions while looking at the display picture on the internet. The lights work great. Slip the light housing into the black fabric housing, then insert the tubes (blunt side first) into four holes of the light housing. The other end of the little black rods will insert into a little opening under the piece of black velcro. This will make the light fixtures look like the picture. Then white diffuser then velcro's over the the front. Be sure to put extra weights under the one big light. If it falls, the bulb will break. This kit comes in a large black duffle bag. When repacking, I put everything in the bag except for the bulbs. I put them all back into their boxes and hold them in a separate bag. Great kit. Great price. Practice setting it up - not on the day you want to film -- and you will be very happy.
I**C
Amazing!
First time buying a green screen kit. And this one is amazing I purchased this one because of the overhead hanging light which I did not see on other brands so I bit the bullet and purchased this kit. When I received the kit everything was packaged well no damages what so ever. It took me awhile to figure out how to put everything to together at first, setting up all the green screen stuff was easy but It took me awhile to figure out how to set up a light kit because it comes with no instructions but once you figure out how to put one light together all the rest was easy and a breeze to put together. Everything is strong and durable the lights are bright comes with all the bulbs needed. Everything is easy to take apart and assembly once you do it once its easy all the time. Comes with the large duffel bag to stuff everything into. Lots of different size adjustments on both the green screen holder and lights to adjust to a level you need it to be. I'm very happy with my first kit and this will last me a lifetime for what I need to do.
J**N
Manage your expectations and this is really a great set.
Like probably everyone else, I opened this up for the first time and thought "Oh crap - what is this junk?". But after actually using it for the first time, I've come around. First of all, if your goal is to create a Chroma-keyed video this will absolutely give you professional results. I was able to get a nice clean key using this with a cheap Nikon Dslr. The lights are very bright and with minimal fuss I was able to get gorgeous video and good seperation between the subject and the background. It would probably be better to have some lights to point at the green screen in addition to the subject/hair light, but it worked well and Final Cut Pro had no problem separating the background. A couple of things to be aware of: 1. You will definitely need some clamps to make the muslin smooth. A certain orange big-box home improvement store makes some terrific metal ones for .99 each - you will need 8 or 10. 2. The muslin is practically transparent, so if you can't put it directly in front of a blank wall, whatever is behind it will show through and mess up your key. Thankfully I had some blackout cloth on hand to clamp behind it which solved the problem. You will need this if you don't have any. 3. They don't give you anything to put in the weight bag to counterbalance the hair light on the boom-arm. I found that a couple of cans of canned vegetables fit in the bag and were the perfect weight to hold it steady. Yes, the construction of the stands is very low quality - the metal is paper thin, the joint clamps are all plastic - but think for a second about what you're getting. This includes 9 fairly expensive CFL bulbs that would probably cost $90-100 by themselves. You also get five stands, three light boxes, a muslin and a carrying bag. That's really a lot to ask for the price. Will this hold up to professional use and lots of teardowns and setups? No. But if you are a prosumer or hobbyist this will certainly get you started - maybe even last you a long time if you treat it with kid gloves. I view it as a very basic starter kit that will allow me to get started with green screening, and I can replace the pieces with higher quality stands and lights as these break. Just one professional light stand and light would cost several times what this entire kit does. When you put it in those terms, I think it's kind of a deal.
M**N
Easy set up - great value
New to the green screen and excited about giving it a try. Looked for awhile and thought the Fancierstudio 2000 Watt Lighting Kit with 10'x12', was a good size at a great price. The items showed up really fast, came in a huge box with a smaller box inside and a fabric carrying case inside that full of all the parts. Great idea on the carrying case, but seriously, I wouldn't want to need to take this stuff anywhere once it's set up. The set up was rather easy, but the instructions didn't include much useful information. Fortunately, it's rather intuitive 80%. The poles which hold up the green screen across the back take some playing with to figure out how they go together. Once you realize the holes needed for the screws into the stands that helps. The 2 side lights are tough because there are no good instructions for how the reflective cone thing gets attached. You need to put it over the light fixture then find the holes in the back of the light fixture and slide the associated metal pieces which come with each light. Those little metal poles have a big end and a little end. The little ends fit into holes on the back of each light fixture. You'll need to open the flaps on the light reflective covers to get them on just right, then after all the poles are in place you can move things around a little and re-Velcro. The only other real problem is the boom light doesn't stand on it's own, you'll need to find a way to prop it up. The light itself is WAY to heavy for the stand and it falls over. Just use some weight on the base, or as I did use some string to attach to the wall. Once it's set up, I did my first video and it turned out fantastic! I've got no complaints!
Trustpilot
4 days ago
1 week ago