🚴♂️ Ride Smart, Ride Strong!
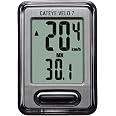
The CATEYE Velo 7 Wired Bike Computer is an essential tool for cyclists, offering a comprehensive display of speed, distance, and time metrics. With its user-friendly design and smart auto-stop feature, it caters to both beginners and seasoned riders. The reliable wired sensor guarantees accurate readings, while the long-lasting battery ensures you can focus on your ride without interruptions.


| Item Package Dimensions L x W x H | 4.29 x 3.11 x 1.89 inches |
| Package Weight | 0.09 Kilograms |
| Item Dimensions LxWxH | 1.46 x 0.71 x 2.17 inches |
| Item Weight | 0.2 Pounds |
| Brand Name | CATEYE |
| Warranty Description | 2 year manufacturer |
| Model Name | Cc-vl520 |
| Color | Black |
| Material | Plastic |
| Suggested Users | unisex |
| Number of Items | 1 |
| Manufacturer | CATEYE |
| Part Number | CA240VELO7 |
| Model Year | 2016 |
| Style | Velo 7 |
| Included Components | Cycle Computer |
| Size | 2.17 Inch |
| Sport Type | Sports Technology |
D**3
A GEM OF A COMPUTER
This is my first foray into the realm of bicycle computers. I started riding again after my two kids got old enough to be on their own. I ride mostly in town, commuting ten miles or so to and from the usual places, but I also started going on some suitably longer trips out into the countryside. And after a while, after all that time spent pedaling and pedaling, one begins to wonder certain things, like: "How fast am I actually going, how many miles am I traveling on these trips, and how long is all of this taking?"I know what you're thinking: "So why do I need a bike computer when all this information can be obtained using my smartphone's maps or other such apps along with GPS positioning?" Well, I tried that, and even after just a few trips, this bike computer is MUCH easier to use than any smartphone. Some things like this computer or any bike computer for that matter are just better suited to do one specific job.Anyway, everything is included in order to successfully install the VELO 7. If anything, you might need a few more zip ties. It took me about an hour. I have a TREK mountain bike. It has shocks, V-brakes and handlebars with a three inch rise. I also have a handlebar pannier that is situated out in front and just above the brake and shift cables; it's two handlebar clamps take up some clamping space to either side of the center handlebar clamp, and because of this, there's not much space left to add accessories like this computer. Even with all of this STUFF to contend with, installation was still a breeze.If you are thinking about installing the sensor to the rear wheel, Cuz Front Shocks, then stop that nonsense, because you won't be able to do it; the wire that runs from the wheel up to the computer itself is not long enough for rear wheel installation. It doesn't matter anyway because everything has been thought out well enough so that you can install the computer to any set of shocks.You can mount the VELO 7 on either your handlebars (parallel to you) or on your goose neck (perpendicular to you). The mount has two sets of half circles for either orientation. But if you are thinking about mounting the computer to an up-bend on your handlebars, then just realize that the mount cannot be angled back flat to the ground. The mount is rigid; it does not tilt in other words.Theft deterrent. The computer can be removed from the mount while you're away from your bike. Just slip it into your pocket!NOTE: If you really want to make the computer's data output as accurate as possible, then you need to measure the wheel's circumference as accurately as possible. Do this by marking off and measuring the distance the wheel travels in one rotation using a flat surface like the cement in your garage. Do this WHILE SITTING ON THE BIKE. If you go by the chart, then you might be off by as much as a few centimeters. That's because your tire flattens under your added weight which shortens the actual radius of the wheel/tire. Once you have this measurement (rounded to the closest centimeter, mine was 201cm) write that number down as you will input it into the computer later on.NOTE: It matters not where on your spokes and forks you mount the two sensor parts. The computer doesn't use radius measurements of any kind from your wheel for calculating data, but circumference instead (See note above).So it's easy to install, but what about the computer's functionality you ask? Well, that is even better!SIMPLICITY. That's how I would describe the functionality of the VELO 7. It has only one big button to push and one big screen to look at. That's it, and that's how it should be once you think about it: You have only one hand to push only one button, cuz the other one should be steering. And you want to be able to glance down and read the info on the big screen quickly and easily, because obviously you should be watching where you're going instead.Always on the top of the screen is SPEED. So too is something called PACE ARROW(s). SPEED is obvious but PACE not so much. These PACE ARROWS - one up, one down, or both showing at the same time - tell you when you are going faster, slower, or the same speed as your average speed.Oh, also always showing on the screen are the letters MPH, miles per hour (or KPH, kilometer per hour, if you're into that sorta thing). MPH starts flashing when you begin your trip and stays flashing until you stop at any time. The flashing MPH kinda tells you that the computer is working, making the necessary calculations. (Elapsed time is related to the flashing MPH, see below.)Pressing the big button toggles the bottom of the screen through: TM, elapsed time; DST, current trip distance; AV, average speed; MX, maximum speed; ODO, total of ALL miles regardless of current trip distance; and CLOCK, the time of day.ONE INTERESTING NOTE: The computer will stop counting elapsed time when you stop the bike. This is actually a good thing. It resumes when you begin peddling again. The flashing MPH tells you that elapsed time is happening. They are one and the same.Pressing and holding the big button for a few seconds resets everything on the current trip. All except ODO and CLOCK. ODO and CLOCK are permanent.That is until you hit the ALL CLEAR button on the back of the computer.There is an ALL CLEAR and RESET button on the back of the computer; both are small and recessed. ALL CLEAR clears the computer back the factory settings, resetting ODO and CLOCK to zero. RESET is a bit different; it allows you to change the CLOCK, change MPH or KPH, and change the circumference setting of your wheel. All this without resetting the ODO.I read online somewhere that the battery lasts for years. We'll see. The computer goes dormant after a while, and then only the clock is shown on the screen. As soon as you get on your bike and start a new trip, the computer wakes up automatically . KUDOS!!!The hardest part probably, and it's not really that difficult once you get the hang of things, is setting up the computer itself. You have to push the RESET button on the back and toggle through some simple menus using the big button on the front, then input some info. I liken it to setting up a Casio wristwatch. Remember those things? Push the wrong button and you're back resetting everything and starting over. It can get frustrating. But it's not that bad though really.Simple to install. Easy to use. Intuitive design. Actually gives you valuable data at a glance when riding. Smarter than some people I know. A big screen. This thing will literally "Get You To The Church On Time."The price is great for what you get. HIGHLY RECOMMENDED!-----UPDATE:8/13/2015-----I started having some weird intermittent signal generation problems. When riding, the computer would go to 0 (zero) MPH and ELAPSED TIME would stop. It would then start up again, then stop, then start. But things finally got worse and it stopped altogether. At first I thought it was the sensor down on the wheel; I thought the two sensor parts were misaligned or were too far apart to work properly. But that was not the case.The problem instead was a loose wire up on the mount. I must have removed the computer from the mount once too forcefully because one of those metal pickups dislodged itself just enough from its wire to stop making contact, either that or they were never properly aligned to begin with. So, I had to realign the pickup with its wire. I did this by popping out pickup from the wire using a sharp, pointed knife. Then I just pressed it back into the wire. This must have done the trick because the computer began to work again. No more intermittent signal problems.Little things like this can drive me crazy. But, I'll just file this one under "Working Out All The Bugs." Still Highly Recommended!
D**W
Great Cheap (price wise) Computer once you get it setup
This is a really nice bike computer. It is a basic bike computer with a nice detection wand that works really well. I will start by pointing out that I only use this on my trainer (I use GPS and an iPhone on the road). Since I use this only on the trainer, I do not keep it on the bike (take it off when I take the bike out of the trainer). I got this solely for the trainer, so I could see speed and distance and got this unit since it was cheap (price wise) and is easy to read).The unit is much smaller than I expected (from the photo), it is on par (size wise) with other bike computers (like the cheap ones with the Schwinn name). Although it is small, it has a very high contrast screen making it super easy to read and the large numbers make this a quick glance item.Installation is easy, you have the wand that goes on the frame (wherever you can put it for your use [usually the front frame]). You just put the magnet on a spoke where it will pass the sensor. I am installing this on the rear wheel (since I use it for a trainer). The wand can be mounted using zip ties, I did notice that it has a sticky pad on the bottom (I would not stick this to my frame...). However, zip ties are easy and safe on the frame. You than run the cable (keep it away from the drive and feet area) to wherever you have the computer (if you have this on the handlebars you would just run it up the fork and tie it down, but make sure you still have wiggle room [do not taught it up where the frame and fork meet] for turning the handlebars). I have this on my trainer (so I can look down and see the distance/speed), it will not reach from the rear wheel to the handlebars, fine with me; but FYI.My only complaint with this product is the setup! It is crazy hard (it is not a good sign when the manual is half the size of the packaging) to setup (not install, but actually setup the unit for use). The instructions are lacking and the one manual (with the graphical flow chart) requires you to know information from the other manual... You have to reset the unit using the back button, than the front button is used to increase or go through items, and you have to use the set button on the back (did not realize this at first). When you go through it you will want to put in the basic information (preferences) and read the instructions on how to set the time and input the manual circumference (I would not use the generic choices, use the chart and manually enter your exact size for your wheel; otherwise your speed and distance will not be right). Entering the time and circumference was tough since it no longer used set for moving to the next and introduced holding down the main button). This unit looks great and is easy to use and operate once setup, but the setup of the unit is a design nightmare!The unit offers numerous information. The speed on the display is the main feature and I just keep the button in Distance mode. The unit has other modes, but most likely distance is the main thing. The Odometer is nice, but I let Strava keep track of that for me (I manually enter the numbers from this unit into Strava after exercising so it keeps track of the milage on bike [I use this for just general info and maintenance intervals]). You can browse through information screens by pressing the center button and you can reset the workout by holding down the center button (this does not reset the ODO).After 10 minutes of the sensor not detecting the magnet it will go to 'sleep' and just display the time. I do not not see the point of this, since this seems like it would waste the battery, and if I am not moving I am not on the bike and do not need to know the time. It is hard to say how the battery is, since I have not had this that long. However, I just think it would go further without keeping the display on for the time.In the end this is a great bike computer. It has a large display with easy to read numbers and is easy to install (not so easy to setup, but once you do it, you are good; until the battery dies). The unit detects the magnet with no problem and I have not had any issue. It is very nice looking and works perfectly. I am very happy with this unit and highly recommend it for a bike computer!
S**O
Pretty accurate, smaller than advertised
The speedometer is pretty easy to set up if you’re not a vegetable, it is smaller than you think, around 1 7/8 inches tall and 1 1/2 inches wide. It is very readable, I don’t know how accurate it is since I only rode it in the backyard once, but it seems accurate since it calculates the rpm of the wheel instead of gps. It runs off of a button battery which should last a long time (replacing it needs a flathead screwdriver) overall, it seems like a good purchase, I’ll see how it holds up in the future. My only complaint is how it is small compared to the pictures (5 stars so more people see this, I give it 4 stars tho)
M**P
New bike, new computer - great product
Just ordered this for my 2nd bike.It's easy to use and reliable. Once I install these computers, I never have to worry about them - they just work. And the battery life is great!!I keep buying them, so yeah, I would recommend them to a good friend.
J**.
Great Battery Life
I have Cateye products for years. The battery lasts for seasons not months.My last one got physically damaged but was still running after 10 years
B**Y
so far so good
so far so good, still checking milage accuracy
T**K
Great Value Odometer
Got this a few months back and it hasn't disappointed. Easy to use, lightweight, and while the module itself is subtle enough, it has an easily-read display. It's hard to read if riding at night, but a headlamp can fix that easily. I've mounted it both on my stem and handlebars without an issue. Definitely a must-have when cycling.
Trustpilot
4 days ago
1 day ago