🛒 Roll, Lock, Organize — Your Productivity, Upgraded!
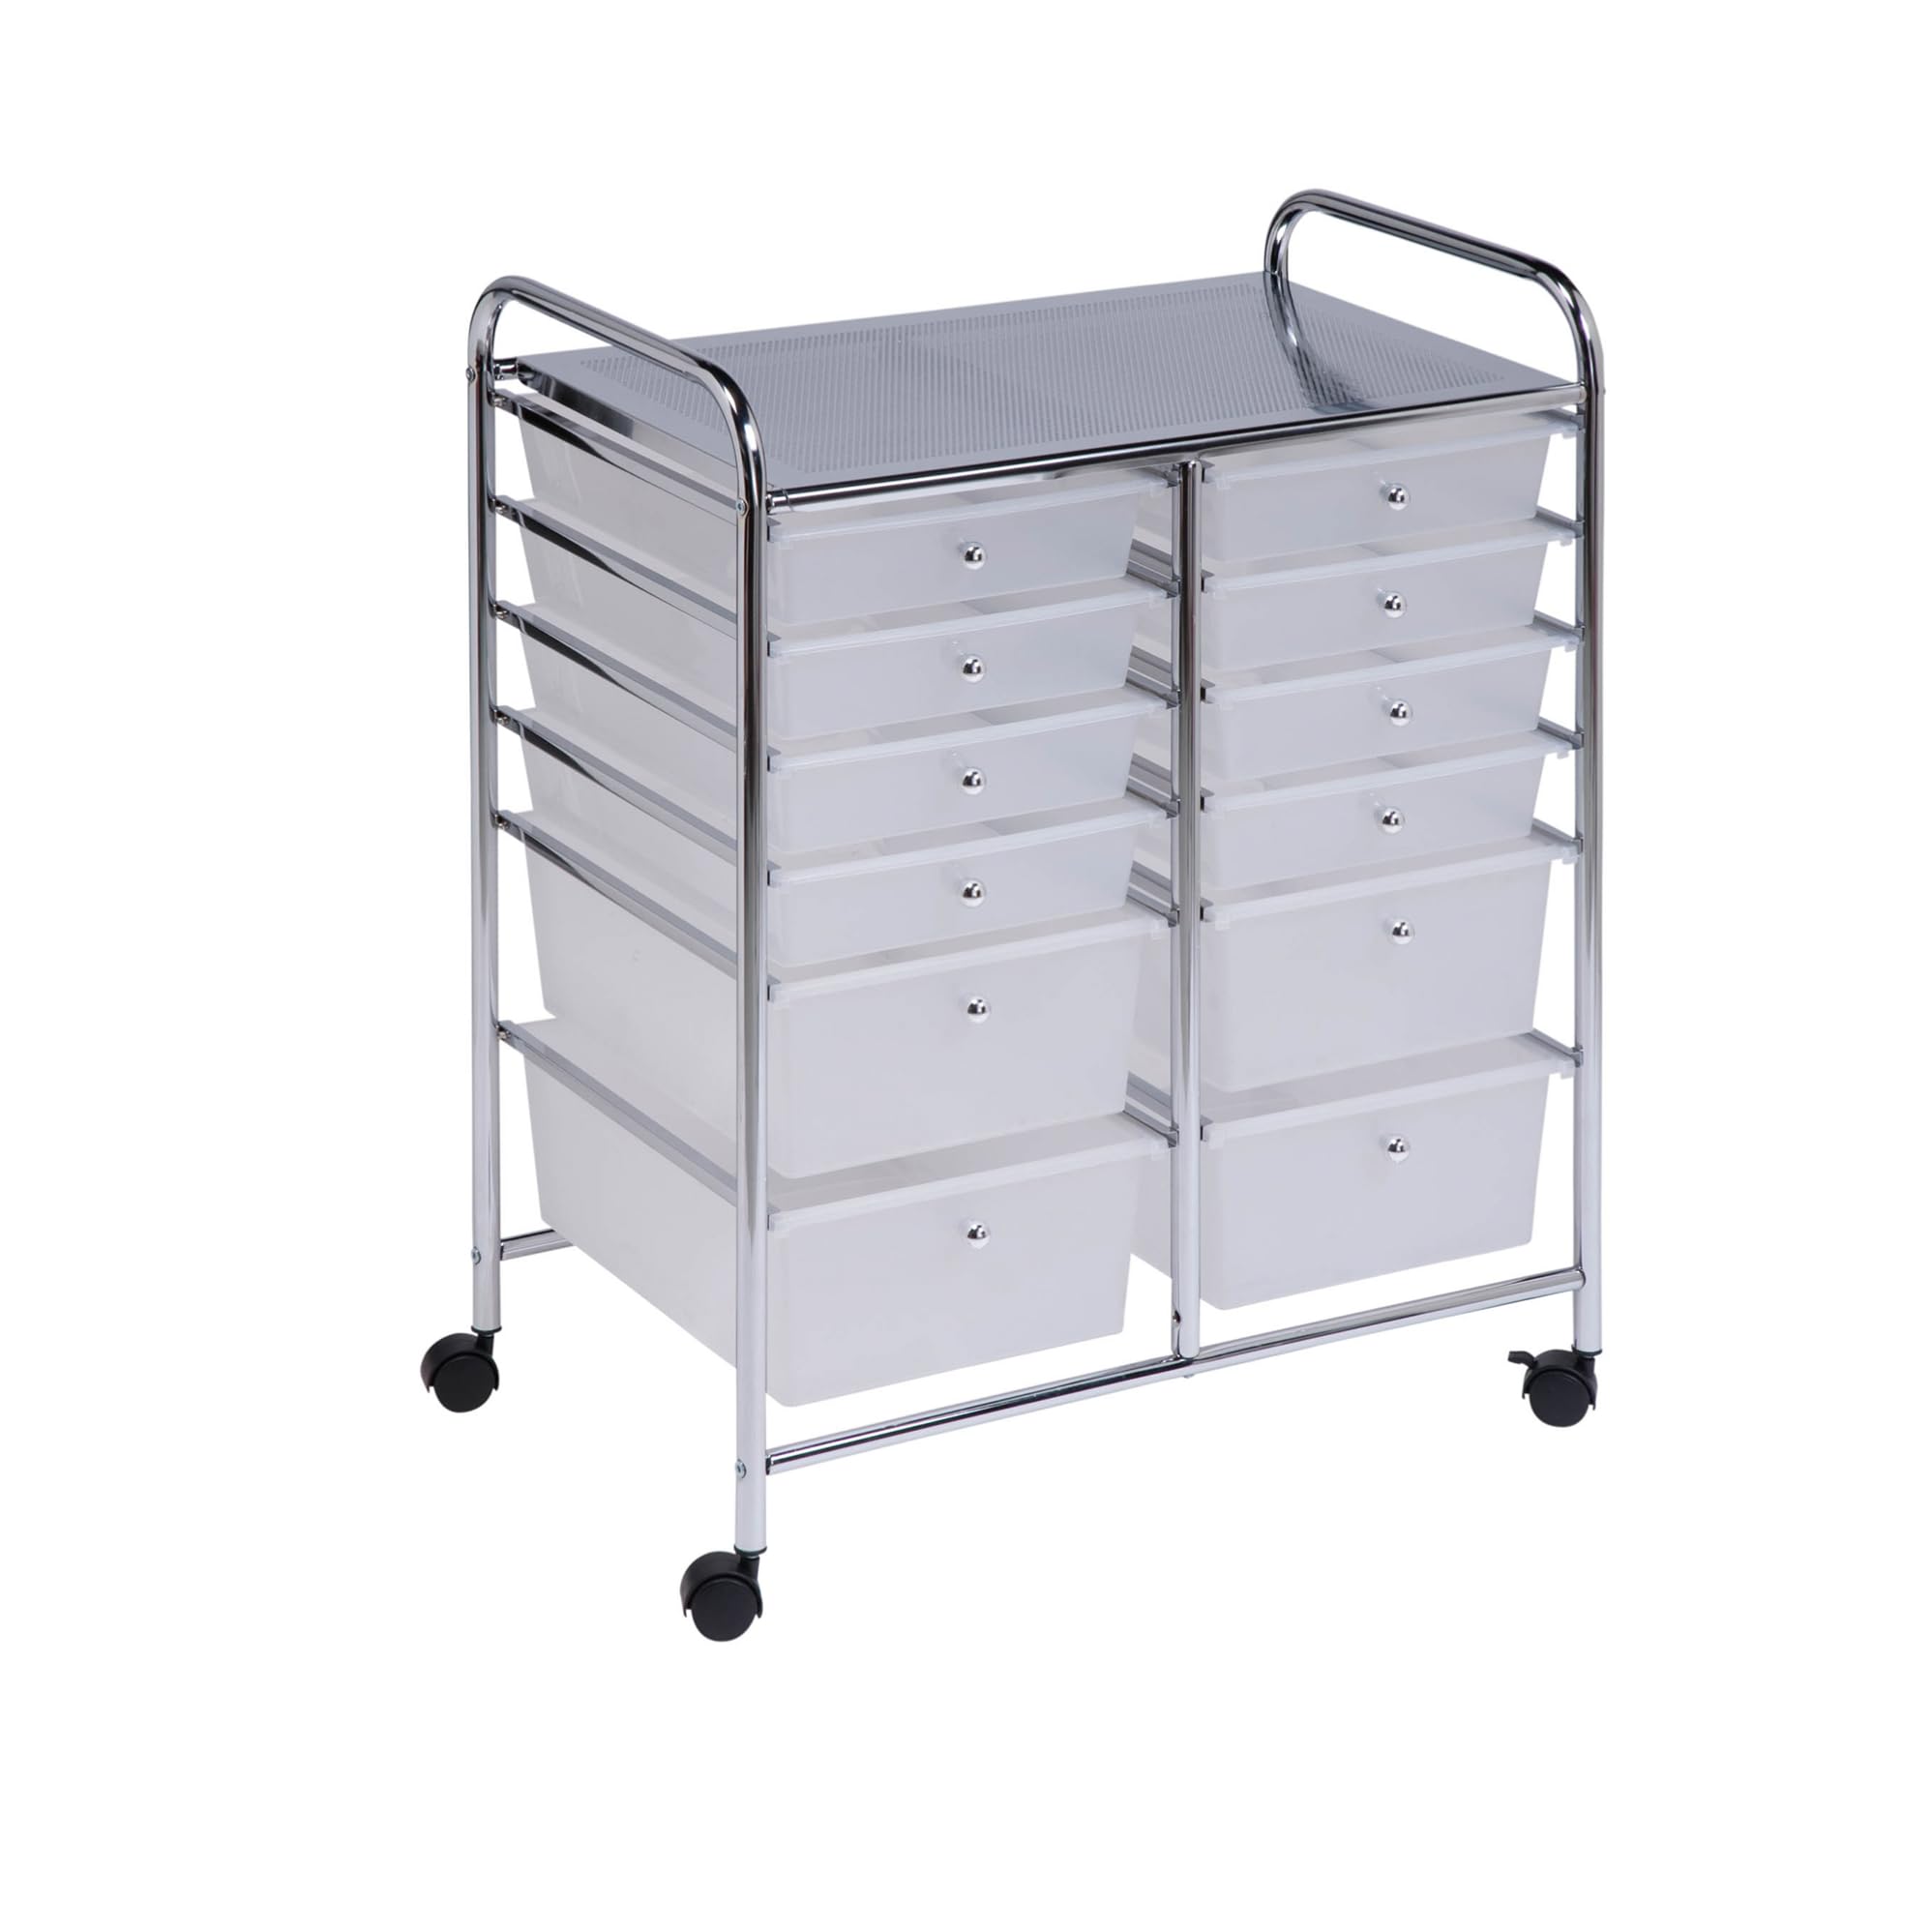
The Honey-Can-Do Rolling Storage Cart features 12 semi-transparent plastic drawers in two sizes, a durable chrome frame, and locking wheels for both mobility and stability. Measuring 15.25"D x 25.25"W x 32"H with a 29-inch high work surface, it’s designed for versatile storage and workspace needs in home, office, or studio environments. Easy to assemble with included tools, it’s a smart, stylish solution for organized multitasking professionals.


| Brand | Honey-Can-Do |
| Color | Chrome |
| Material | Metal, Plastic |
| Number of Shelves | 12 |
| Product Dimensions | 15.25"D x 25.25"W x 32"H |
| Special Feature | Portable |
H**W
Well worth the money, especially if it is on sale
Some of the bad reviews made me question buying this storage cart, but I'm so glad that I decided to go ahead and order it. It came quickly. It was very easy to put together. All of the holes were where they were supposed to be, and all of the screws fit easily. It is quite study and well designed. I haven't had any problems with the with the drawers sticking. One reviewer said to lift the front of the drawer a little when you pull it out, but I don't even have to do that. I don't know if I am lucky with getting a "good one", or if the manufacturer has made some improvements. I am just glad I bought it and am considering if I could use another one. I have been a crafter/artisan/seamstress for over 60 years and have several on-line shops. Family and friends joke that I could probably outfit a craft store, which tells you that I use lots of different types of storage items. In one of my shops I make and sell custom quilts. I have so much fabric around and am always working on multiple projects at the same time. Recently I decided to find a storage item that would let me separate various started quilts and keep the pieces and misc. for each quilt all together. This storage unit works perfectly. It lets me store the pieces of 4 quilts that are in the more advanced stage in the larger drawers (about 5" deep), use 4 of the smaller drawers (about 2 1/2" deep) for the beginning pieces and misc. for 4 quilts that I am just beginning, 1 of the smaller drawers to hold quilting specialty thread, and the last smaller drawer to hold quilting rulers, instruction booklets, and various quilting machine maintenance tools. Plus the top gives me an extra "counter top area" to use while I am sewing on either my regular sewing machine or long arm sewing machine, or ironing the fabrics or already pieced sections. It is exactly what I needed. Another biggie is the price. I had found this item on Amazon, and saw the regular price listed and the current sale price. Because it is not an inexpensive item, I decided to check out JoAnne Fabrics to see if they had something similar and at a better price and with better reviews. It turns out that JoAnne's regular price for this same item is double what the list price is on Amazon, and their half-off price is what Amazon's regular price is. Plus I got the Prime free shipping. It was a definite no-brainer. The only other question was if I dared take a chance on the reviews. As I mentioned before, I am so glad I took the chance and bought this from Amazon, and will probably by another one.
J**.
Take a good product and make it work better for you
After reading past reviews of the pros and cons of these "made in xxxxxxx" [not the USA], I decided to give this one a try. I was leery of possible breakage from shipping, but that turned out to be a non-event, because everything was very well packed for shipping. Putting the article together was not difficult at all. Long frame screws are hex head and they give you the allen wrench to do the job with. Knob screws are slotted but all you need to do is apply pressure with a finger and turn the knob to tighten it. Many people complained about the screws loosening after a while. Here is a simple solution: When you order this item also order either Henkel Corp 209728 Loctite Blue Threadlocker or Permatex 24200 Medium Strength Threadlocker Blue, 6 ml. Now here is how to do it: 1. Start assembling the item, but leave the top cover off and the wheels off. After all screws are in, tighten them snugly but not overly tight. 2. Now that all screws are holding the device together, remove one screw at a time. On the long screws, put a few drops of the threadlocker onto the bottom half of the threads. Just lightly coat the threads; be careful or it will drip all over because it is runny. 3. Now screw the screw back in place, but this time make it secure. start with the top-center screws, top side, bottom side, rotate the assembly and bottom center and rotate once more, then bottom & top of other side. Voila! The threadlocker will secure the screw threads to prevent slippage. Which means the screws will not easily come loose. 4. Put the wheels on and put the top cover in place now. 5. You can even use the threadlocker on the screws that hold the knobs in place. Again, insuring that they won't easily come loose. I didn't find any rough edges on the drawer slides, so I don't think I will experience a scraping/shaving of the shelves. It really looks good, and I am sure I am going to find it very useful. For anyone who uses it for heavier items, there is a way to make it sturdier. Get a big roll of 50 pound or 100 pound picture wire and a pair of ordinary pliers. On the back side of the assembly, tie a length of wire from top right to bottom left and another piece of wire from top left to bottom right. pull tight and twist the wire to make it extra snug. You have just made a brace for your shelving with inexpensive materials. Hope this helps some of you to take a good product and make it work better for you.
J**X
Perfect cart for my needs
Note this is my wife writing this review... After reading all the reviews I still decided to go with the Honey Can Do Cart, in the end it was exactly what it I needed. Portable, compact and a lot of room for storage. I do a lot of paper crafting so all the drawers are perfect for all the different items I needed to contain, stamps, paper, inks, paints and tools. I also like that the top is a nice smooth finish which works perfect for a table, so needless to say it's great when I want to roll it out into the living and watch some TV while I craft. What I neglected to read was the overall drawer size it does not fit a standard portable paper trimmer that's 12" long, or 12x12 paper , while it's really no big deal because I ended up sewing a little 13x13 tote that hangs on the side for my 12x12 sheets of paper and my paper cutter it may change a few people's mind from purchasing it. I also love that it's clear not color like the others that I looked at, I really just wanted it to blend in to any part of our home and not be an eye sore, while I'm sure part of the cost is in the color, or lack of I shall say it was worth it to me to pay that extra few bucks. Assembly was super fast and easy, I was able to put it together in less then 25 mins while my daughter slept for her morning nap. It was assembled long before she ever realized their was a huge cardboard box, and plastic bins to play with, which was great. I will say that my 16 month old loves to open and close the drawers, while it's no fun for mommy when I don't stop her in time, the drawers open smoothly enough that our daughter doesn't have a hard time pulling and closing them, and she can easily roll the cart around even with all the items inside. The structure of the cart is very sturdy and feels well made, all the bins arrived in tact. One thing that felt cheap was the knobs on the drawer bins, they are made of plastic so what can you expect, but they get the job done.
T**.
Nice Craft Cart - Really Hard to Make Wheels Fit!
I like this cart, and easily put it together in 10-15 minutes… and then I spent 20+ minutes trying to figure out how to get the casters/wheels into the legs! Because I read the reviews, I knew to check to make sure the plastic drawers weren’t broken before I started putting the cart together (thank you, other reviewers). Once I confirmed all drawers were unbroken, I quickly put the cart together using the tool provided. It was easy. Before I put in the drawers, I carefully flipped it over onto my living room rug to push in the casters and wheels… and they absolutely wouldn’t fit. Like, not even close. I am 5’9” and regularly lift weights, and I was pushing down on these with all of my strength, to no avail. I watched videos here, trying to see if anyone else had the same problem (yes). I tried greasing the casters with dish soap as suggested, and then pushing them down. Nope. I read that someone used a rubber mallet to make them fit, and I don’t have one of those, so I used a regular hammer, but covered each wheel with a folded up washcloth so the hammer wouldn’t break the wheel (and to distribute the weight of the blow). It took a few gentle but firm hits with the hammer onto a folded up washcloth placed over each (dish soap greased) wheel and caster, but the wheels finally went in. One wheel has a bit of broken plastic which I tried to show in a picture, but the cart sits level, as you can see by the bead sitting on the flat middle top surface (in the picture I shared). If the wheels were the correct size and went in more easily, this would be a five star review, because for the money, this organizes my jewelry-making supplies (@ mamawolfmalas on Instagr@m) really well and keeps the cats out of my stuff. I also love that I can have it next to me while I get creative on the couch, but can also roll it into a spare room if we have company over. In short: Great craft organizer cart! Please figure out the wheel situation, sellers of this product, however, because, whew! Assembly started out easy and ended up being somewhat stressful!
P**.
Perfect for Craft Supplies and 3D Prints
Rolling Storage Cart and Organizer with 12 Plastic Drawers has been an absolute game-changer for me! Originally purchased to organize my extensive collection of craft supplies, it's proven to be incredibly versatile. The 12 spacious drawers are ideal for storing everything from yarn and beads to scissors and paints. They slide smoothly and are transparent, making it easy to locate exactly what I need without rummaging through each drawer. Recently, I repurposed this cart to organize my 3D printings and accessories. It's fantastic for keeping filament spools, tools, and printed parts neatly organized and easily accessible. The sturdy construction and smooth rolling wheels make it effortless to move around my workspace as needed. Assembly was straightforward, and the cart is surprisingly sturdy for its size. It's also compact enough to fit in tight spaces while offering ample storage capacity. I can't recommend this storage cart enough—it's durable, practical, and perfect for anyone who values organization and efficiency in their hobbies or workspace!
G**.
Don’t have the issues many others have
I was hesitant to purchase this unit based on the reviews about difficulty in assembling, drawers broken, inability to open-close drawers. Metal sharp enough to shave plastic from drawers etc. Disclaimer - I JUST put this thing together and haven’t loaded anything in it yet. That said: 1. Assembly took me about 35-minutes start to finish. 2. Allen wrench provided was adequate to assemble main frame. 3. Phillips/straight head screws for drawer knobs can be hand tightened without a screwdriver. No screwdriver supplied with kit. I didn’t need one - hand tightening was adequate to secure drawer knobs. 4. Main frame assembly was uneventful - just make sure of TWO things during assembly - a. There are washers that MUST go on the inside of the two outer frame pieces. They’re shown in the assembly diagram. IF YOU FORGET THEM - the sides will be too close together and the drawers will be very difficult to push in and out. I tend to think some people neglected to install the 8 washers properly (if at all). B. Do not tighten the screws as you install them initially. Install all the framing screws hand-tight first, and then, making sure the aforementioned washers are installed, tighten each screw incrementally - working your way around the unit until all the screws (Allen head wrench needed) are SNUG. If you over tighten, you run the risk of collapsing the frame tubing and that’ll ruin it. 5. Once everything is tight - turn the frame over and insert the caster inserts in the bottoms of the legs. These are plastic pieces that will hold the casters themselves. Press in as hard as you can - check to make sure they’re ALL the way in. Mine were out a little ways. Instead of pressing down with your body weight (risking damaging the frame), I used a hammer and just gave 3 of the more stubborn inserts a quick ‘pop’ and they seated easily. 6. I pushed the casters into the inserts. NOTE - there are two of the four casters that lock - make sure they’re on the front or side you want to access to lock. You’ll have a booger of a time getting them back out - yeah - that’s why I’m telling you this now. Lol 7. Put the drawers in the slides. Mine slid in easily without force, or scraping plastic, etc. I FORGOT TO PUT THE SPACERS/WASHERS IN INITIALLY - and basically recreated what I read here about stuck drawers, hard to operate, cocked in the tracks, and cutting the plastic. I performed a ‘self-induced forehead slap’ procedure, then backed the frame screws out one by one and installed the spacer/washers - problem solved. 8. Tighten everything up again - and then put the top on. It’s a ‘force fit’ top with curved sides front and rear. I put the front of the top in position, then pulled/pushed down on the rear of the top and it popped into position for me. The unit is sturdy without anything in it. The load specification is right at 50 pounds for the cart. I’ll keep things as evenly distributed in there to equalize loading and see how it goes. IF I have any issues with screws coming loose, I’ll remove each in turn and put some thread lock on them. Other than that - the drawers slide in and out and are well in their tracks. It’s ‘cheaply’ constructed of very thin wall metal (aluminum with chrome coating). Some of the press cut edges that are the rails for the drawers to slide on are RAZOR SHARP & I can see how someone handling them during construction if not careful can cut themselves - badly. BE CAREFUL!!! In closing - I’m going to load this unit up with my wood ship modeling tools and will provide an update after a week or so to comment on durability, stability, frame flex, etc. So far - I’m okay with the unit. Not super impressed by any means, but not disappointed either. I’m more relieved that my unit came with all parts included, I didn’t cut any fingers off, and the drawers slide in and out without any effort. It meets my initial expectations. I’ll update after a while.
H**Y
TIPS for those having trouble/frustrated with unit - don't give up on it yet!
I just put this thing together. I thought I'd write a review because I have a few tips. After reading others' reviews I want to clarify a few things that I think might have gone wrong for them. 1) Some have complained that the drawers get stuck and do not slide in and out easily. Mine slide in and out very easily. BUT that is after I fixed a mistake I made while initially putting it together. I forgot about the black washers, which MUST be used otherwise you will have problems getting the drawers to slide in and out. The washers provide the space that allows drawers to slide with ease. 1) The drawers arrive all stuck together and some folks could not get them apart, or got them apart with great difficulty. My tip: Take out the plastic saran-type wrapping that is in between the drawers. Pull them out carefully. The clear plastic wrap has a suction effect on the drawers. Once you've extricated the plastic wrap, then it gets WAY, WAY easier to pull apart the drawers. Start with one side of the stuck-together-drawers and get it to give even just a few millimeters, then switch to other side of the drawers and even it out. You need to even it out on both sides as you work, or else you will not make progress. Repeat until you have separated drawers from each other enough that the can be pulled apart. No hammer, butter knife, or other tools needed! THank goodness. 3) The wheels - yes they are flimsy if you don't install them properly. You will need a hammer or some kind of hammer-type object to push the black 'accordian-like' pieces all the way into the legs. You should not see the accordion part of those pieces anymore. THEN you can insert the caster wheels. THEN use your body weight to push down on the entire upright-standing unit so that the caster wheels all click into place and stay in place. Hope this helps!! Now I have a very practical mobile storage unit for my art supplies!
J**J
Rolling cart
Easy to put together, good-okay quality.
Trustpilot
1 week geleden
2 weken geleden


