
DOWNLOAD DE APP


Klantenservice
Copyright © 2025 Desertcart Holdings Limited
DOWNLOAD DE APP


🖼️ Frame like a pro, join like a boss!
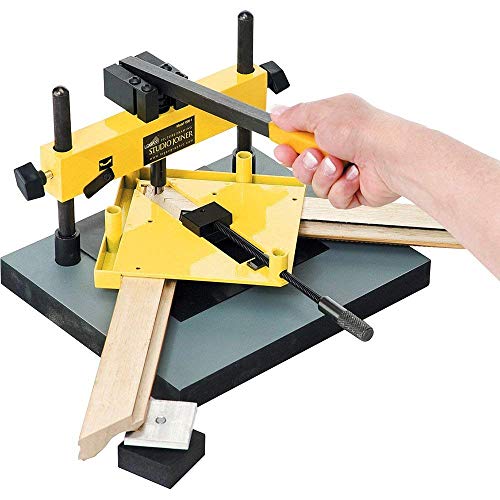
The Logan F300-1 Studio Joiner is a professional-grade framing tool designed to create perfect, permanent wood frame joints with ease. Featuring a magnetic nail holder and quick depth adjustment, it works seamlessly on both hard and soft woods. Made in the USA and including 200 free V-nails plus a 1-year warranty, it’s the trusted choice for hobbyists and pros alike.
| ASIN | B0009INFI2 |
| Batteries required | No |
| Best Sellers Rank | 457,566 in Home & Kitchen ( See Top 100 in Home & Kitchen ) 26 in Framing Tools 8,623 in Posters & Prints |
| Customer Reviews | 4.3 4.3 out of 5 stars (215) |
| Date First Available | 12 Nov. 2011 |
| Item model number | FBA_F300-1 |
| Product Dimensions | 22.86 x 9.4 x 28.96 cm; 3.93 kg |
C**L
I would recommend any purchaser to view the online video on Logan's ...
Does what it promises to do. I would recommend any purchaser to view the online video on Logan's website (details were included in the box) as the paper instructions were not as clear as they might be. The video, though, was excellent and had us stapling away happily in a few minutes.
R**T
Useful picture framing tool
Same tool used in my recent picture framing course so have bought one to use at home. Simple to use and efficient.
A**R
The studio joiner works as advertised and the seller was ...
The studio joiner works as advertised and the seller was exceptionally helpful when it arrived with a damaged part. They arranged for a replacement from the manufactures and kept me informed of what was happening. They were excellent
A**N
Works well some of the instructions regarding the use of ...
Works well some of the instructions regarding the use of support spacer were not clear but works well once you have worked it out practice on scrap material is a must.
P**G
Good for small frames, but that’s it.
Over priced and complicated for anything large. Perhaps avoid this if you have anything larger than an A4 frame to put together.
J**1
Useful framing tool
This tool is fine if you follow the instructions carefully, though helpful to watch u-tube video as well. Don't forget to use bevelled edge of nail side down to go into frame, practice on sample bits first. If you want to do a lot of framing best to buy the more expensive model. Probably more efficient. This took quite a lot of fiddling about to be accurate but I guess practice makes perfect.
T**R
The mitre clamp issue
I've had my studio joiner for a couple of months now and have found that the mitre clamp won't tighten up the joins as much as it used to. Once it's gripped the moulding in place it simply just clicks when trying to tighten up. Before I go through the long process of returning it I wonder if anyone else has come across this?
A**O
Hace más rápido el ensamble, yo uso una engrapadora, conectada a la compresora y todo es más rapido
M**K
It's really good to pin a frame , I really liked it .
A**O
Deludente e, quanto all'ingegneria costruttiva, rappresenta una vera offesa all'intelligenza media. Se rapportato al prezzo, mi sembra ... un furto autorizzato, "nu mariuliggio "... e chest'e!!!
J**N
I read a lot of reviews on this product that are negative. I experienced the same problems with this joiner as many of the others who are complaining. However, with practice, I find this to be a good product. Don't expect perfect corners immediately - it takes practice. Most of the complaints are that as you are pressing the V-nails into the back, the front is spreading, leaving a gap. The reason is lack of support under the frame, and there is a simple solution for this. Using two pieces of the same scrap frame material, make a simple corner joint, BUT MAKE IT BACKWARDS. The result is that you have a corner with a mirror image contour that you can put under your frame corner to provide overall support no matter where you put the V-nail. Using this method, I rarely use Logan's support bracket that comes with the joiner. Also, watch the calibration of your saw - you MUST check the 90 degree vertical and 45 degree miter angle of the saw with a carpenters square. It has to be perfect; these corners are super-sensitive to very small angle errors. Otherwise you will get joints with gaps no matter how good you are at using the joiner. Don't depend on your saw to remain calibrated forever. With use, it drifts. Check it often. I check mine every 50-75 cuts. And finally, use Logan's suggestion of coloring the edges of the joints with wood stain. It hides minor joint errors. I use a stain pen - it's easy to use and doesn't require opening a can of stain every time I want to join a corner. I've been using the joiner for roughly 6 months - I have no problems getting good joints.
R**R
Great tool
Trustpilot
1 maand geleden
3 weken geleden