We remain fully operational. Our teams are working around the clock to ensure your deliveries continue safely.

DOWNLOAD DE APP


Klantenservice
Copyright © 2025 Desertcart Holdings Limited
DOWNLOAD DE APP


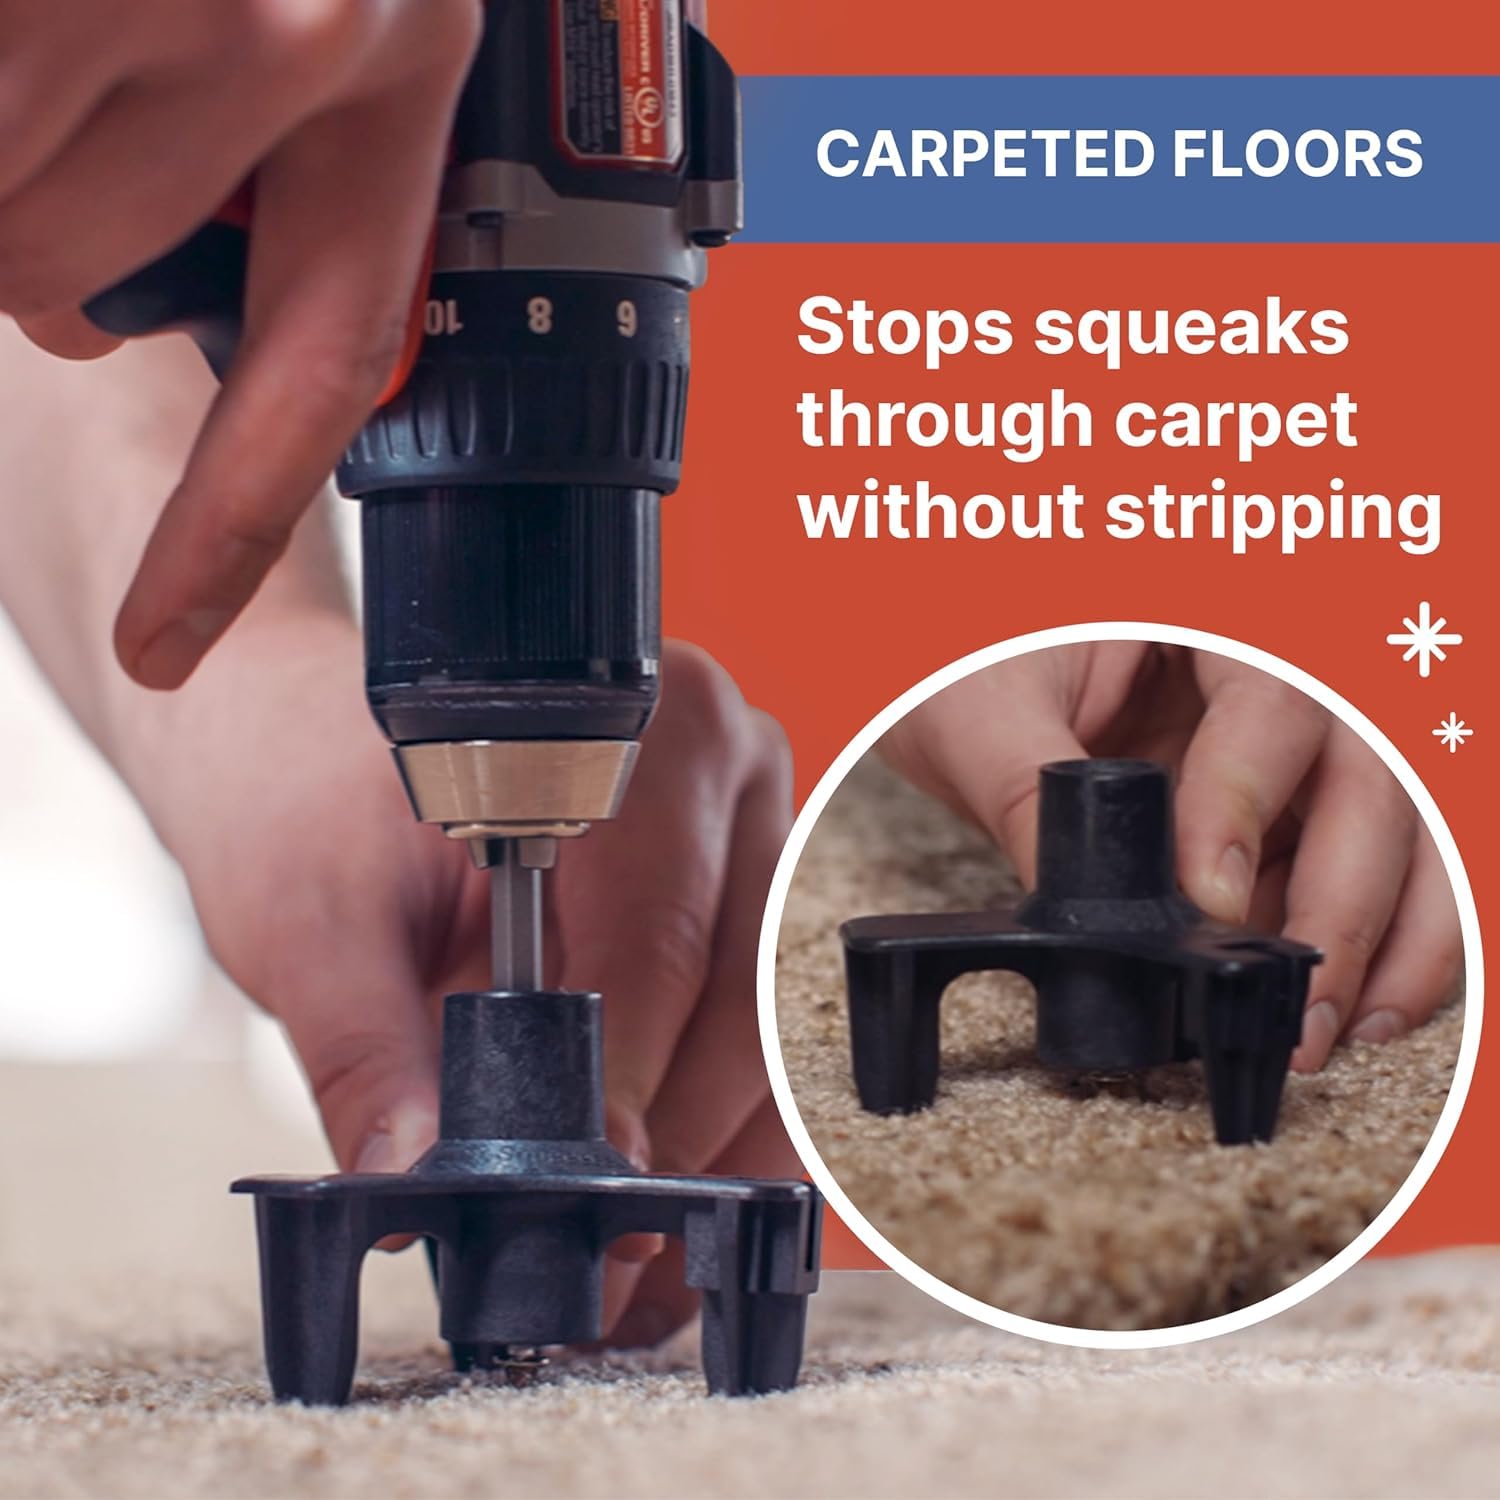


🔧 Silence your floors, amplify your peace of mind.
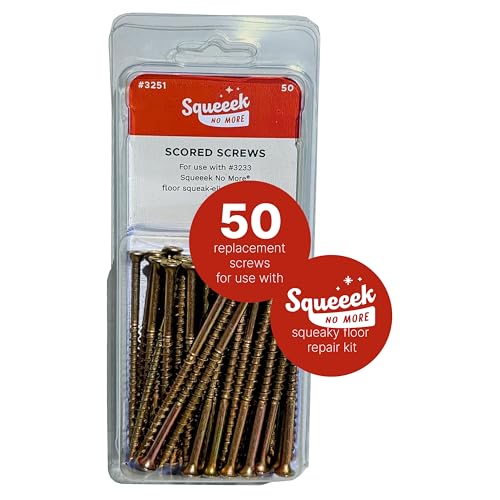
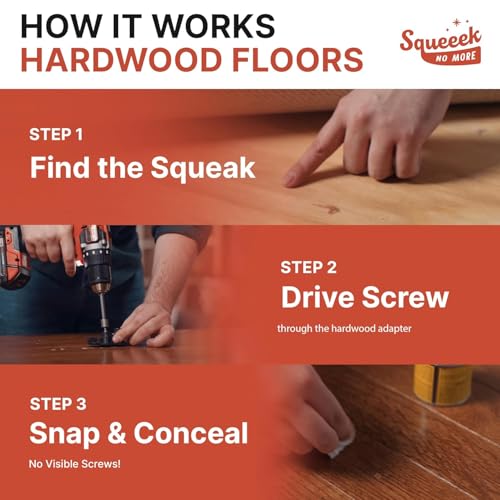
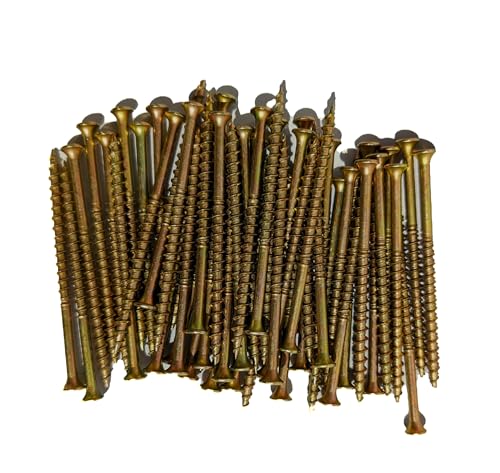
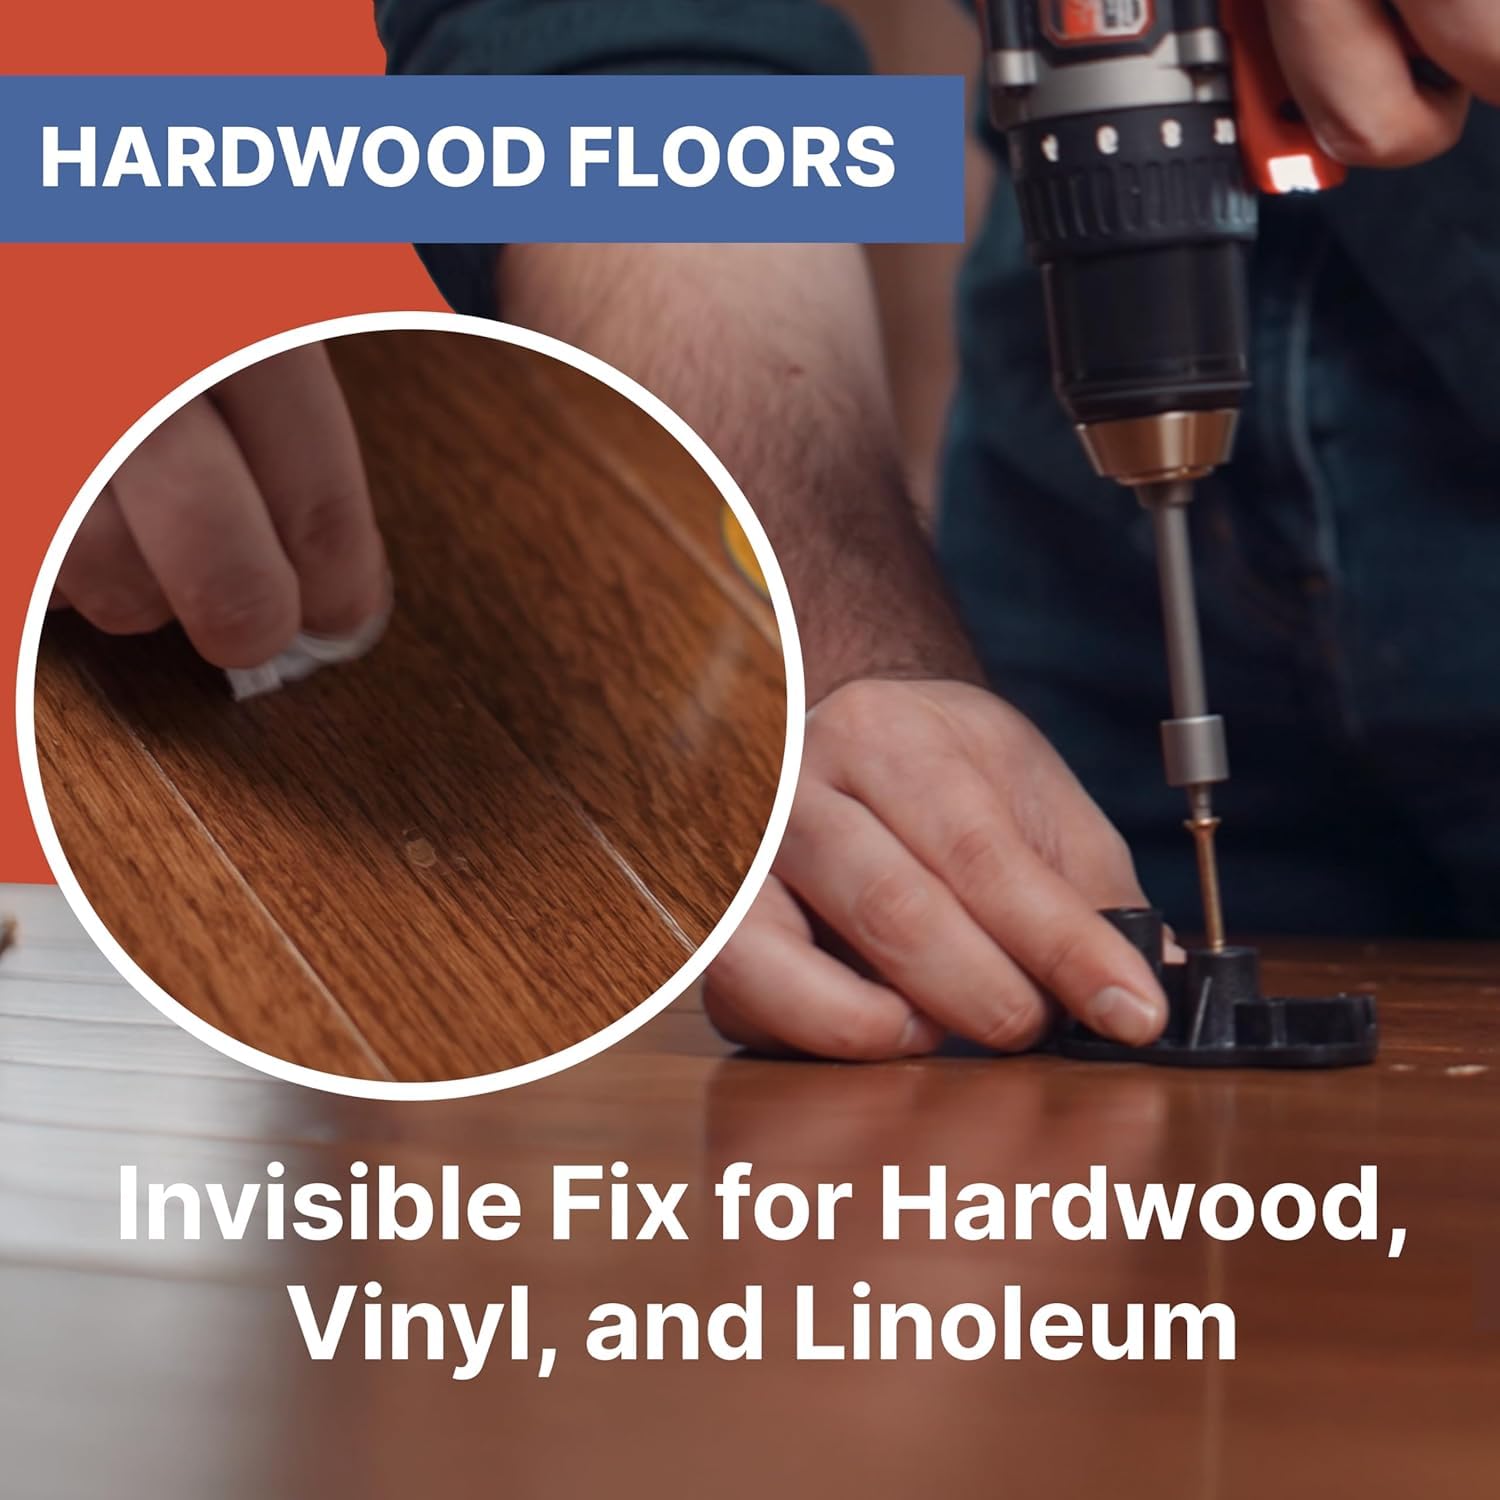
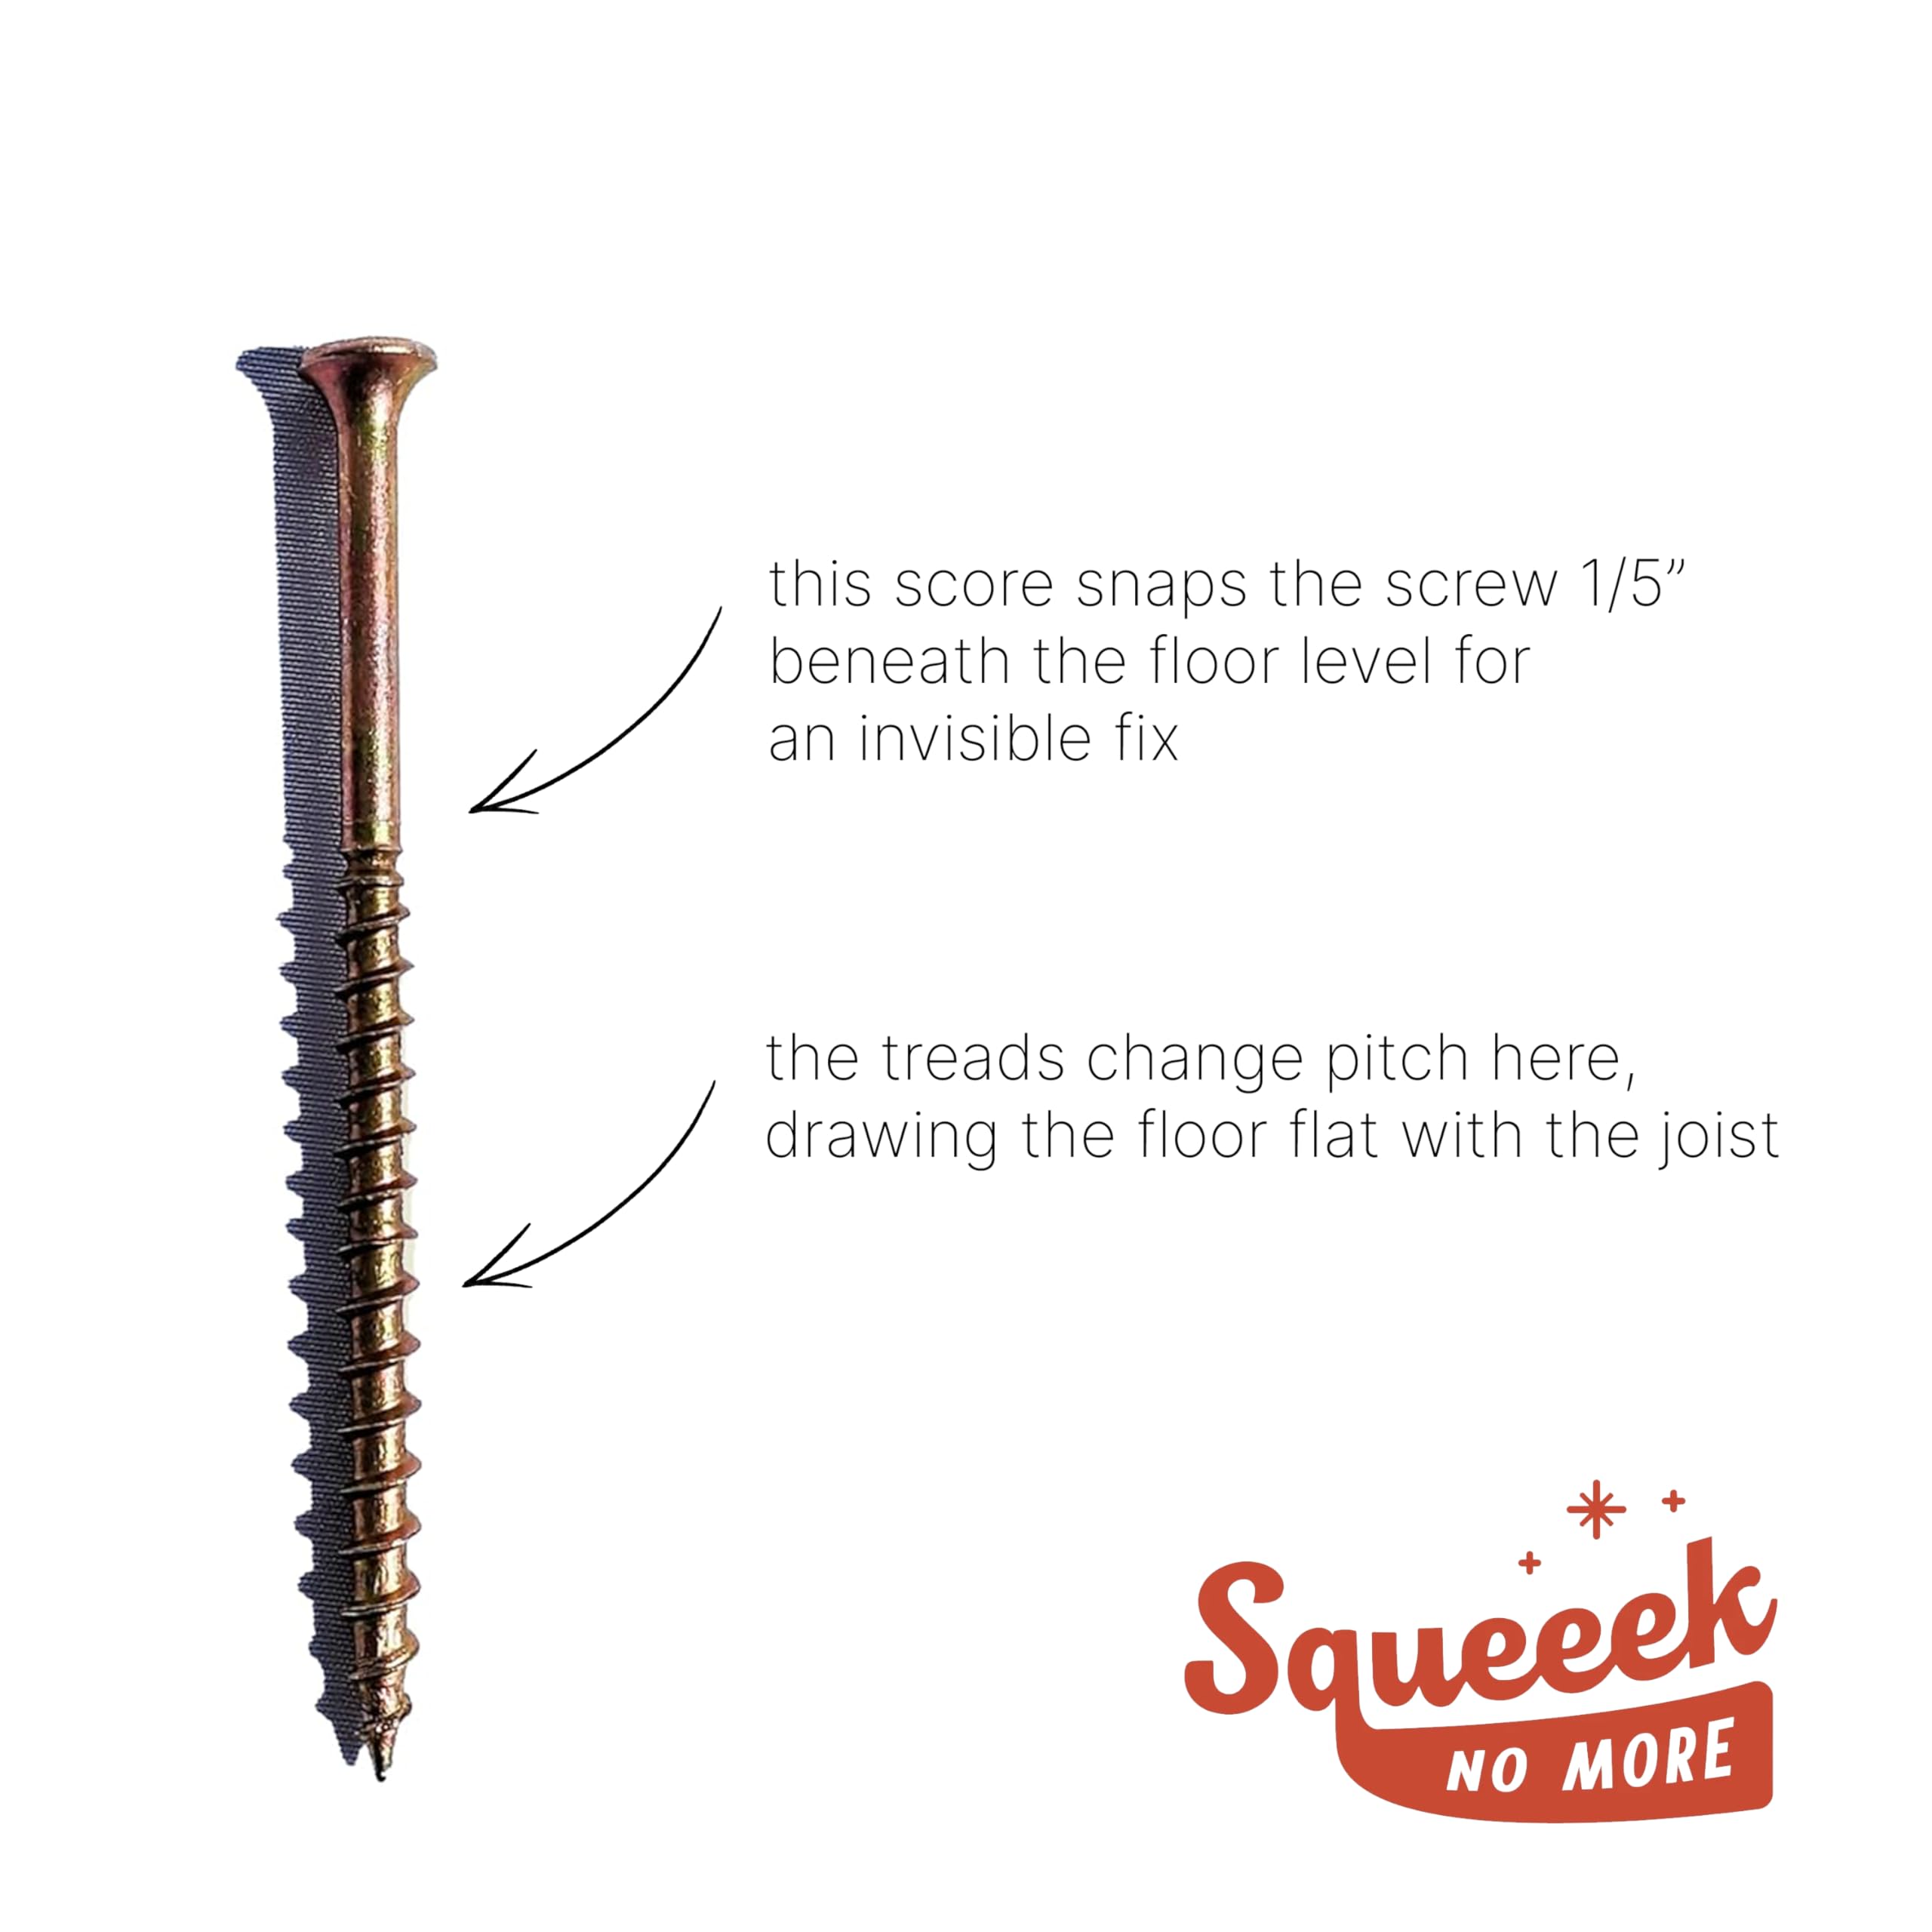
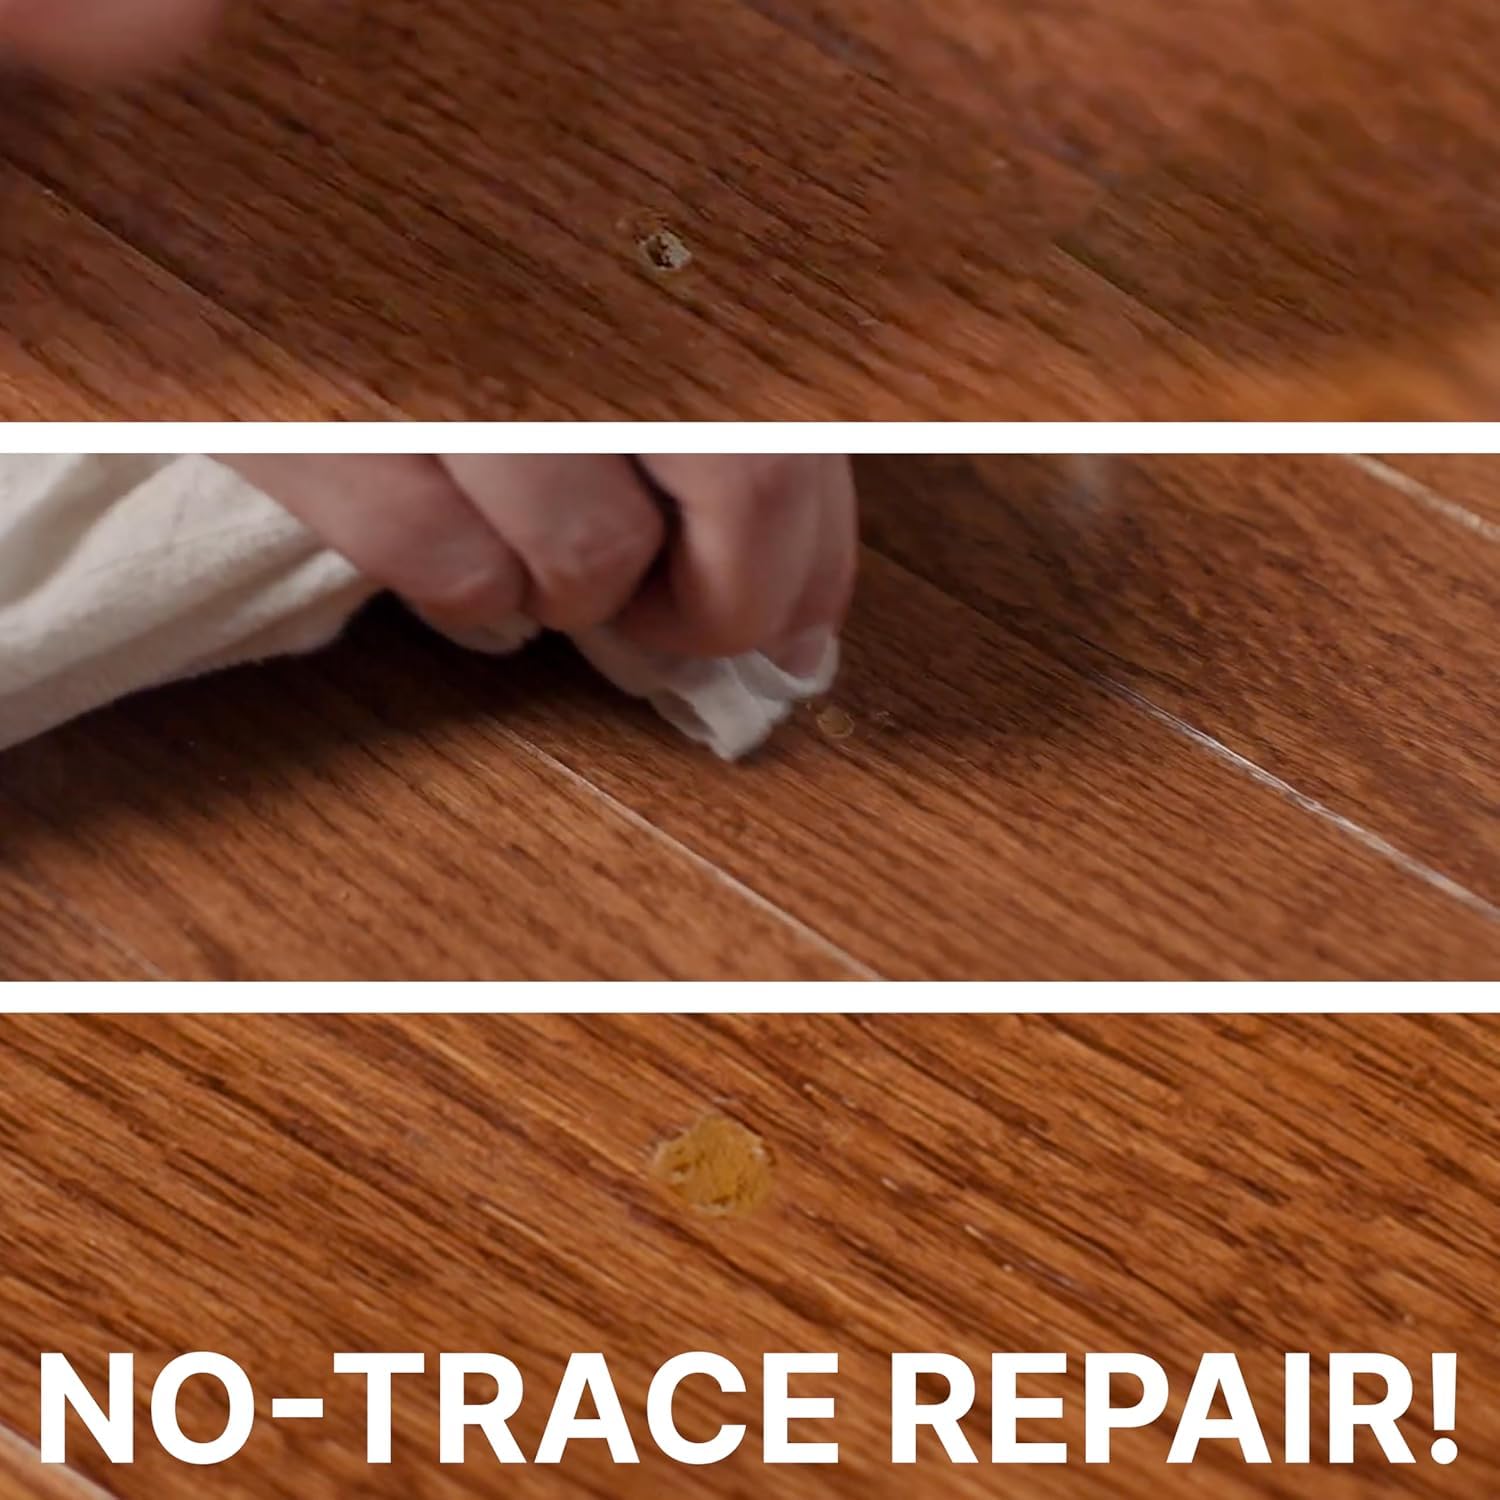
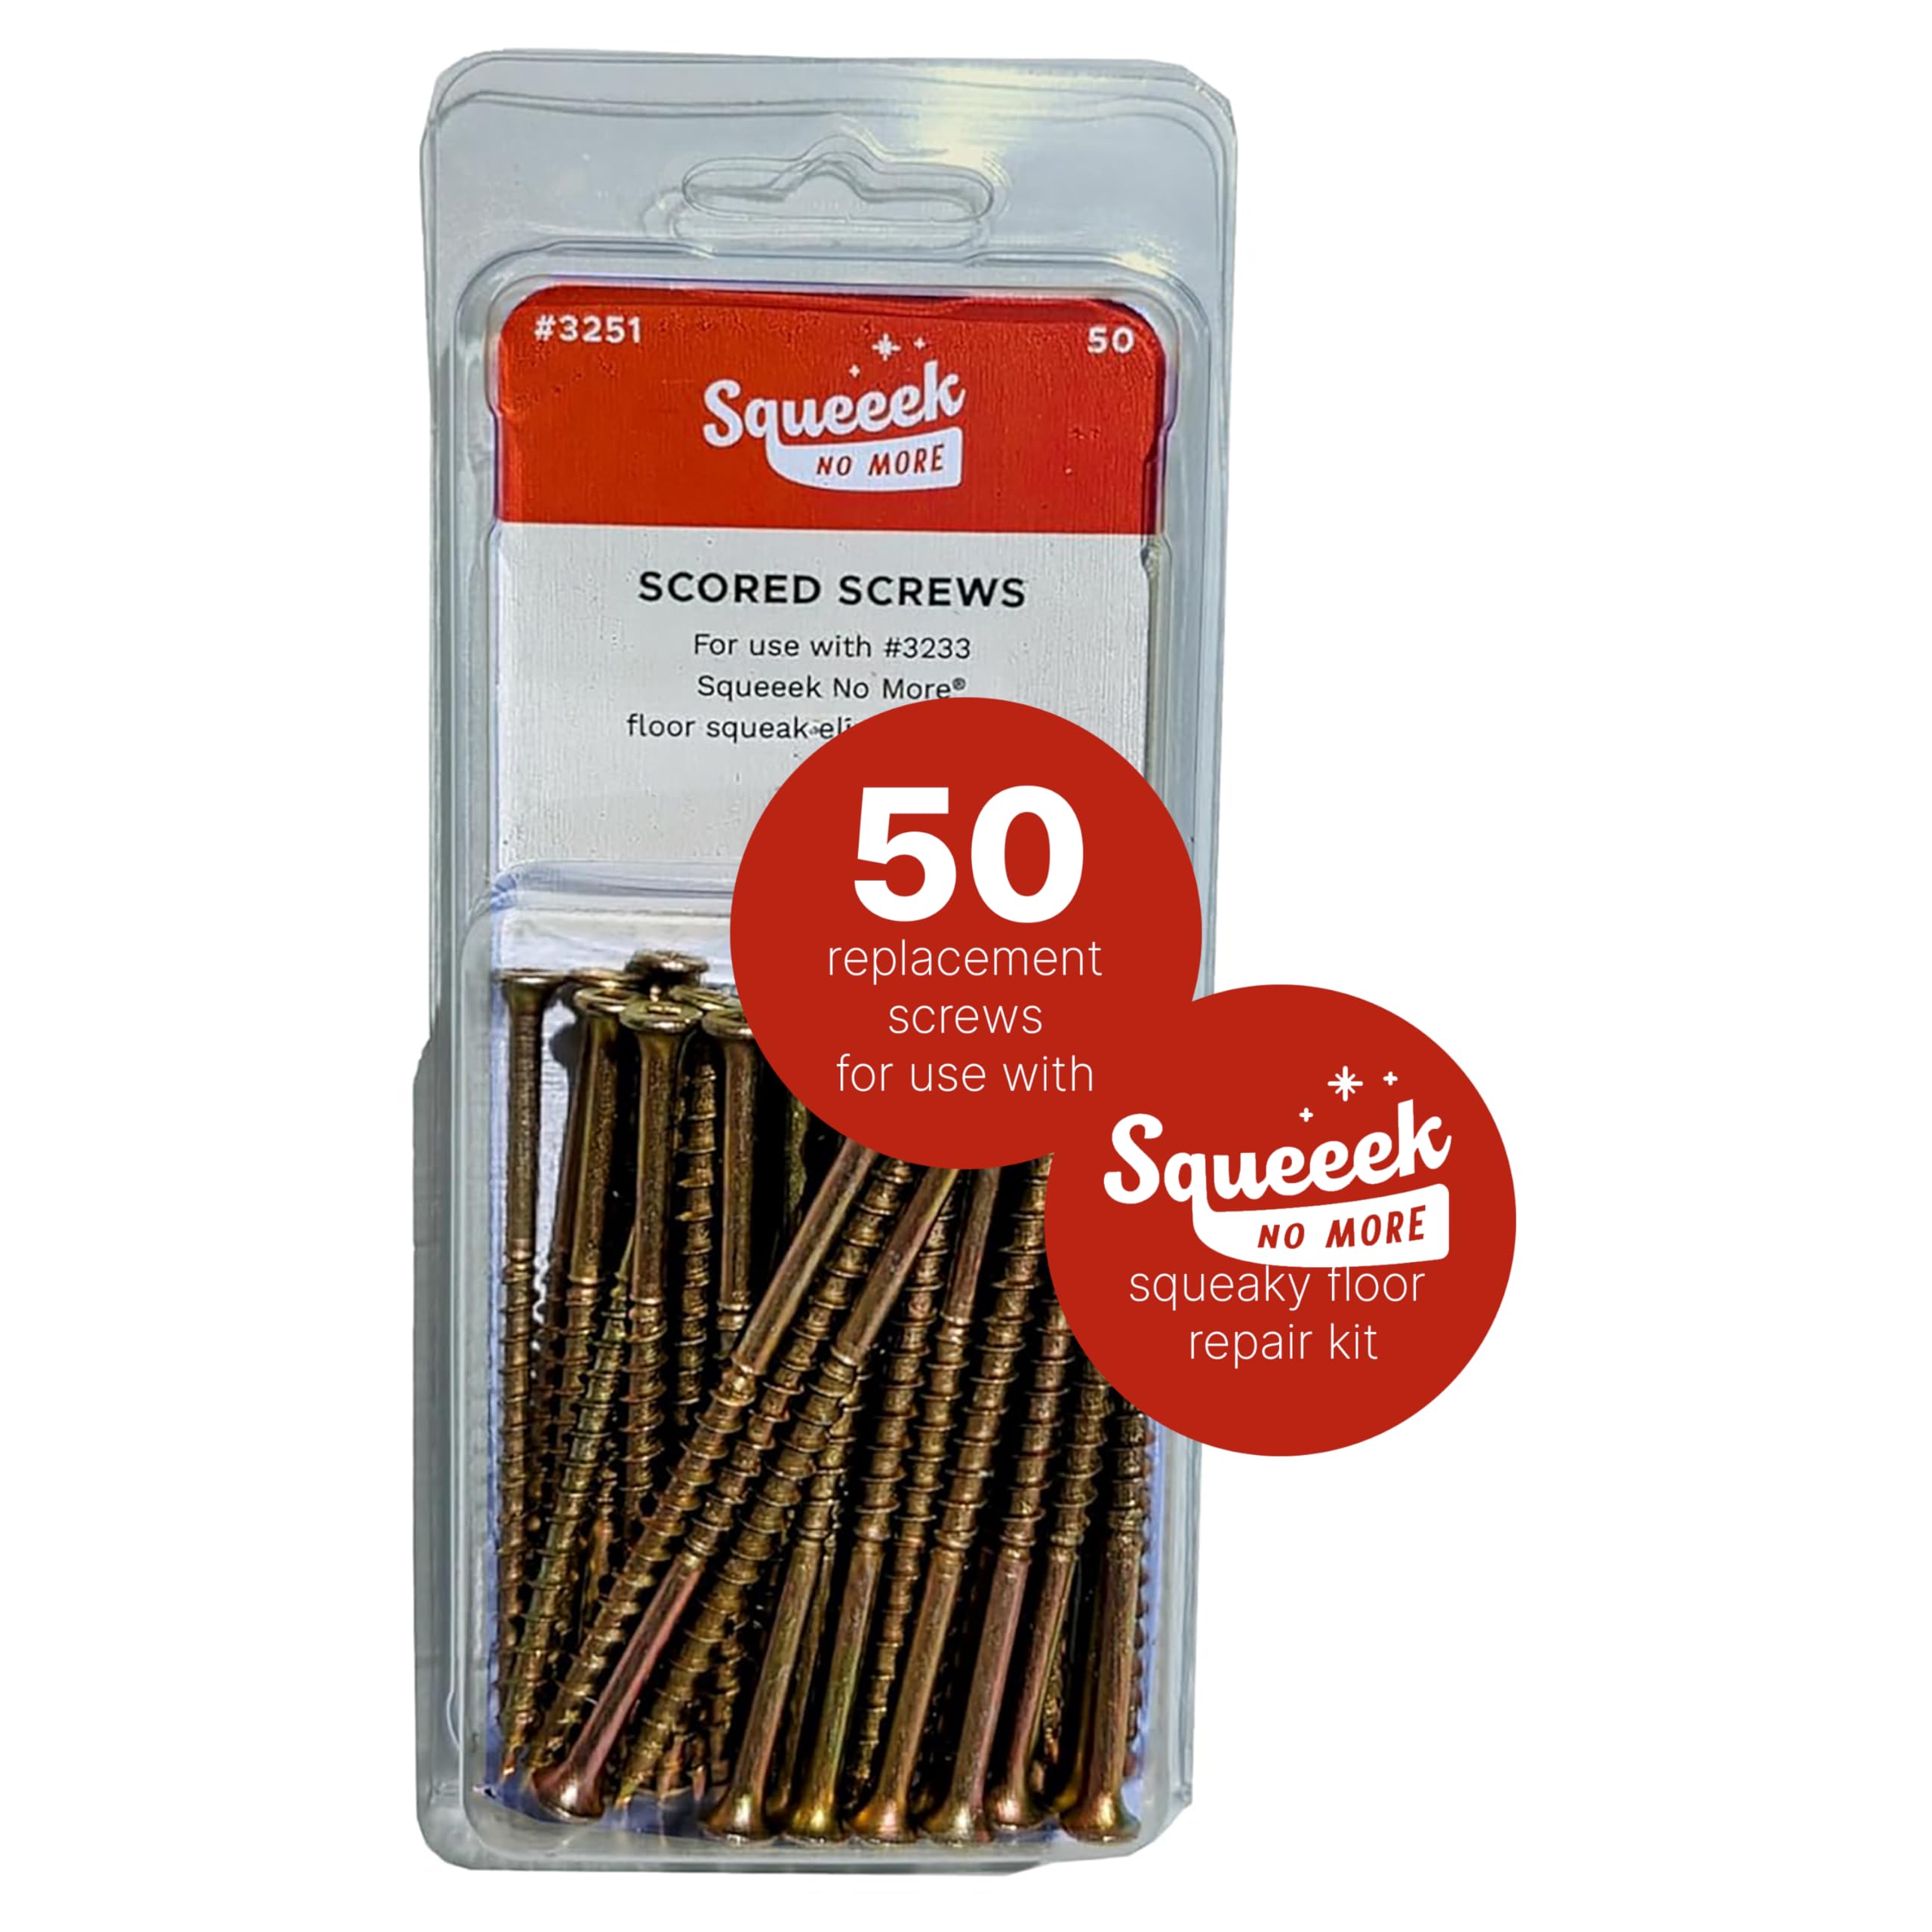
O'BERRY Enterprises 3251 Squeak Replacement Screws are high-strength, zinc-plated wood screws designed specifically for use with the SQUEEEK NO MORE Squeaky Floor Repair Kit. These screws snap 1/4 inch below the surface to provide a clean, invisible finish while fastening floorboards securely to joists. Compatible with all floor types including hardwood, carpet, vinyl, and linoleum, they offer a durable, rust-resistant solution to eliminate squeaks without damaging flooring. Available in convenient 50-count packs, they are perfect for professional-quality, damage-free floor repairs.


| ASIN | B000H5WV1Y |
| Best Sellers Rank | #10,122 in Industrial & Scientific ( See Top 100 in Industrial & Scientific ) #24 in Machine Screws |
| Brand | SQUEEEK NO MORE |
| Color | Yellow |
| Compatible groove diameter | 0.13 Inches |
| Date First Available | July 25, 2007 |
| Department | Unisex-Adult |
| Exterior Finish | Zinc |
| Fastener Size | No. 8 |
| Fastener Type | Wood Screws |
| Global Trade Identification Number | 00765806032517 |
| Head Style | Bugle |
| Head Type | Bugle |
| Is Discontinued By Manufacturer | No |
| Item Diameter | 0.13 Inches |
| Item Weight | 10.6 ounces |
| Item model number | 3251 |
| Manufacturer | O'BERRY ENTERPRISES |
| Material | Alloy Steel |
| Maximum Shear Strength | Approximately 250 MPa to 700 MPa (36,259 psi to 101,538 psi) |
| Metal Type | Alloy Steel |
| Number of Pieces | 50 |
| Point Style | Flat Point |
| Set Screw Thread Type | coarse |
| Size | Pack of 1 |
| Thread Coverage | Fully Threaded |
| Thread Size | #00-90 |
| Thread Style | Right Hand |
| Thread Type | Unc |
| UPC | 765806032517 |
A**R
Out of limited options, it was the best I could find
After hearing some ridiculous contractor quotes, I went online looking for a solution to my impossibly squeaky floors. We have a cat and you could hear the thing walking they were so bad. The hardware store guys told me you just learn to live with it...after four years in this house I was going crazy. Saw this thing demo'd online and gave the starter set a try. They're not perfect, but when you can find a joist they work very well. Couple things: - if you have an older home with older hardwoods, the holes are nearly invisible among the other surface imperfections. Make sure you pick up a couple colors of wood putty, one darker than your floors and one lighter, so that you can mix them like play-dough and get your color right. - That's important because the screws do not always snap off - I'd say it works about 80-85% of the time. The little tool they give you does not snap the screws as neatly as they show in the video. And in working it around, you enlarge your holes a bit. Or sometimes the screw doesn't generate enough torque to snap before it just starts chewing through the wood and you're just spinning. Then you back it out and either put it in planning to snap it or just fill the hole you create during the mangling process to break it off. - I found these to be useless between joists. Probably a personal situation with our house and the old nails, but the only sound reduction came when the flooring was re-secured to the joists. - In an old house, not all of the joists are 16" apart. Fortunately our basement is unfinished and I was able to see a lot of the time where I was going wrong. Some areas were covered, however, and then it's hide and see. I looked far and wide for a good stud finder that could penetrate 2" of hardwoods and subfloor. Bosch has one that said it could but home depot had stopped carrying it at the store I tried. I found when hunting for a joist that normally the worst of the squeak was directly at the joist. If you can use a finger and create the squeak (vs. jumping on it), you're probably very close. I'm about 200 screws in at this point and have only had one pre-break below the surface but not at the 1/8" that they specify. I find that they torque up a little better if you're going slow so I have a reasonable speed going until I get close to the guard and then slow appreciably. At that point, I'm drilling no faster than I could by hand which seems to work the best. Overall, considering that I had no way to approach some of my floors from underneath, that even if I had, the option of nailing a 2"x4" to the joist and then angling up into the sub-floor sounded like a true waste of time, I think these are the greatest invention I could have asked for. Even using the square drill attachment (vs. say a Phillips) was genius as you never strip a screw. My entire toolkit for this is a set of vise grips, a long paperclip (bend it in half so you don't drop it), tape measure, putty, flashlight, some tape to mark the joist centers and a drill. I'd rate it very easy on the difficulty scale. It is time-consuming, however, and you go through screws like crazy. 6 joists per avg bedroom x 11 feet x 2-3 screws per foot and you're easily over 100 per room even if you're just attacking the squeaky spots (if your rooms are as noisy as ours were). Sweet bliss coming into the house now - I'm almost afraid to walk on them. Good luck! Update - 2 weeks later - couple hundred more screws in place. Still a fan - figured out two things: 1) they will quiet spaces between joists, just put in a grid, spacing them 4" apart, so in 1 sq. ft, you'll use around 16 screws to silence it. compare that to a joist, where you get about 3" of silence on either side when you can snug the floor back down to the joist. ups your total per room substantially. i picked up a 500 pack for the weekend. 2) resist the temptation to rock the screw head back and forth to minimize floor damage - hold the tool like an airplane thrust lever and push forward only. faster and less frustrating.
N**V
This really work on hardwood floor squeaking!
These are amazing. Brilliant! The threads change mid-screw which pulls the boards together. So smart!! And they get rid of the squeak in my hardwood floors. Snapped off as designed perfectly. I'm going to buy some more. So impressed.
A**N
Thank you Saint O'Berry
These are a godsend. I really don't think I would have my sanity if it weren't for this product. My floors squeak! Oh boy do they squeak! As the years went by, the squeaks got worse. The squeaks were always louder and more prevalent in the winter time when the house was dry. We have carpet through much of the house so getting at the actual floor was an issue. A few years ago I decided to give this product a try, and to my amazement it works wonderfully! I went through the initial 50 screws in the set. I bought another 50 pack and went through all of those as well. I then said, "screw it" and bought the contractor pack of 250. The rate I'm going I'll need to buy another one here shortly. If you know how to find your joists, or spend a little time to find them trial and error then this will undoubtedly work for you. I even fixed a few mechanical squeaks with this. Our joists have metal X brackets that run from one joist to another, I guess to keep the joist secured or not warp. I was getting a metallic squeak where these brackets rubbed together that sounded like fingernails on the chalkboard. I was lucky enough to drive a screw in to bind against the bracket and move it aside just enough so it wouldn't rub against the other bracket. Some tips after using this for a few years: - I keep a slip of paper with my drill and when I know I find a joist in a room I'll write down the measurement (example: living room +2 inches off south wall baseboard). Then I can easily find other joists 16" off that measurement. - You don't need the special bit and tool set. If you're handy you can just buy the contractor pack, use a standard square bit, and then gauge where you need to snap the screw head off and use a pair of pliers or the claw of a hammer and pop it off. - It has been my experience that the squeaks will slowly come back over time in a few problem spots. I believe the threads aren't quite enough to keep the floor secured to the joist and as the humidity changes, kids jump around, or heavy foot falls will cause the floor to break free from the screw over time. If you drive a screw and fix a big squeak, drive a couple more nearby to help keep the squeak from coming back. I have driven in probably 500 screws (many of those I had to back out because it didn't fix a squeak, or I missed a joist) and not once has it affected the carpet. I have a pretty standard nylon 1" pile plush carpet and it has been fine. The only goof I ever had with this was when I snapped a head off the screw that wasn't screwed down as far as it should have been -- one of the drawbacks from not using the guide. So if you step barefoot just right in this one spot with your heel you feel a slight bump. Not enough to hurt, just enough to say, hmm, I should fix that sometime with a big hammer. I have not used this to try to fix squeaks on a hardwood floor or other surface, just carpet. Ultimately, the best way to fix it would be to rip up the carpet, and use actual flooring screws. I will be doing that next time the carpet needs to be replaced. In the meantime, Squeeek No More is the best solution. Thanks you O'Berry Enterprises!
R**L
Good but a bit tricky.
Does what they say. They do leave a pretty big hole from the width of the nail (not the head but the nail shaft) up to about 2x that size. It depends on how well the heads snap off. Takes a strong grip and pliers to break them off. Be sure to realize if you have hardwood or softwood floors. I highly recommend but they aren't easy. They often work and made our floor much better but did not completely remove the squeaks.
C**O
Easy to use but still cannot locate the squeak spots yet
L**S
For starters: give it a try on a piece of plywood and a 2x4 underneath. Snap two or three. Since Covid the quality went down. The material never used to bent as some screws do, now. Seems the ingredients are not mixed well? By now I used thousands of these and I detect forgeries (there are fake boxes like these out there, clearly a fake and Amazon was informed). A good product. Works.
G**O
I bought these Squeak No More screws, to continue trying to silence my noisy chipboard flooring, on my top landing, having previously bought the jig, with 50 screws. They have helped reduce the squeaks, but some still remain. Being 71, I need to visit my bathroom, during the night, and because it is otherwise quiet, the squeaks sound very loud. This system is no quick fix, and you obviously need to apply them to the adjacent areas, to improve the cure. Now that I have an extra 150 screws, I can try them on my adjacent carpeted floors, in the hope that I can stop having to tiptoe around, at night. Top Tip: Try to put the screws in at as much of an angle, as the jig will allow, which won’t be much, but I found this improved their effectiveness. I will try to post another review, when I have either succeeded, or failed; whichever is the case.
D**E
Worked perfectly !!
A**R
We live on the second floor of an old late 60's house in BC. Our master bedroom still has the original oak floors, and they squeak like crazy in many spots. This was especially bad in the winter when the furnace is working a lot and the wood is drier. Got this product and also ordered the extra 50 screws package (this only has 50, not 100). Took a little while to find the soft squeaky spots, then applied a screw right at the center of the loud spot and surrounded it with 4 additional screws about 1-2 inches away in each direction. This meant each spot took at least 5 screws to get the squeak out. so 100 screws took care of about 20 bad spots in 3 rooms. It doesn't entirely resolve the squeak but reduces it by a lot. Pre-drilling with 1/8 was required. I just drove them into the pre-drilled hole with an impact driver until the score was below the wood, then used the side-snapping tool to do all the screw heads (the original method didn't work well, but the side-snapper worked well)
Trustpilot
5 dagen geleden
1 maand geleden